Manage a Degree Pathway
Degree pathways are plans for the students to complete their program versions and areas of study (AOS) through a guided pathway.
When a student is enrolled in a program, and the program version configured with degree pathway templates, the student’s degree pathway will be accessible from the student’s record. When that occurs, every student will have two plans by default — Student Plan and Template Plan. Both of those plans are view-only without student-specific information. From these reference plans, students and advisors can create individual plans for the student.
A student may have more than one plan. However, only one plan can be in an Approved state. The pathway that is approved will allow the advisor to register the student for courses from the plan.
On the Degree Pathway page, you can:
-
Review the Template Plan configured for the program version and the Student Plan that contains information for the student (such as any completed courses and applicable transfer credits)
-
Add and edit one or more plans customized for the student by copying and modifying the Student Plan
-
Approve one of the plans and then access the Student Courses list for the student or use the Quick Register button to register them (Select the Students tile > select the name in the Students list > expand Academic Records > select the Student Courses tile.)
When you approve a plan, Anthology Student uses the courses and terms in the plan to update the:
-
Student Courses list
-
Degree Progress Audit page (Select the Students tile > select the name in the Students list > expand Academic Records > select the Degree Progress Audit tile.)
You cannot edit the Student or Template Plan, but you can use Save As in the Student Plan to create a custom plan. Degree pathways customized for the student are displayed below the Student and Template plan in the list in the order of last modified.
Prerequisites
You must have Academics - Student Degree Pathway - Manage authorization.
The student must also be enrolled in a program version.
Your institution must have selected the Enable Catalogs![]() check box when configuring the Academic Records settings for the campus.
check box when configuring the Academic Records settings for the campus.
Your institution must have configured:
- Catalog years (Select the Configuration tile > locate Academic Records > select Catalog Years.)
-
Course categories (Select the Configuration tile > locate Academic Records > select Course Categories.)
-
Courses (Select the Configuration tile > expand Academic Records > select Courses.)
Your institution must have configured a degree pathway template for the program version and catalog specified in the enrollment information for the student. (Select the Configuration tile > locate Academic Records > select Programs > select the name of the program in the list > select the New button and specify the general information or select an existing program version in the list > select the Degree Pathway Templates tile.) An AOS pathway template is optional.
To allow students to access the Degree Pathway in the Student Portal, the Degree Pathway must be turned on in Portal Configuration for both the system and the campus level.
You should be familiar with the Background for Degree Pathways.
If your institution wants to create and manage pool conditions, set the Enable Pool Conditions for Pool Based Elective Pools![]() (Select the Settings tile > expand System > select Advanced Features) to Yes.
(Select the Settings tile > expand System > select Advanced Features) to Yes.
Access Method
Select the Students tile > select the name in the Students list > expand Academic Records > select the Degree Pathway tile.
Procedure to Add, Edit, and Approve a Degree Pathway
There is no limit on the number of custom plans you can have with a status of Draft, but you can only have one plan with a status of Approved. A custom plan does not have to be complete to be approved, but a plan must have a status of Approved to access the Student Courses list or use the Quick Register from the plan.
We do not recommend using this feature with, or selecting perpetual terms in, custom plans.
-
Take the appropriate action.
-
Add a custom plan
-
Select the link for a Student Plan or an existing custom plan.
-
Under Edit - Student Plan, select the Save As button.
-
In the dialog, specify the name you want to use and select Save.
-
-
View or edit an existing plan
-
Select the link for the plan.
-
If you want to update the plan with any changes or updates made to the Student Courses list, select the Update button.
-
-
Approve a custom plan
Toggle to make this pathway the approved pathway and enable registration from the pathway.
Anthology Student displays the:
- Program version at the top
- Areas of study below the program version (if any)
Anthology Student populates any existing courses and terms using information from the:
- Student Course list
- Degree Progress Audit page
Anthology Student also displays a legend at the bottom that you can use to determine when a course is required, registered, fulfilled, or unfulfilled.
If you are viewing or editing a plan, Anthology Student:
-
Updates the information and plan with current information (such as when a course changes to fulfilled or transfer credits are approved)
-
Displays a message if there has been a change to the configuration that changed a Student Plan (such as a change to the course or catalog)
If the message is displayed and the custom plan is:
- Approved, Anthology Student automatically resets it to the updated Student Plan.
- Draft, Anthology Student makes no changes.
In both cases, you should review the plans and make any needed changes. For custom plans that are drafts, you can use the updated Student Plan as a reference or reset and load the Student Plan into the custom plan.
-
-
If needed, expand the Program Information and review the numbers for required credits, fulfilled credits, unfulfilled credits, and the values.
-
If needed, expand the Degree Pathway Information and review the values.
-
Take the actions appropriate to work with the custom plan.


 Add a course to terms, move courses/course pools from term to term, or move courses/course pools back to the list of courses
-
If the list of courses is not already expanded, select the down arrow (
 ).
). -
Select and drag and drop the courses or course pools (for example, General Education Requirements or Electives) to the location you want.
-
For course pools, specify the number of credits and select the Add Elective button. Select the link on the pool name and choose a course.
Anthology Student updates the totals for the term at the bottom of the page.
-
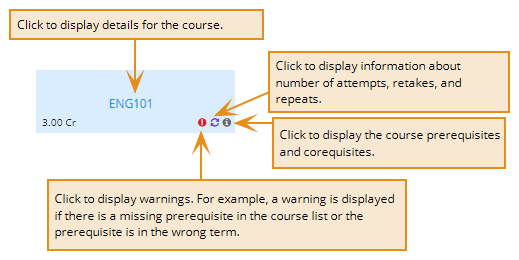
If needed, review the information for the course and any warnings.
Anthology Student also performs validations for your changes. For example, it displays a message if the credits in the custom plan exceed the credits required to complete the program versions.
Restrictions and Additional Information
You cannot add or move courses to:
- Term 0
- Past terms
- Locked terms
You cannot move courses that are:
- Registered
- Completed
Anthology Student considers an incomplete grade in a course a completed course. After the expiration date, Anthology Student determines if the course stays as a past course or is placed back into the course list on the right to be placed.
In rare cases, Anthology Student does not let you add a course to terms. You will need to keep track of the course and its placement manually.
View Pool Conditions
-
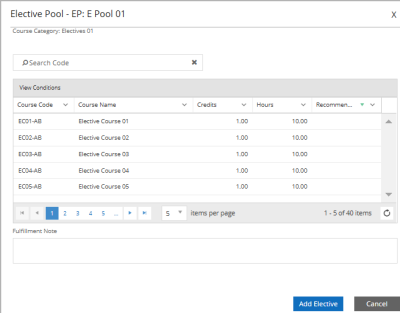
Select the Elective Pool title. Elective Pool pop-up appears.
-
Select View Conditions
button. This option allows you to access the student's elective requirements with and/or logic indicated and their fulfillment status. The elective pool condition is Fulfilled if the requirements of the conditions are fulfilled. For example: A scheduled course (unfulfilled) that is part of a condition group will not count as fulfilled until the course requirement is fulfilled. If you try to add a new course that does not satisfy the conditions of the pool, a warning message is displayed to alert you.
Restrictions and Additional Information
Retake Courses:
The system displays a fulfilled status if any course instance is fulfilled. Otherwise, it displays the current status if the first instance is unfulfilled or dropped.
Repeat Courses:
The system displays a fulfilled status if any course instance is fulfilled. Otherwise, displays the current status of the latest instance.
Manual Fulfillment:
If a course is manually fulfilled, the course status displays as "fulfilled" in the Pool Conditions tab. When a fulfilled course is used to fulfill other instances in other categories, required courses, or EP courses, the course is be marked as "future," and the status in the Pool Conditions tab displays as "Future".
Minimum GPA:
When a course is unfulfilled due to minimum GPA requirements (unfulfilled low grade), the Pool Conditions pop-up displays the "Unfulfilled Low Grade" status. If the student has taken or retaken the course, the Pool Conditions pop-up displays the status according to the retake logic.
Equivalencies:
When a course is fulfilled by an equivalent course, the course status displays as "fulfilled" in the Pool Conditions tab. If a fulfilled equivalent course is part of the elective pool and is used to fulfill a main course, the EP course disappears from the EP and is merged with the main course (either required or EP). In this scenario, the Pool Conditions pop-up does not display any status for the mentioned course.
Automated Multiple Fulfillment:
When an elective pool course is fulfilled by multiple fulfillments, the status in the Pool Conditions tab displays as "Fulfilled."
Waive Elective Pool:
The current waive functionality for elective pools waives the entire pool. In this case, no course status is displayed for any courses in the Pool Conditions pop-up.
Adjust Requirement:
The Adjust Requirement functionality can add or remove courses from the elective pool when required credits are increased or decreased based on the CFO. When a course is added as part of the Adjust Requirement and it is part of the pool conditions, the system displays the status (if any) in the Pool Conditions pop-up. When a course is removed and it is part of the pool conditions, the system removes the status from the Pool Conditions pop-up.
Custom CFO Cases Where EP Comes First:
If an EP course instance is fulfilled based on a custom CFO, the DPA displays the course instance as "fulfilled," and the Pool Conditions pop-up reflects the same.
Add a term
Select the New Term button on the toolbar, specify the position, and select the Save button.
Anthology Student inserts the new term and renumbers the subsequent terms.
Restrictions and Additional Information
You cannot add or move:
- Into position for Term 0
- Into positions for past or locked terms
You cannot move terms with registered, fulfilled, or unfulfilled courses.
Move a term
Either:
-
Select and drag and drop the term to the location you want, or
-
Select the Move button on the toolbar, specify the term you want to move and the new position, and select the Save button.
Anthology Student renumbers the subsequent terms.
Restrictions and Additional Information
You cannot add or move:
- Into position for Term 0
- Into positions for past or locked terms
You cannot move terms with registered, fulfilled, or unfulfilled courses.
Reset the custom plan to the Student Plan
-
Select the Reset button on the toolbar.
-
Select the Load Student Plan button in the dialog.
Anthology Student redisplays the custom plan with the information from the Student Plan.
Select or change the term at your institution
-
In the Term number box, select the search icon (
 ).
). -
In the dialog, select the term in the list and select the Select button.
If you select a perpetual term, it is displayed in the column to the right of Term 0 or the last completed or locked term.
If the start date of the term you select, causes the term numbers to be out of order, Anthology Student reorders the terms when you select the Save button. For example, if the start date of the term selected for Term 5 is next year and the start date for Term 6 is this year, it changes Term 5 to Term 6 and Term 6 to Term 5.
Restrictions and Additional Information
You cannot:
-
Select or change to a term that has already been selected for a Term n (number) in the plan
-
Change the term for a term that contains a registered course
-
- From the prerequisites
- To corequisites
-
Enter the name of the course in the Search Courses filter. Anthology Student filters the list.
-
Select the plus (+) button to expand the course.
-
Select the Reset button on the toolbar.
-
Select the Revert Changes button in the dialog.
-
To print the plan, select the Print button on the toolbar. Anthology Student displays the print page appropriate for your browser. In the settings for the print, be sure to:
- Select landscape mode
- Specify a scale of 100%
If your browser supports it, you can also save it as a PDF. For example, if you want to email it to a student or staff member instead.
-
If you have updated a plan, select the Update button.
-
Select the Approve button to make the custom degree pathway the approved pathway and enable registration from the pathway. If there is an existing approved plan, Anthology Student displays a message asking you if you want to approve this plan instead.
On an approved pathway, the Approve button toggles to Unapprove. Select Unapprove to make further changes to the custom degree pathway.
-
Once the pathway is approved, you can select the Register button and the student for courses. The Register option navigates you to the Student Courses tile in a new browser tab.
Use the Quick Register button to quickly register a student from the Degree Pathway page. Quick register displays abbreviated course information and, if there are shared or cross-referenced courses, a consolidated list of the courses. The Quick Register option opens a dialog on the Degree Pathway page.
Anthology Student performs the same validations it does when you register for the class from the Student Courses list and displays the conflicts in a consolidated list. If you have permission, you can override all the conflicts at once and continue to register the student.
For more information, refer to Register a Course from the Degree Pathway
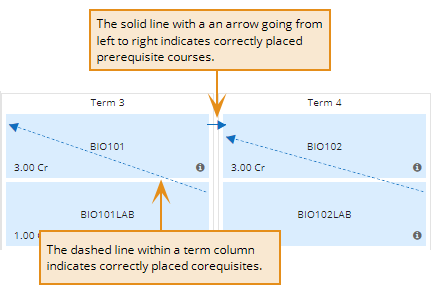
Select the Show Prerequisites button on the toolbar.
Anthology Student displays arrows:
The example shows the types of indicators in a correctly configured template plan.
Select the expand (![]() ) or collapse (
) or collapse (![]() ) course list button on the toolbar. Anthology Student expands or collapses the course list.
) course list button on the toolbar. Anthology Student expands or collapses the course list.
Procedure to Delete Degree Pathways
You can delete the custom plans for degree pathways in a status of Draft.
- In the Degree Pathway grid, select the custom plan.
- Select the Delete button.