Load Banks
You can use the Load Banks page to retrieve records of bank balances and summary data for an identified set of faculty members.
On this page, you can select a banked load type within an assignment line and apply all or a portion of the banked load to a term as a regular load assignment type. When you can save the change, the banked load type total will decrease by the amount of load "withdrawn" applied to a term. This may additionally reflect in an aggregate banked FTE load.
You can also generate pay from banked or expired loads. You can select a banked load for a faculty member and apply part or all of that load to a term. When saving the change, the banked total will decrease by the amount of the load "withdrawn" from the term.
Once the banked loads are saved, you can navigate to the Assignment Manager or Load Validations processes and review the applied (previously) banked load as an assignment in the selected term. You can conduct load validation activities on the faculty member and review the applied banked load being considered as an assigned and validated load for the term.
Prerequisites
You must have:
-
Common - Processes - View authorization
-
Faculty Workload - Processes - Load Banks - View and Manage authorization
The following Advanced Feature flag must be set to Yes (Select the Settings tile > expand System > select Advanced Features.): Enable Load Banking![]() .
.
To integrate with an external payroll system, your institution must have configured Yes under Settings > Faculty Workload > General for the feature: Export Payroll Earning Lines from FWM![]() .
.
Access Method
Select the Processes tile > expand Faculty Workload > select Load Banks.
Procedure to Review and Apply Banked Loads or Generate Pay
-
Specify the filters for the load bank records to be retrieved.
In the Campuses field, accept the default (All Campuses) or select up to 10 specific campuses.
Select at least one of the following additional filters. Each field allows up to 20 values.
- Departments
- Staff
- Courses
- Non-Teaching Types
You can search Department, Staff, Course, and Non-Teaching Type values by Name or Code.
-
Select the Apply Filters button.
The system retrieves records for the selected campuses based on the filter options.
-
Review the details in the grid.
When the FTE factor is not configured, the FTE-related columns are not displayed.
-
The grid displays additional details when you select the expand icon (
 ) for a Staff record.
 When the child grid is expanded, there will be one row per Load Type showing the Load Type balance (Load Type 1, Load Type 2, Load Type 3, etc.). The Load Type balance is a summary of all banked loads per Load Type, with the earliest expiration per Load Type displayed.
When the FTE factor is not configured, the FTE-related columns are not displayed.
-
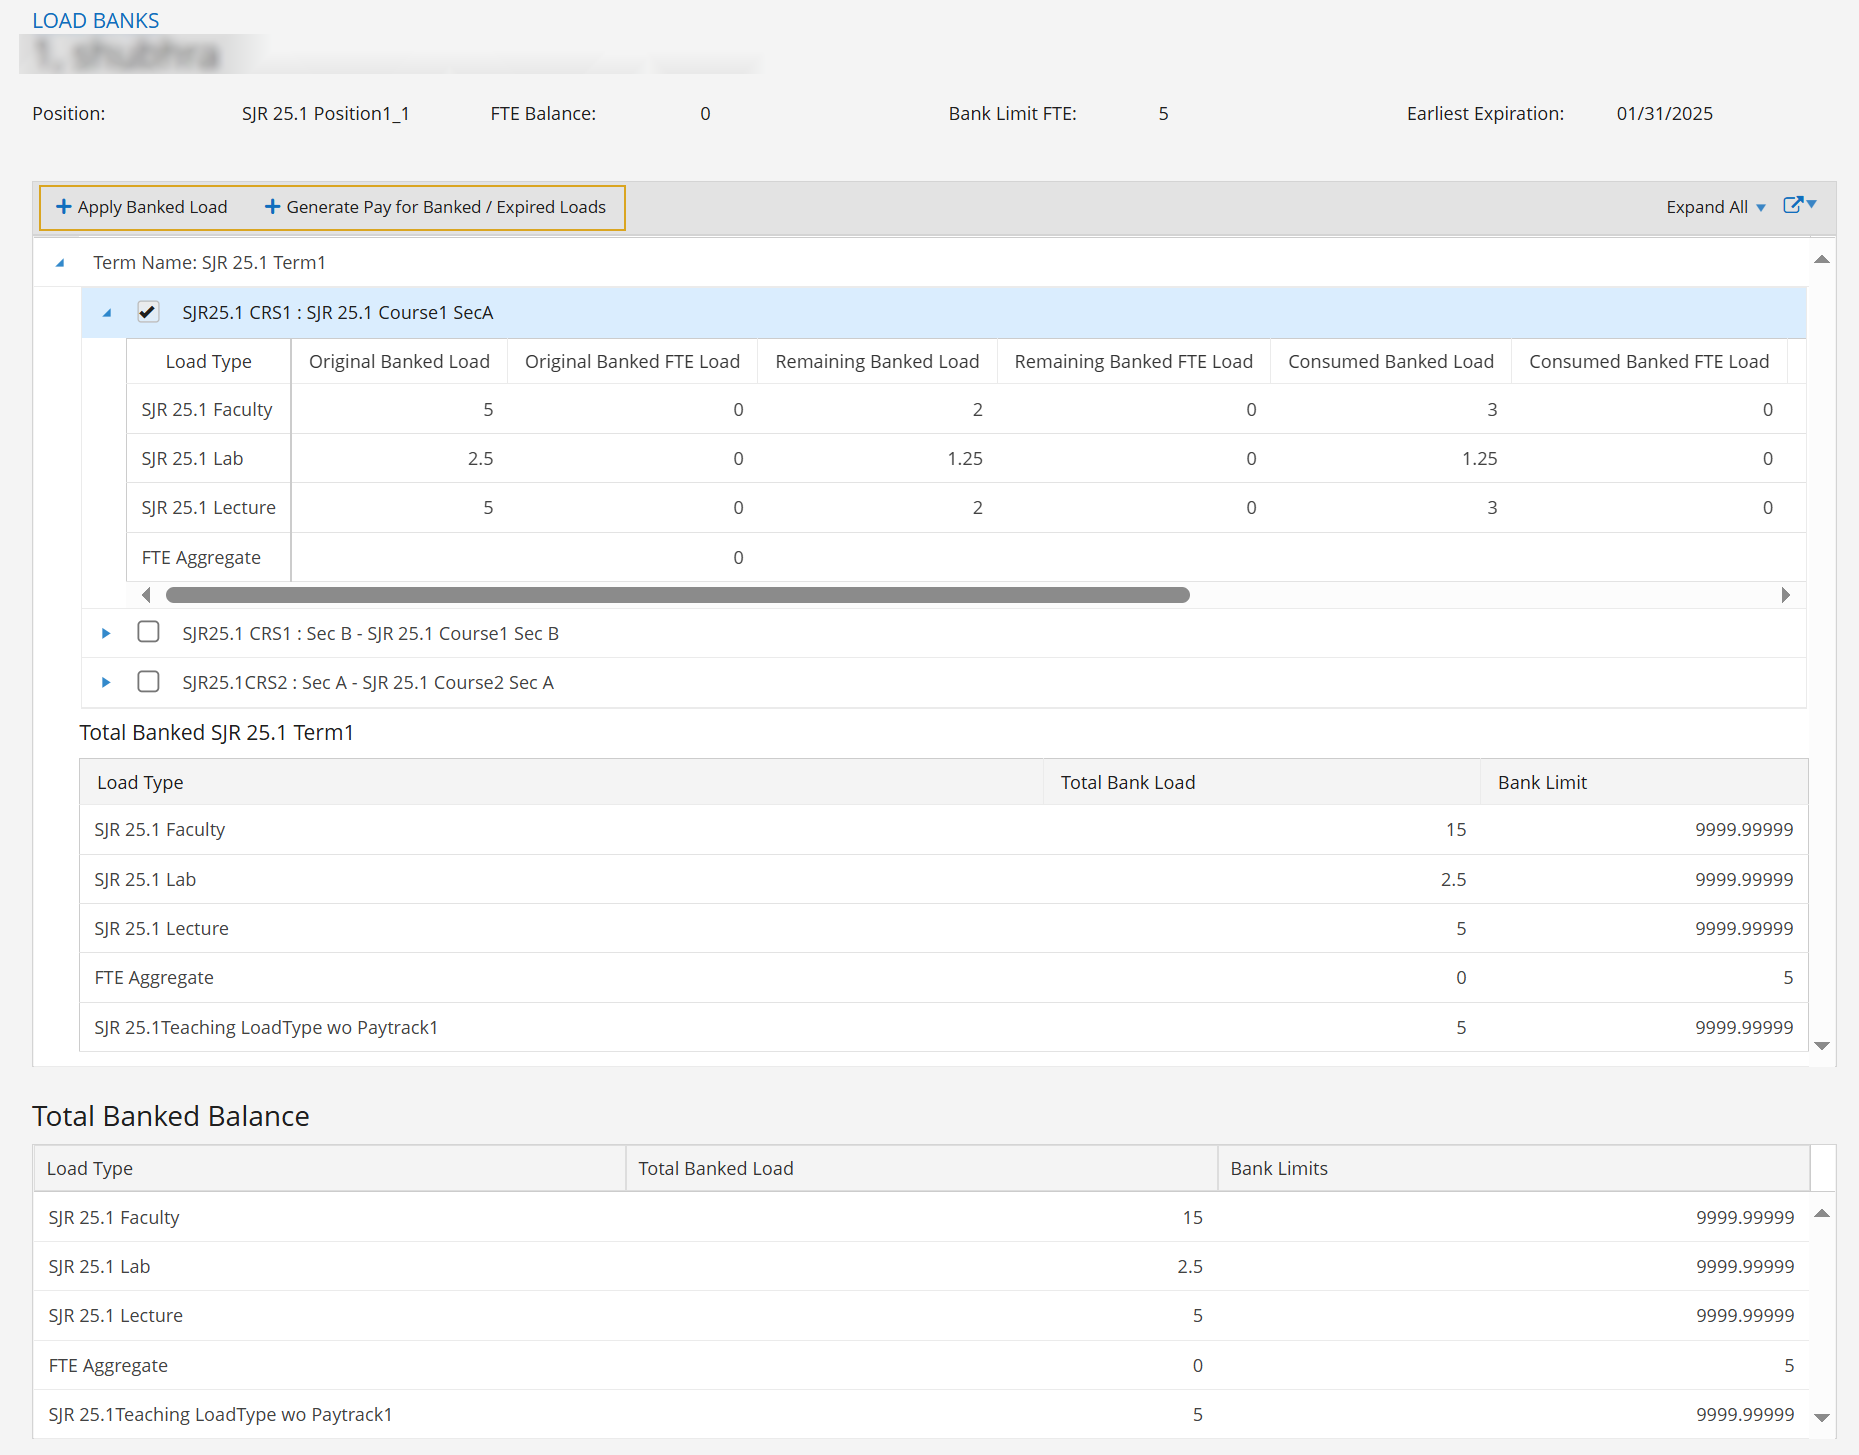
Select the link on the Staff member's name. The system displays the Load Banks page for the selected staff member.
The fields below the staff member's name indicate the values for:
- Position
- FTE Balance
- Bank Limit FTE
- Earliest Expiration
A collapsible section contains the records for the staff members assigned courses in each term.
The Total Bank Balance section displays a grid indicating the values for:
- Load Type
- Total Banked Load
- Bank Limits
-
Select the expand icon (
) for a course record in the term and then select the check box. The following buttons will be enabled in the grid toolbar:
- Apply Banked Load
- Generate Pay for Banked / Expired Loads
Continue with the steps to:
Apply Banked Loads
-
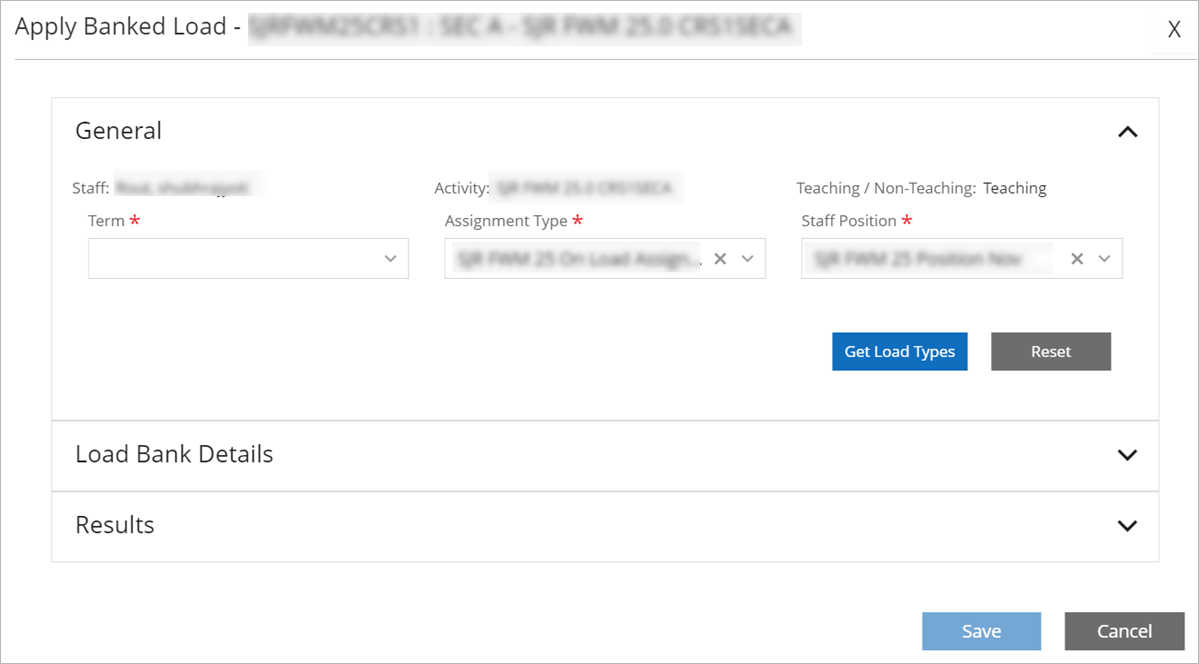
If you want to apply the values for the term to another term, select the Apply Banked Load button. The system displays the Apply Banked Load pop-up with the General section expanded.
Banked loads that are applied to a term are validated by the business process so that they have no opportunity of becoming overloads again.
Overload can still occur in a term with an applied load from the bank, but it is not expected that the banked load causes the overload.
When you have completed the Apply Banked Load process, the Assignment Manager grid will be marked Yes in the column Applied from Bank
 .
. -
In the Term field of the pop-up, select the term to which you want to add the assignment from the banked load. The term must not have an end date in the past.
-
Select a Staff Position if the staff position has expired and the field is blank. You can only select positions that are valid for the dates of the selected term.
-
Edit the Assignment Type if needed. The values are limited to active assignment types that have a policy associated with the selected term.
-
If you want to edit the values again, select the Reset button to clear the fields in the pop-up.
-
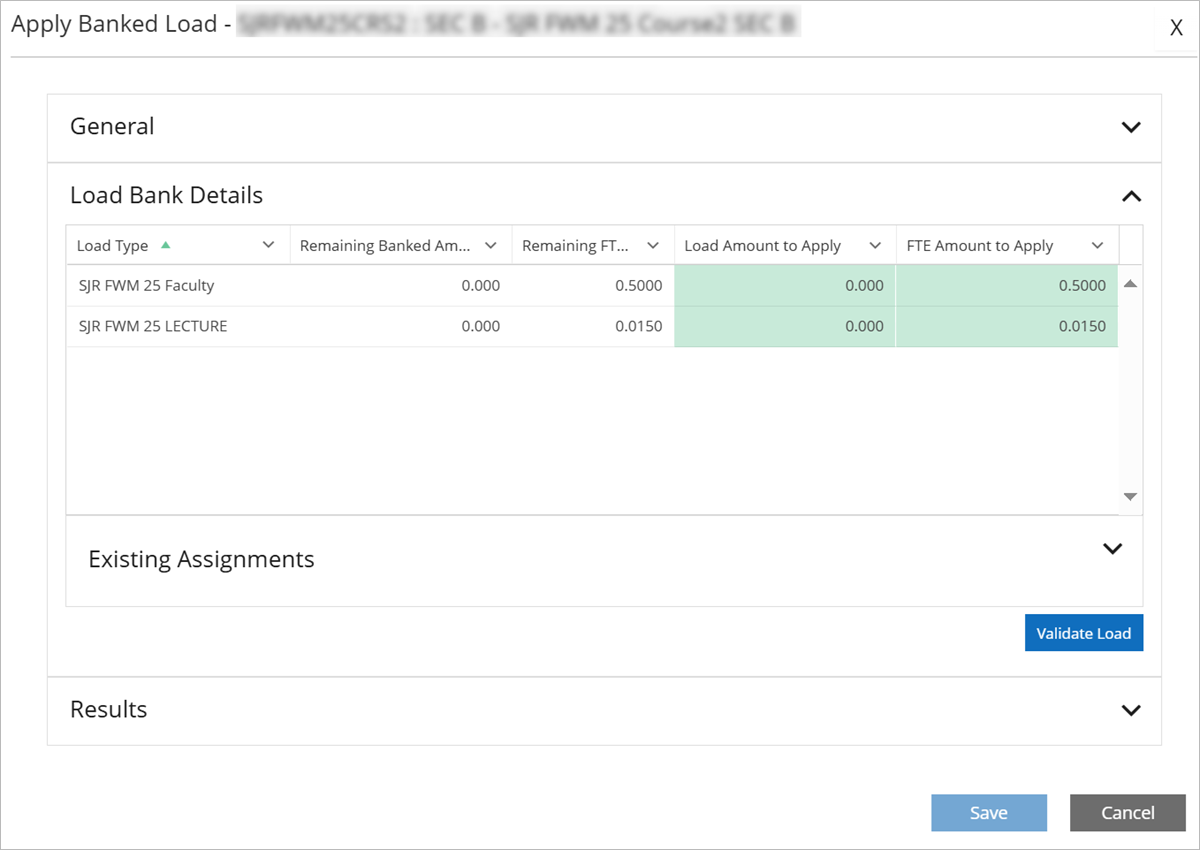
Select the Get Load Types button to proceed with entering values in the editable fields. The system expands the Load Bank Details section of the Apply Banked Load pop-up.
-
You can edit the following values in the Load Bank Details grid:
-
Load Amount to Apply — This amount cannot exceed the remaining banked amount nor overload the staff member. The default value is the entire remaining banked amount for this assignment.
-
FTE Amount to Apply — This amount cannot exceed the remaining FTE banked amount nor overload the staff member. The default value is the entire remaining FTE amount banked for this assignment.
The Remaining Banked Amount and Remaining FTE Banked Amount fields are not editable.
-
-
When you have created a new assignment, select the Validate Load button.
The system will apply the logic from the load validation policy for the faculty member in the term in which the assignment is created.
If you enter an amount to apply that creates an overload, the following message appears: "The amount applied is creating an overload. Reduce the amount applied so that no overload is created by this assignment."
After you have adjusted the amount to apply below the overload threshold, the Validate Load action will populate the Results section with the policy result of "Pass". The policy result will be "Fail" if the applied load amount exceeds the policy max value and the overload is not applied.
-
Select the Save button to close the process of creating and saving the validated assignment and the validated load. (The Cancel button will cancel the process and return to the Load Banks page.)
Once saved, the Load Bank Details section and the Load Banks page are refreshed and display the new account balances for the load type and the assignment. When the banked load goes to 0 on a banked course, the course will be hidden in the Load Bank Details.
Generate Pay
-
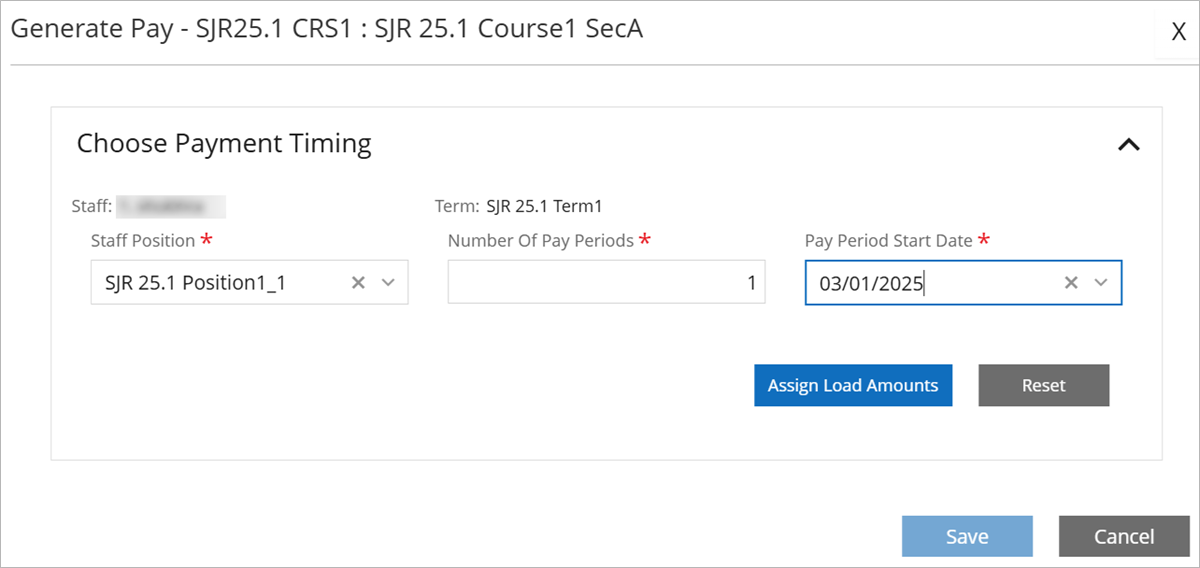
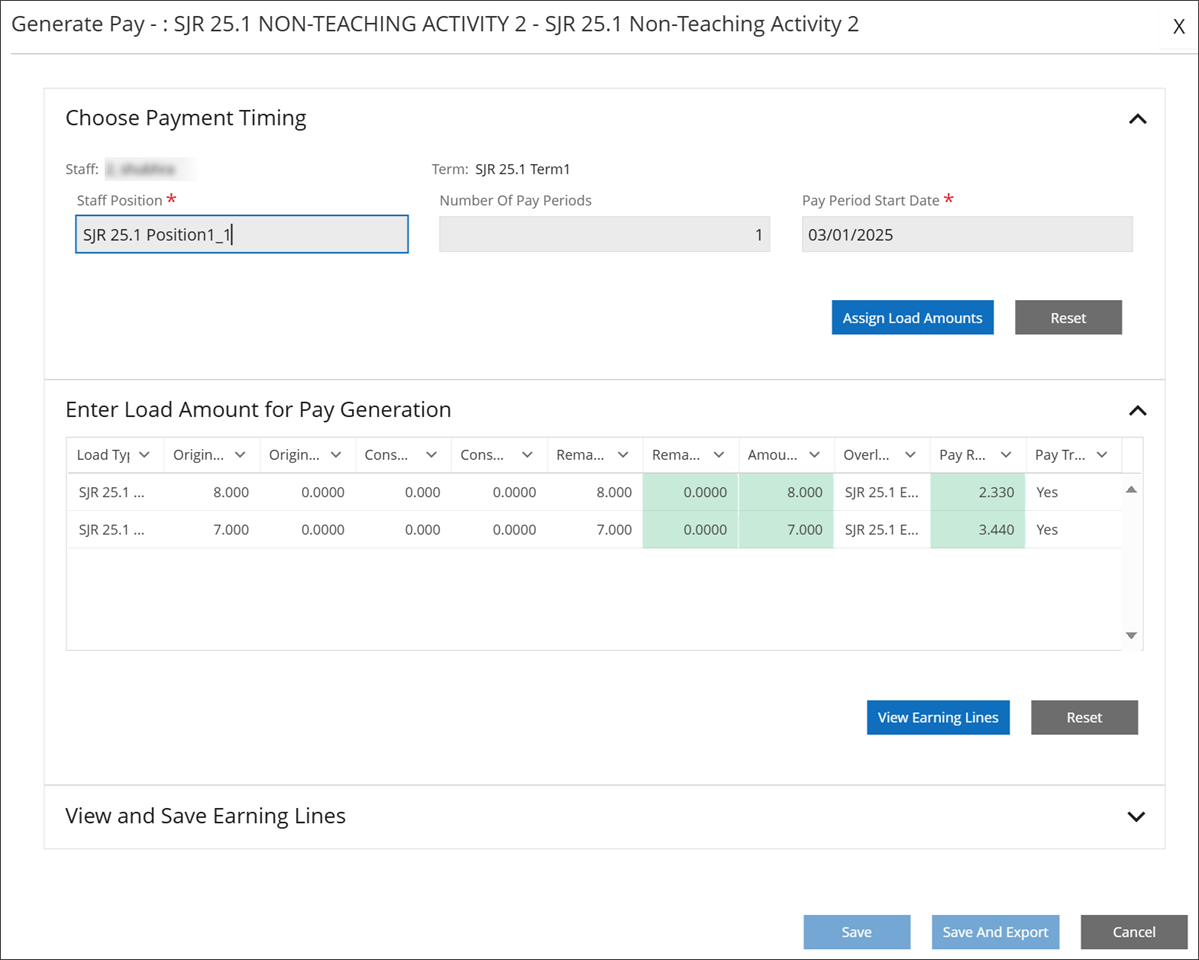
If you want to generate pay from banked or expired loads, select the Generate Pay for Banked / Expired Loads button. The system displays the Generate Pay pop-up. The title of the pop-up indicates the selected staff member, term, and course.
-
In the Choose Payment Timing section, select the Staff Position for which you want to generate pay from the banked load. This field is populated by default based on the record selected in the Load Banks grid.
If the original position has expired or you want to generate pay for a different position, select a value from the faculty member's current positions in the drop-down.
If the position has expired, the system displays the message, "Position used to bank originally has expired, please select an active position for generating pay".
-
In the Number of Pay Periods field, specify if the load should be paid out in a lump sum or over time. Enter 1 for lump sum pay. Enter a value greater than 1 for pay over time. Valid values are 1-104. The default is 1.
-
In the Pay Period Start Date field, select the periods for which you want to generate pay. The list includes only current and future pay periods and defaults to the nearest pay period start date for the position.
The system retrieves the pay periods from the pay cycles attached to the original position on the original assignment. If a new position has been selected, the pay periods come from the position's pay cycle.
If the pay periods do not exist far enough into the future to cover the value specified in the Number Of Pay Periods field, the following message appears: "Not enough pay periods exist within the pay cycle to cover the number selected. Reduce the number or generate additional pay periods."
The system checks that the position is active over the periods during which pay is generated. If the position will expire before the last pay period date, the following message appears: "Selected position will expire before pay periods complete. Please select another position, extend position dates, or adjust the number of pay periods selected to end within the active position dates."
-
Select the Assign Load Amounts button or the Reset button.
-
Assign Load Amounts will capture the information entered in this section. The system validates the information and then proceeds to the Enter Load Amount for Pay Generation section.
-
Reset will reset the data within this section and allow you to restart the process.
-
-
In the Enter Load Amount for Pay Generation section, review the following values:
-
Edit the values in the Remaining Banked Amount, Amount for Pay Generation, and Pay Rate fields.
-
Select the View Earning Lines button or the Reset button.
-
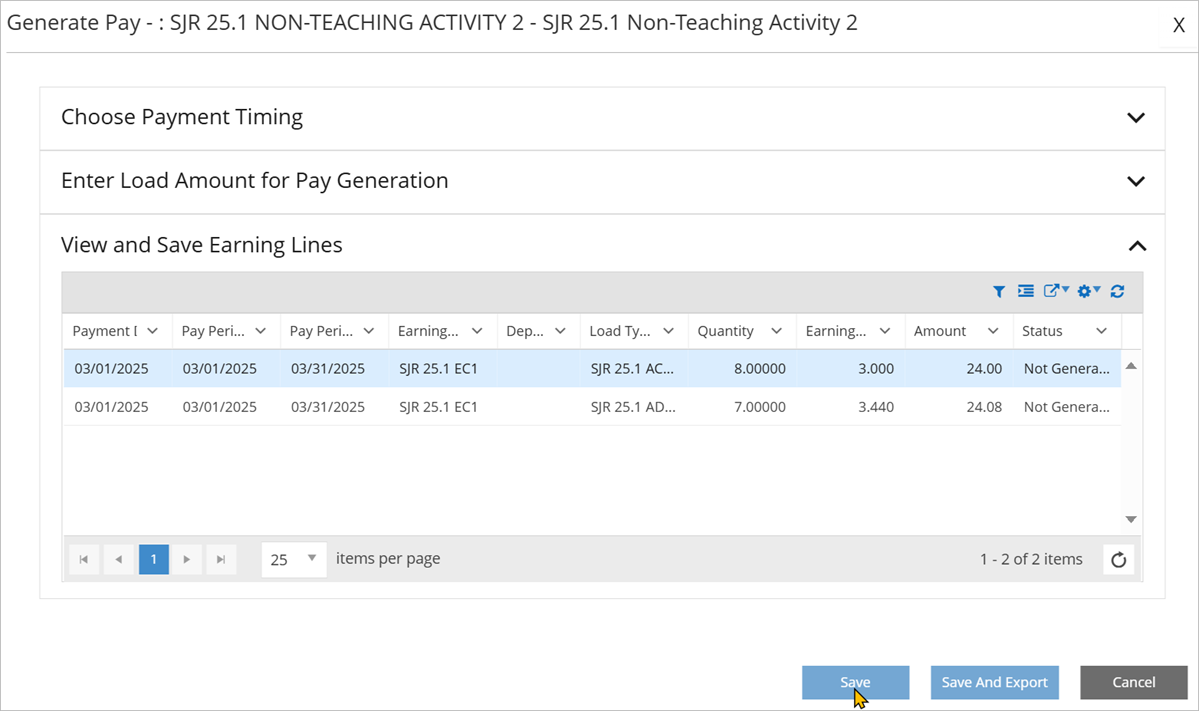
The View Earning Lines option will expand the View and Save Earning Lines section.
-
Reset will reset the data within this section and allow you to restart the process.
-
In the View and Save Earning Lines section, review the following values:
-
You can now Save, Save and Export, or Cancel the process.
When part of a payout is exported by process files and part is not, you can move to Pay Out Banked/Expired Load and export the entire payout (group of earning lines). You can also cancel the pay out in its entirety.