Split Assignment Loads
You can use the Assignment Manager page to split an assignment by assignment type and load type so that a single load type is divided into multiple assignment types with different associated general ledger (GL) codes.
Example Scenarios
Overload scenario - Split load and assignment type with different GL codes
A faculty member is teaching a course that is part onload and part overload. The onload part is funded by a specific GL code and the overload part is funded by a different GL code.
When the system splits the course load between onload and overload, the GL code can be updated from the onload GL.
Split a singular load type between different GL codes
A faculty member is teaching a course that is delivered with only one load type. However, 50% of the faculty member's salary for the course is covered by a grant and comes from another budget line. The load type (in this instance let's say lecture) needs to have its load split 50/50 and allow the Assignment Manager user to associate 50% of the load with the grant budget code and 50% of the load to the normal faculty budget load for that department.
In this scenario, there is no impact on the total load being calculated or validated. The Assignment Manager facilitates budget tracking.
Multiple departments/multiple faculty members supporting course delivery by load type split
A faculty member is delivering a course that has two load types in it (lecture and lab). The course is Chemistry I (CHM101). The lecture portion of the course is supported by the general sciences department fund while the lab portion of the course is supported by the experimental lab sciences department. The 45 hours of lecture are coded against the GL for the general sciences department while the 54 hours of lab are coded against the GL for the lab sciences department.
In this scenario, the Assignment Manager allows the reassigned by load type when the lecture and lab are delivered by 1 faculty member or split between several.
Generating Earning Lines with GL Codes
You can generate earning lines for assignments using the General Ledger (GL) codes associated with the loads.
Earning lines can be created with the GL codes for Non-Teaching assignments when the Compensation Plan is set to Prorate by Rate or Prorate by Lump Sum.
First, you will perform load validation through Processes > Faculty Workload > Load Validations or Processes > Faculty Workload > Assignment Manager.
-
If there is no change in the GL codes, the system maps the default GL codes to the assignment
-
If you change the default GL codes for one or more Load Types, the system maps the modified GL codes to the assignment
-
if you change the default GL codes mapped for the Onload or Overload value using the Split Assignment Loads option, the system maps the modified GL codes to the assignment
-
If you change the default GL codes and split the Load Types using the Split Assignment Loads option, the system maps the modified GL codes to the assignment
Prerequisites
You must have:
-
Common - Processes - View authorization
-
Faculty Workload - Processes - Assignment Manager - View and Manage authorization
The Advanced Feature flag for Enable Course Budgeting![]() must be set to Yes (refer to Advanced Features).
must be set to Yes (refer to Advanced Features).
Before you can view or validate workloads for teaching activities, your Academic Records department must have scheduled classes. (Select the Class Scheduling tile.) When Faculty Workload Management validates loads, it automatically includes all the previously allocated loads for the faculty (associated with the other class sections) for which the load validation is performed.
Access Method
Select the Processes tile > locate Faculty Workload > select Assignment Manager.
Procedure to Split the Load Types
-
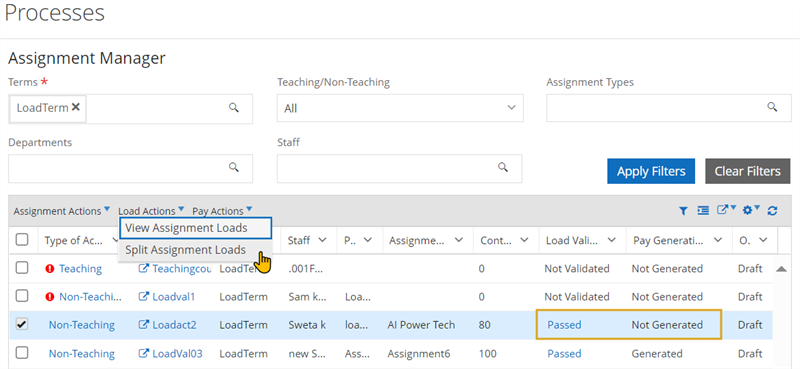
Select the record for a validated assignment with a Load Validation Status
 of Passed. If the Load Validation Status is Not Validated, the load cannot be split and the Split Assignment Loads option is not activated.
 -
In the Load Actions drop-down, select Split Assignment Loads.
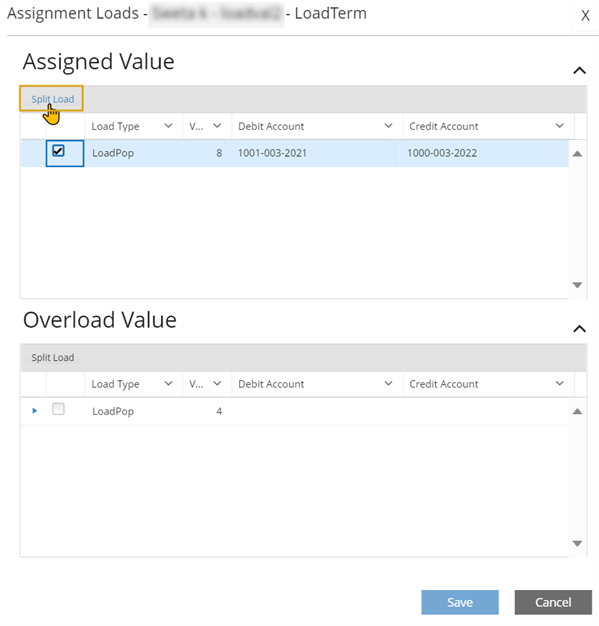
The system displays a pop-up with two grids labeled Assigned Value and Overload Value (if an overload exists). Both grids are expanded and show the following columns:
Select the expand icon (
 ) to view the child records in the Assigned Value and Overload Value grids.
If the Pay Generation Status
is Not Generated, the Split Assignment Loads pop-up is editable. If it is in a status other than Not Generated, the pop-up is read-only. -
Review the load validation details in the Assigned Loads pop-up.
-
If you want to split the load, proceed with step 4.
-
If you want to change the default GL codes, proceed with step 5.
-
If you want to edit the Value, proceed with step 6.
-
-
You can split the assignments by selecting the check box for a record and selecting the Split Load button in the grid toolbar.
After you have selected the Split Load button:
-
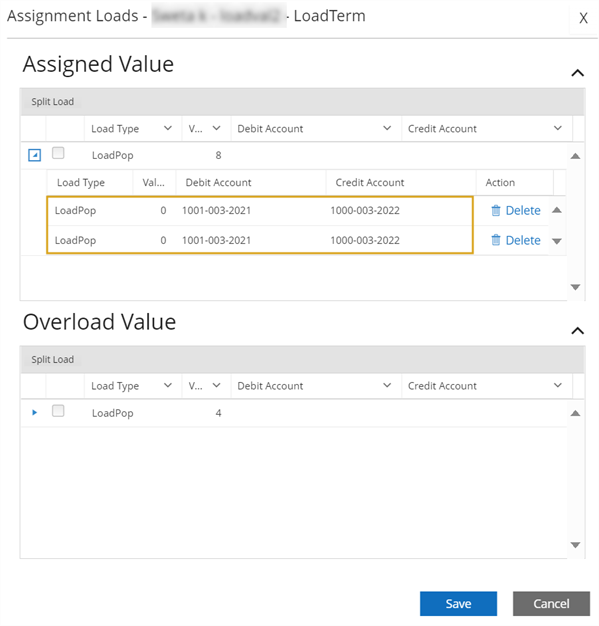
The grid will display child records. The Debit and Credit Account columns in the child records are pre-populated with the default GL mapping. The Debit and Credit accounts of the parent row are blanked out.
The number of child rows is based on the number of GL codes mapped in the configuration. For example, if 2 Debit and Credit Accounts are mapped for this assignment's campus, then 2 child rows are created.
-
You can add additional child rows by selecting the check box for the parent row and then selecting the Split Load button again.
If you try to add a fourth row, a message indicates that the load type cannot be split further. For example, You cannot further split the load since this Load Type is associated with only 2 GL codes.
-
-
You can change the default GL codes in the Debit and Credit Account columns if the Pay Generation Status for the selected record is Not Generated. If the Pay Generation Status is Generated, the Debit and Credit Account columns are not editable.
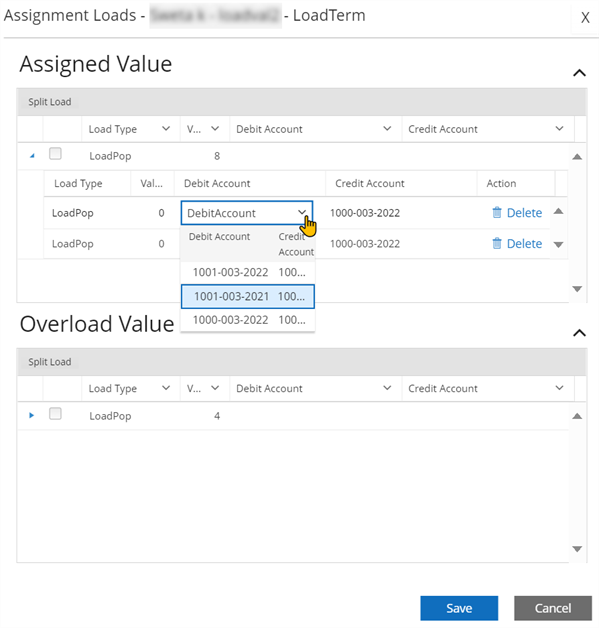
The Debit and Credit Account drop-downs are populated with all the GL codes mapped to the respective Class Load Type or Non-Teaching Activity in:
-
Configuration (refer to GL Code Association for Non-Teaching Types, Non-Teaching Activities, Class Load Type Details, or Course Load Type Details) — OR —
-
Settings (refer to General Ledger Link)
When multiple accounts are available, you can select different values from the Debit and Credit account combinations listed in the drop-downs.
The drop-downs will list only GL codes associated with the campus where the class section is scheduled.
If the Debit and Credit Accounts are not configured for the selected record, the following message is displayed: You cannot modify GL code or split load because GL code association is not configured.
-
-
You can change the number in the Value column. By default it is blank. The Value column can be modified into any number, but the sum of the Load values of rows with the same split load type cannot exceed the original value.
-
To save your changes, select the Save button.
When you select the Save button, if the sum of values in the totals of the split rows does not match the original value of the parent row, an alert icon is displayed against all the parent rows. A tool tip displays one of the following messages depending on the validation error:
-
Total of the split load values does not equal 100%
-
Same GL codes are linked to multiple split load types
-
Split load type value must not be zero or empty
-
Total of the split load values does not equal 100%, the same GL codes are linked to multiple split load types and the split load type value must not be zero or empty
(This message is dynamic based on a combination of validation errors under a, b, and c.)
If you corrected the values in the split loads, and saved the record, the alert icon will not be displayed when the record is opened again.
-
-
To delete a child record, select the Delete link in the Action column.
If only one row remains after deleting all the other rows, the system will delete the last remaining split row and will display only the parent row with the default GL codes.
Procedure to Reset Assignment Statuses
After you have split assignment loads, you can use the Reset Assignment Statuses action to reset to default GL codes and remove any split rows for assignments with Passed Load validation status.
-
Select a record with Passed load validation status.
-
In the grid toolbar, select Assignment Actions > Reset Assignment Statuses.
-
A pop-up with the following message appears:
For the selected assignments, the Load Validation status will reset to Not Validated, Pay Generation status will reset to Not Generated, Overall Status will reset to Draft; Assigned Load Values, Policy results, Earning Code, Rate association and the associated Earning lines will be cleared. Do you want to reset?
Select Reset to proceed.
The system will apply the statuses listed in the message to the selected record. If the loads were split, they will be removed. If the default GL was changed, it will revert to the default.