Financial Aid Exceptions
The Financial Aid Exceptions form displays exceptions that are generated when the Automated Processes jobs are run. Exceptions occur when transactions such as batches or individual student disbursements cannot be processed successfully. When an exception occurs as part of an automated process, some form of manual intervention is necessary to resolve the exception and allow the transaction involved to be resubmitted for automatic processing. When you open the Financial Aid Exceptions form, you will have access to the exceptions assigned to you.
The exception processing functionality provides an interface for the display of the exceptions to staff members or staff groups that have been assigned to receive the exceptions. The staff member may then resolve the exceptions by making changes to the transaction and the supporting information.
Financial Aid Automation 24.0.0 enhances the handling of exceptions by:
-
Enabling authorized users to resolve or snooze multiple exceptions at once. See Resolve/Snooze Exceptions in Batch.
-
Displaying an exception icon (
 ) on the Student Profile that enables users with appropriate permissions to access the resolutions page from a hyperlink on the exception code. See Access Exceptions from the Student Profile.
While processing exceptions, staff members may:
- Escalate exceptions (to their managers if they cannot resolve the issue)
- Resolve exceptions (exceptions that are resolved will then be resubmitted through automated processes)
- Resolve / Create adjustments (specific COD transactions only)
- Reject exceptions
- Self-assign exceptions (if the exceptions are routed to the staff group in which they are a member)
- Snooze exceptions (hide the exceptions for some time while awaiting more information)
- Override exception logic for Hold Group validation for exceptions DISBBTCH0022 and ELIGBLTY0003 for selected fund sources and the group configured as a C Code Group and/or Verification Group
Background Process "Auto Clear"
Financial Aid Automation has a background process called "Auto Clear" which runs at specific intervals. This process can clear exceptions that were resolved by Job Management so that these exceptions will not be presented to users as Open or Resolved in Exception Management. After performing a search on the Financial Aid Exceptions page using "Closed" as the search criterion, any exceptions that have been auto-cleared will be listed in the history of the closed exception indicating when the exception was closed and by which user.
Additionally, Auto Clear will also clear Eligibility exceptions that were created during the Pre-Payment and Batched for Payment processes when disbursements are paid (thereby bypassing the Eligibility Process). Auto Clear identifies and clears these Eligibility exceptions since the disbursements are paid and keeping these exceptions in Open status will be redundant.
Disbursements that are not in Batches
Any disbursements with Open/Snoozed/Escalated statuses resulting from the Eligibility process that are manually batched or not in batches will not be posted by the Disbursement Posting job. Disbursements that are not in batches and have Open/Snoozed/Escalated exceptions will not be picked up by the Disbursement Posting Job when the Job is configured to “Include Disbursements that are not in Batches”.
Eligibility Exceptions
Be aware that you can set any eligibility exceptions as Resolved and then batch these fund sources for payment as the Disbursement Posting job will not reference a status of Resolved to validate it. As this is a manual action, it ensures that releasing a disbursement even though the exception is not truly resolved is the user's responsibility. Eligibility exceptions will be auto-cleared when the payment is made.
In certain instances involving COD transactions, the staff member working on the transaction may indicate to the system that a financial adjustment will resolve the exception. When this occurs, the system will adjust the financial amounts of the transaction as required, and then re-submit the transaction to the automated processes.
Prerequisites
You must have:
-
Common - Processes - View authorization
To process exceptions, you must have the following additional authorizations:
-
Financial Aid Automation - Financial Aid Exceptions - Process Exception - Save
-
Financial Aid Automation - Financial Aid Exceptions - View
To use contextual actions in the toolbar of the main grid, you must have the following authorizations:
-
Financial Aid Automation - Financial Aid Exceptions - Advanced Search - Save Search
-
Financial Aid Automation - Financial Aid Exceptions - Delete Saved Search
-
Financial Aid Automation - Financial Aid Exceptions - Process Exception - Save
-
Financial Aid Automation - Financial Aid Exceptions - Reassign
-
Financial Aid Automation - Financial Aid Exceptions - Self Assign
-
Financial Aid Automation - Financial Aid Exceptions - Undo Override
-
Financial Aid Automation - Financial Aid Exceptions - Unlock
-
Financial Aid Automation - Financial Aid Exceptions - View
Access Method
Select the Financial Aid Exceptions tile.
Procedure to Display and Review Exceptions
After selecting the Financial Aid Exceptions tile, the Financial Aid Exceptions form is displayed.
Exceptions generated over the previous 24-hour period are displayed in the grid by default. The total number of these exceptions is displayed in the tile on the left under Summary. You can review the following values for exceptions in the grid.
Any exception with a red lock icon ( ) is locked, meaning the record is currently open with another user. A black lock icon (
 ) indicates you can open and work with the exception.
If the exception has an info icon (![]() ), place the cursor over the icon to review the status and number of age days for the exception.
), place the cursor over the icon to review the status and number of age days for the exception.
If an exception has a Detail link in the Exception Detail column, select the link for basic details about the exception.
If you hover the cursor over an exception that is in Pending status, a message indicates why you cannot perform any other action on that exception other than Resolving it.
If you need to manually search for exceptions, select Advanced Search. Specify the following values in the Advanced Search pop-up form and select Search.
|
Start Date |
Include Process Level Exceptions? Version Start Date |
If you plan to use the same search criteria again, select Save Search. Your search parameters will be saved as a tile on the left side of the form.
For the saved search tiles, you can:
-
Open a previously saved search by right-selecting the tile and selecting Open Saved Search.
-
You can delete a saved search by right-selecting the tile and selecting Delete Saved Search.
You can only have 12 saved search tiles active at a time. If you try and save a search and there are already 12 search tiles, the Override Tile pop-up appears with the following notification: "There are currently the maximum of 12 summary tiles configured. You can override an existing tile with your saved search criteria." Choose the search you wish to save in the Saved Search to be overridden field and select Override.
Once the grid displays the exception records, you can perform the following tasks:
| Task | Action to Take |
|---|---|
|
Review the student record for the student associated with an exception. |
Select the student's name. The student record is displayed in a new browser tab ( |
|
Reassign an exception to another staff member or staff group. Permission: Financial Aid Automation - Financial Aid Exceptions - Reassign |
|
|
Assign an exception to yourself. Permission: Financial Aid Automation - Financial Aid Exceptions - Self Assign |
An exception may only be self-assigned if the exception is assigned to the staff group to which you belong, or if the exception has a status of "Open". Exceptions in statuses other than "Open" cannot be self-assigned. |
|
Undo a completed Override. Permission: Financial Aid Automation - Financial Aid Exceptions - Undo Override |
|
|
View an exception record. Permission: Financial Aid Automation - Financial Aid Exceptions - View |
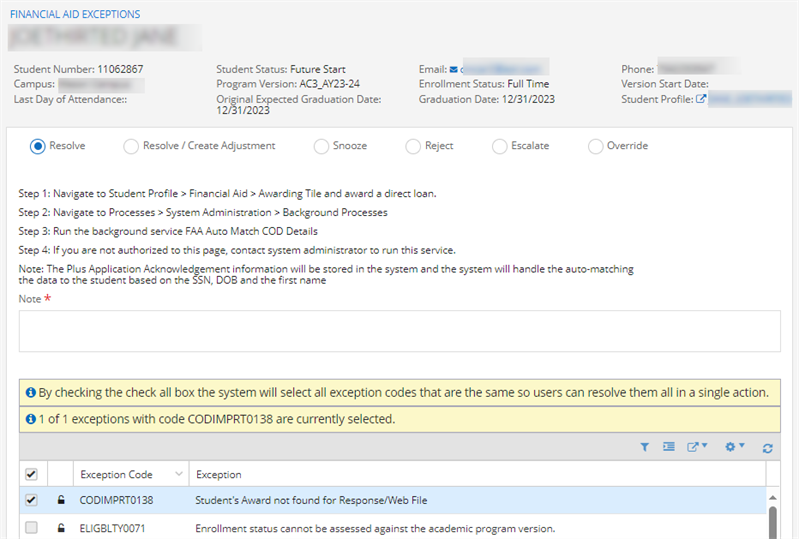
Select the Exception Code to view the details of the exception record and process the exception. See Procedure to Process Exceptions. When you use the Select All option to select multiple exceptions in the grid, the following message is displayed: "By checking the Check All box, the system will select all exception codes that are the same so users can resolve them in a single action." The following message is also displayed: "# of # exceptions with For ELIGBLTY exceptions, Financial Aid Automation dynamically displays the Set FA Entrance Interview Date field. When you specify a date value in this field and resolve the exception, the FA Entrance Interview Date will also be updated on the Award form. |
Procedure to Process Exceptions
-
Once you have reviewed the records in the main Financial Aid Exceptions grid and located the exception you want to process, select the Exception Code link to take action on the exception. The system will display the exception details for the associated student record or process.

The system only selects exceptions of similar descriptions that are assigned to a user or the group in which the user is within. This is applicable for both Process-level and student-level exceptions.
The following student details are displayed in the form header. For a process-level exception, only the campus name is displayed because the exception is not associated with a student or financial aid record.
Email
(link to the user's default email provider)The grid displays the following details about each exception:
-
Choose any of the following radio buttons to process the exception.
Resolve
You can resolve an exception using the Financial Aid Exceptions form and you can resolve a snoozed exception before the configured snooze timer expires. .
-
Select the Resolve radio button.
-
Review the displayed steps to resolve the exception and take the appropriate action.
-
Specify a comment related to the resolution in the Note field (required).
-
Select Save and continue working from the displayed exception grid or select Save & Close to return to the main Financial Aid Exceptions form.
Dynamic exceptions allow you to resolve the exception by updating the specified mandatory field values so that you do not have to navigate across different pages.
Below is a list of dynamic exceptions.
CODEXPRT0002 - The Student has an invalid or missing address
CODEXPRT0003 - The Academic Year End Date for the student does not fall within the appropriate date range
CODEXPRT0005 - The Borrower has an invalid or missing address
CODEXPRT0006 - The Citizenship Status for the borrower is missing or states that the student is not a US Citizen
CODEXPRT0007 - The Borrower Address has an invalid or missing City
CODEXPRT0009 - The Borrower Date of Birth is missing or is not valid
CODEXPRT0010 - The Borrower Last Name is missing or is not valid
CODEXPRT0011 - The Borrower SSN is missing or is not valid
CODEXPRT0012 - The Borrower Address has an invalid or missing State
CODEXPRT0013 - The Borrower Address has an invalid or missing Zip Code
CODEXPRT0014 - The Student Address has an invalid or missing City
CODEXPRT0015 - The Loan End Date for the student does not fall within the appropriate date range
CODEXPRT0025 - The Student Address has an invalid or missing City
CODEXPRT0027 - The Student Address has an invalid or missing State
CODEXPRT0029 - The Student Address has an invalid or missing Zip Code
CODEXPRT0033 - The Student SSN is missing or is not valid
CODEXPRT0034 - The Student Date of Birth is missing or is not valid
CODIMPRT0037 - Incorrect Award Dates
CODIMPRT0038 - Incorrect Academic Year Dates
CODIMPRT0065 - No Accepted PLUS Credit Decision Status
CODIMPRT0101 - Incorrect PreProfessional CourseWork Indicator
CODIMPRT0102 - Incorrect PreProfessional CourseWork Flag
CODIMPRT0113 - Invalid Student/Borrower SSN combination on a Direct Loan PLUS Award for Graduate/Professional Student
CODIMPRT0114 - Invalid Student SSN change on a Direct Loan PLUS Award for Parent of a Dependent Undergraduate Student - Field limiting to SSN.
CODIMPRT0115 - Invalid Borrower SSN change on a Direct Loan PLUS Award for Parent of a Dependent Undergraduate Student - Field limiting to SSN.
CODIMPRT0117 - Dependency Status is I and Additional UnSub is true
ELIGBLTY0030 - FA Entrance Interview Date
ELIGBLTY0092
Resolve / Create Adjustment
The Resolve / Create Adjustment option is available only if:
-
The exception was a system-generated COD disbursement.
-
The paid disbursement amount in Anthology Student is different than the amount received from COD or the scheduled disbursement amount in Anthology Student is different than the amount received from COD.
If the option is available, you can resolve an exception by having the system calculate the adjustment amount and then create an adjustment transaction.
-
Select the Resolve / Create Adjustment radio button.
-
Specify a comment related to the resolution in the Note field (required).
-
Select Save and continue working from the displayed exception grid or select Save & Close to return to the main Financial Aid Exceptions form.
When you select Save, an adjustment transaction is created in the system for the total amount of the difference listed for the paid disbursement in question.
Snooze
An exception may be placed into a snooze mode for up to 30 days. This will remove the exception from the User Interface until the specified period has passed.
The default length of time for a snooze transaction is 24 hours from today's date (1 day). If desired, you may change this by entering the Date and Time that you would like the exception to be removed from snooze mode.
This functionality is disabled for exceptions that are created as a result of import processes.
Reject
The Reject option is only available for exceptions that have been assigned to you for secondary review, and if you are a staff member with permission to perform a secondary review of exceptions. If you have this permission, you may review exceptions escalated by another staff member. A secondary reviewer can only reject an exception if the exception was not resolved correctly by the originally assigned staff member.
-
Select the Reject radio button.
-
Specify a comment related to the rejection in the Note field (required).
-
Select Save and continue working from the displayed exception grid or select Save & Close to return to the main Financial Aid Exceptions form.
Escalate
You can escalate an exception to your manager's attention using this form if you cannot resolve the exception yourself.
-
Select the Escalate radio button.
-
Choose either the Manager option and select a name in the drop-down field or the Staff Group option and select a staff group.
-
Specify a comment related to the escalation in the Note field (required).
-
Select Save and continue working from the displayed exception grid or select Save & Close to return to the main Financial Aid Exceptions form.
Override
Automated Processes perform eligibility evaluation on scheduled and paid financial aid disbursements. Any disbursement that fails eligibility is excluded from the COD export files, which would release the disbursement for payment.
In some instances, however, there may be scheduled disbursements that you may want to release for payment, even though the disbursement failed the eligibility evaluation based on the current information in Anthology Student. For example, you may know that the conditions causing the eligibility to fail will be mitigated in the future. Therefore, you may not want to delay the processing of the disbursement.
Override enables authorized staff members or staff group members to override a disbursement eligibility exception, thereby allowing the disbursement to be processed in the same manner as a disbursement that has passed the eligibility evaluation.
For eligibility exceptions that were generated from any of the post-payment stages, Anthology Student automatically creates a scheduled refund.
The disbursement eligibility status will not be marked as "Passed", and any subsequent eligibility evaluations will still evaluate all criteria, including the particular criteria that were manually overridden. The disbursement eligibility status will be set to "Passed" only if the disbursement passes the evaluation within the eligibility automated process. By marking the exception as "Overridden", the disbursement will be set to "Passed", provided that there are no other exceptions on that disbursement. Any exception marked as "Overridden" will remain in that status until all exceptions associated with the disbursement that are still open have been overridden, closed, or resolved.
When there are multiple eligibility exceptions for a disbursement (due to our existing logic whereby overridden exceptions will reappear if that disbursement is run through eligibility before it moves forward in the payment process, either released for payment or paid in a batch), you can override the exceptions that can be overridden before the other exceptions that cannot be overridden are properly resolved because the job will pass them once all resolved and closed exceptions have been passed.
-
Select the Override radio button.
-
Specify a comment related to the override in the Note field (required).
-
Select Save and continue working from the displayed exception grid or select Save & Close to return to the main Financial Aid Exceptions form.
Exception Warning Message
If you are manually overriding an exception and there are other exceptions associated with the disbursements that are still open and have not been overridden, closed, or resolved, Anthology Student informs you that the exceptions you have overridden will be opened again until the other exceptions are resolved. The following message is displayed: "This fund source disbursement has other associated exceptions that will remain open."
-
-
After you have worked on an exception, the History Notes field in the main grid will list every change to the exception record.