Import Student Funding Records
You can use the Process tab on the Automated Student Fund Management form to import an Excel file and load the data into a staging table. You can then review and edit the imported funding records before you submit the records to the main student funding table in Anthology Student.
The Excel file used for the data import must have a specific set of columns as defined in the attached template file: STUDENTSFM_12072023.xltx: The system imports only .XLSX files created using Microsoft Excel version 2001 and later.
Excel Template Limitations and Guidance
-
The columns that are colored RED indicate required fields that the System expects.
-
The columns that are colored BLACK are not required. The following fields will be colored BLACK when Max Amount Type is selected as Award Year.
- Max Paid Credit Limit
- Min Credit Hours
- Max Credit Hours
-
Agency and Agency Branch will not be in BLACK color when the Fund Source Type selected is Grant (Other than Pell).
-
As of now, the Re-Award column allows selecting “Do Not Re-Award”. However, if you want to make changes to this field then, upon import, you can search for this student on the Search tab and edit the student.
-
As of now, Transaction Category will show only Tuition and Priority as 1. However, if you want to add or change Transaction Categories, then you can search for this student on the Search tab and edit the student.
-
As of now, the Excel template is limited to 1000 rows. To add more rows, right-click to the previous row and select "Insert". Inserting rows before the 1001th row will retain formatting and pre-applied validations.
-
Any rows that are duplicates will be in BLUE color. This just indicates that the row is duplicated.
Students in the Excel file must be identified by Student Number and/or SSN and exist in the Anthology Student database. The SSN takes the precedence over the Student Number. If the SSN is valid and the Student Number is invalid, the Student Number will be updated in the grid by the SSN look up. Upon import of the records from the Excel file, Anthology Student will auto-fill values for the student records, for example, student names, enrollments, fund source codes, and other information that is available in the system. You can then review the data and edit field values as needed.
For a flowchart of managing outside awards through import, staging, and processing, see Student Fund Management - Process Flow.pdf.
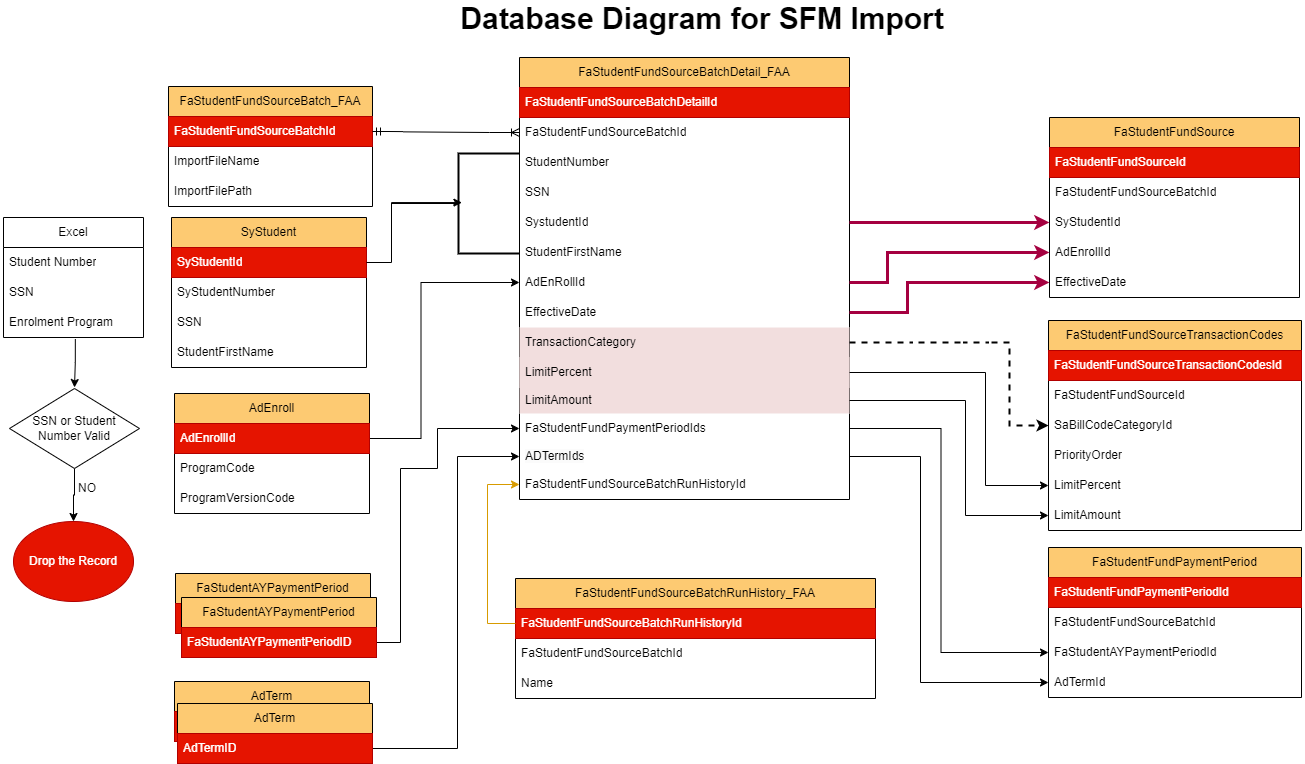
The image below shows a database diagram for the Student Fund Management import process.
To view the data flow diagram, click SFM-Import-DFD.xlsx.
File Locations
The system automatically creates the sfm_archive folder
in the EDE path. The Excel files to be imported can be placed in the EDE path or uploaded from the local system. When a file is uploaded, it is moved from its original location into the sfm_archive folder. The EDE path should be valid as the file import from the local system will copy the Excel file into the EDE path.
When the import process is completed, the file is renamed by appending the BatchId and time stamp to the original file name.
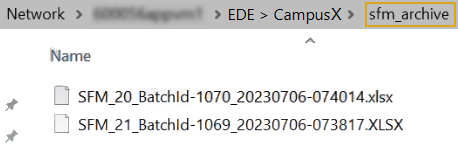
In the example, the original import files named SFM_20.xlsx and SFM_21.XLSX were moved to the sfm_archive folder and renamed as SFM_20_BatchId-1070_20230706-074014 and SFM_21_BatchId-1069_20230706-073817.
Prerequisites
You must have:
-
Common - Processes - View authorization
-
Financial Aid Automation - Processes - Automated Student Fund Management - Delete, Edit, New, and View authorization
Access Method
Select the Processes tile > expand Financial Aid > select Automated Student Fund Management.
Procedure to Import Student Funding Records
-
Select the Process tab to specify the file selection criteria and manually queue the import job.
-
The Campus EDE Path field displays the configured EDE path for your campus.
-
In the File Option drop-down list, select one of the following options:
-
Choose From Campus EDE Path (default)
Select this option if the Excel file has been placed in the EDE path for your campus. The file will be listed in the Available File drop-down. Choose the file in the list.
-
Upload File
Select this option to import the Excel file from a local drive. Click the Choose File button, navigate to the file in your local system, and click the Upload button.
The system will save the Excel file to the
sfm_archivefolder in the EDE path and process it from there. The Upload File functionality validates that the file name provided for upload does not already exist in thesfm_archivefolder. Only the file name is verified against any existing file in the folder. The contents of the file are not compared. You will receive an error message when you attempt to import a file from a location other than the EDE Path and a file with the same name already exists in thesfm_archivefolder.
-
-
Click the Queue Import button. The following confirmation messages will appear:
-
"SFM Import file [path and file name] successfully uploaded." (This message appears when the Upload File option was selected.)
-
"File import queued successfully."
-
"Automated Student Fund Import Succeeded."
-
-
Continue with the Open Batches tab. See Review Imported Student Funding Records.