Review Imported Student Funding Records
Once you have imported student-specific funding data from the Process tab of the Automated Student Fund Management page, the Open Batch tab will list the batches so that you can work with the batches. The batches listed on this tab reflect data that is stored in the student funding management (SFM) staging table.
You can:
-
Open batches and review the imported record details
-
Add record details that are required for auto-awarding at your campus
-
Remove or delete batches
-
Specify the batch review status
-
Queue the batch to be submitted to the main SFM table in the Anthology Student database
For a flowchart of the review process, see Batch Status - Reviewed vs. Not Reviewed.pdf
Prerequisites
You must have:
-
Common - Processes - View authorization
-
Financial Aid Automation - Processes - Automated Student Fund Management - Delete, Edit, New, and View authorization
Access Method
Select the Processes tile > expand Financial Aid > select Automated Student Fund Management.
Procedure to Review Imported Student Funding Records
-
Select the Open Batches tab.
-
Review the status and values of the records in the grid.
-
Click the refresh icon (
 ) in the footer of the grid to retrieve the current status of the background jobs.
 -
Click the link on the Batch Number to review the records contained in the batch. (If the imported file does not contain any records, the Number field does not have a hyperlink).
The system displays the records for the selected batch number in the Results - Batch No: nnnn grid on the Process tab. The record count will be zero (0) when none of the records (using SSN or the Student Number) from the Excel spreadsheet matches the student record in the Anthology Student database.
The import process populates the fields in the Results grid based on the data in the import file and any matching data existing in Anthology Student. If the import file contains invalid values, for example, a fund source type that is not mapped in Anthology Student, the corresponding field in the grid will remain blank.
All fields with a blue background are editable. You will need to specify values for any required field that is not populated. Fields that are not required for a specific record will be disabled. For example, for a term-based enrollment, the Payment Periods field will be disabled but the Term Code field will be required.
Notes:
-
When you select values in fields that are not pre-populated (for example, Academic Year, Term, Fund Source, Payment Period, Agency), the drop-down lists in the grid offer values based on the student's current enrolled program version and award year.
-
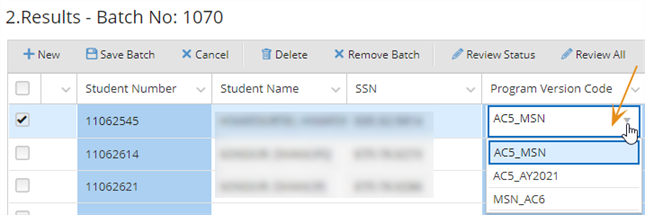
If a student is enrolled in multiple program versions, the Program Version Code field displays the latest enrolled program version. The other program versions are listed in the drop-down.

-
If the student status is "Permanent out" or the student is not enrolled, the Program Version Code field indicates "Not Enrolled". Once the student is enrolled, the grid will be refreshed and the Program Version Code field will be updated.
-
If a student transferred from another campus, the Campus field indicates the campus the student transferred to.
-
If the student record in the Excel file includes:
-
A valid SSN, the record is imported, and the Student Number is populated in the grid.
-
A valid Student Number, the record is imported, and the SSN is populated in the grid.
-
Invalid values for both Student Number and SSN, the record will not be imported.
-
A valid SSN and a valid Student Number but the values belong to two different student records, the system checks the SSN first and matches it to a student record.
-
-
If the Excel file contains valid student identifiers (SSN and/or Student Number) and invalid values for fields such as Fund Source Code, Agency, etc., the fields with invalid values will remain blank in the grid. You will need to select valid values. for these records.
-
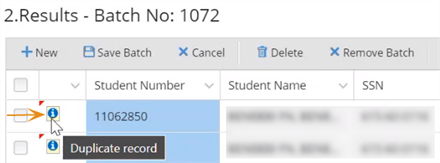
If the batch contains records that already exist in the Anthology Student database, the first column in the grid displays an information icon with a tooltip indicating a duplicate record.
To determine if a record is a duplicate, the system checks the following fields in addition to the student identifier:
- Funding Type
- Maximum Amount
- Maximum Amount Type
- Term Codes/Payment Periods
- Transaction Category
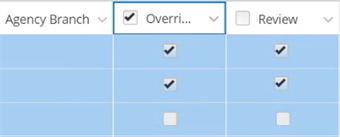
The system enables the Override check boxes for duplicate records. You can choose whether or not to override existing records by selecting or clearing the Override check boxes.
Once a batch with duplicate or overridden records is submitted and processed successfully, the affected records in the Results grid on the History tab will have "Yes" values in the Duplicate and Overridden columns.
When you select "No" in the Override field for a duplicate record, the system stores both the original record and the imported record. When you select "Yes", the system stores only the imported record.
-
If there are gaps in the rows of student records in the Excel file, records that appear below the empty rows will not be imported.
-
Any records that are not imported into Anthology Student due to invalid student identifiers or other issues will still be available in the Excel file (i.e., no records are deleted from the import file), but those records will not be visible in Anthology Student.
-
Records for students that are not found in the Anthology Student database because the student is not enrolled or other data is missing, are imported and included in the batch, however, auto-awarding will not be possible for those records until those students are enrolled and the records are completed.
-
-
Once you have reviewed the fields that are pre-populated from the imported Excel file and completed your entries in the remaining required fields, the Review check box will be enabled for a record. Select the Review check box to indicate that you have completed your review of a particular record.
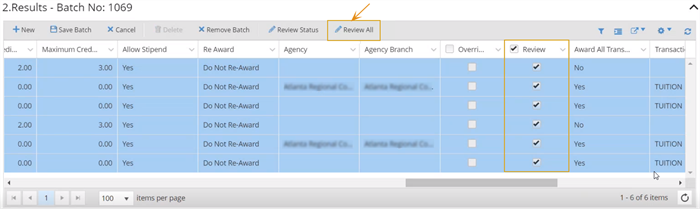
You can also review all records at once, confirm that the Review check boxes are enabled for all records, and select the Review All button in the grid toolbar. The system will mark all records in the grid as reviewed.
-
If the imported records are incomplete (for example, you realized after completing the XLSX import that a student record is missing), you have the option to add a record to the batch by clicking the New button in the grid toolbar. The system will add a new row to the grid.
You can specify a valid Student Number and the system will populate the remaining fields based on the data available in the Anthology Student database. You can then edit the data and populate fields that were not automatically filled. The newly added record needs to have either the SSN or Student Number to save the record. Otherwise, the record will not be saved by Save Batch.
-
If you want to remove a record from the batch, select the record and click the Delete button in the grid toolbar.
-
After you have completed the review, click the Save Batch button in the grid toolbar.
The system displays the message "The Batch was successfully saved."
-
Click the Review Status button in the grid toolbar, select "Reviewed" in the Reviewed Status field, and click Save to close the pop-up window.
The system displays the message "The Batch Review Status was successfully changed." (By default, the Review Status is set to "Not Reviewed".)
-
Click the Queue Update button below the grid to submit the reviewed records. Records that are not reviewed will not be submitted.
Note: If you did not set the Review Status to "Reviewed", the Queue Update button will be disabled. If your batch has "Reviewed" and "Not Reviewed" records, the Queue Update button will be disabled. To enable the Queue Update button, the requirements should meet the Batch Review status as "Reviewed" and only "Reviewed" records are queued.
The system displays the Submit Batch pop-up window.
You can change the Batch Name value or accept the default name consisting of batch number and time stamp. The Batch Name allows up to 50 characters.
Click the Submit button to close the pop-up.
The system displays the message "Batch <batch # - time stamp> succeeded.".
Once the batch processing status is set to "Succeeded", the system:
-
Stores the reviewed batch records in the main SFM table
-
Moves the batch from the Open Batches tab to the History tab if all records have been reviewed
-
Keeps the batch on the Open Batches tab if only a subset of batch records was reviewed. The batch status on the Open Batches tab will be set to "Pending Review".
-
Displays the details of the reviewed records on the Search tab
-
-
To remove a batch, select the batch record and click the Remove Batch button in the grid toolbar. The Batch Status field value in the grid will be set to "Removed".
The system displays the message "The Batch status was successfully changed."
When you remove a reviewed batch, the Review Status will be reset to "Not Reviewed".
When you click the link for a removed batch, the buttons in the grid toolbar on the Process tab will be disabled and the editable fields will be disabled.
You can select the removed batch on the Open Batches tab and click the Re-expect Batch button if you need to work on the batch again. The system will reset the batch status to "Open".
-
To delete a batch completely, select the batch record and click the Delete button in the grid toolbar. You will be prompted to confirm the deletion. You cannot restore a batch that has been deleted.
-
Continue with the History tab. See Review Completed Student Funding Batches.