The topic "Create a Student Enrollment Period" is not available in Version 3.1.
The topic "Create a Student Enrollment Period" is not available in Version 3.0.
Create a Student Enrollment Period
This workflow creates a new student enrollment period and assigns an enrollment number to a student. The workflow uses the GetServiceInstance<IStudentEnrollmentPeriodService> activity. This service creates a new enrollment record with a proper student enrollment number. The service calls the InsertStudentEnrollment method on the iStudentEnrollmentPeriodService to insert a new enrollment record in the AdEnroll table.
Note: Do not use the SaveEntity<StudentEnrollmentEntity> activity to create a new student enrollment period record. The saved record will not have a new enrollment number in the StuNum field of the AdEnroll table.
-
Open the workflow where you want to create an enrollment.
-
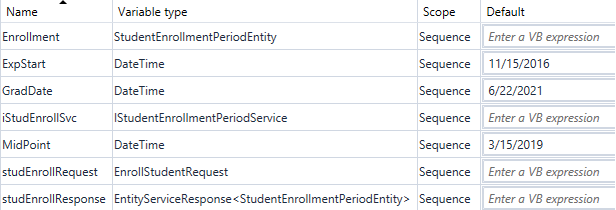
Create the following variables. Specify default values as needed for your use case.
-
Drag a CreateEntity activity into the sequence.
-
In the TEntity field, select Browse for Types....
-
Select Cmc.Nexus.Academics.Contracts > Cmc.Nexus.Academics.Entities > StudentEnrollmentPeriodEntity and click OK.
-
In the Result property field, specify the Enrollment variable created above.
-
-
Drag an Assign activity into the sequence.
-
In the "To" field specify studEnrollRequest (variable created above).
-
In the "Value" field specify new EnrollStudentRequest(Enrollment).
-
-
Drag a GetServiceInstance activity into the workflow.
-
In the TService field, select Browse for Types...
-
Select Cmc.Nexus.Academics.Services > IStudentEnrollmentPeriodService and click OK.
-
In the Result property field, specify the iStudEnrollSvc variable created above.
-
-
Insert Assign activities for each row in the following table. Assign values as needed for your environment.
Note: Use LookupReferenceItem or other methods to find the correct values for these fields. They have been hard-coded in a test environment for example purposes only.
Assign Properties To Value Value Example studEnrollRequest.entity.StudentId <StudentID> 20073 studEnrollRequest.entity.SchoolStatusId <SchoolStatusId> 5 studEnrollRequest.entity.CampusId <CampusId> 1 studEnrollRequest.entity.ProgramId <ProgramId> 83 studEnrollRequest.entity.ProgramVersionId <ProgramVersionId> 166 studEnrollRequest.entity.ShiftId <ShiftId> 64 studEnrollRequest.entity.BillingMethodId <BillingMethodId> 52 studEnrollRequest.entity.GradeLevelId <GradeLevelId> 1 studEnrollRequest.entity.StartDateId <StartDateId> 2998 studEnrollRequest.entity.IpedsState <IpedsState> "GA" studEnrollRequest.entity.AcademicAdvisorId <AcademicAdvisorId> 115 studEnrollRequest.entity.ApplicationReceivedDate <ApplicationReceivedDate> datetime.Today studEnrollRequest.entity.EnrollmentDate <EnrollmentDate> datetime.Today studEnrollRequest.entity.MidpointDate <MidpointDate> MidPoint (variable created above) studEnrollRequest.entity.GraduationDate <GraduationDate> GradDate (variable created above) studEnrollRequest.entity.ExpectedStartDate <ExpectedStartDate> ExpStart (variable created above) -
Optionally, for testing purposes, insert a WriteLine activity with Text = "Before Call".
-
Drag an Assign activity into the sequence. This is the call to the GetServiceInstance activity using variables created above.
-
In the "To" field specify studEnrollResponse.
-
In the "Value" field specify iStudEnrollSvc.InsertStudentEnrollment(studEnrollRequest).
-
-
Optionally, insert another WriteLine with Text = "After Call".
-
Optionally, insert a LogObject activity with Level = Error and Object = studEnrollResponse.
-
Click Publish. The New Workflow Definition Version window is displayed.
-
If you want the workflow to be run as soon as the event occurs on the entity, select Enable This Workflow Version, otherwise leave the check box cleared.
-
Click Save, then Cancel to close the publisher window.