Forms Builder Form as External Link in Portal
You can create links to Forms Builder forms as external links in Portal. Forms Builder forms can be used to enable students to fill out forms for various purposes, e.g., event sign-up forms, parking passes, immunization forms, etc. To access these forms, Portal users will log in as student or staff using single sign-on (SSO), select a Portal menu option (e.g., the External Links), and click a link that will bring up a form.
Depending on the options selected in the Portal Configuration tool, a linked form can be displayed as popup, new browser tab, or as an IFrame within the Portal window.
For anonymous or authenticated form sequences, the Portal link can be configured with auto-login (SSO) enabled.
For authenticated sequences:
-
The AuthGuid value provided by Portal enables the user to be impersonated, which also helps to establish an SSO-login into the form sequence that’s configured as an external link in Portal.
-
User related information can be obtained through the FormInstance.UserInfo variable which can be consumed to perform workflow related activities using Workflow Composer.
Note: End users can use the default Logout button in Portal to log off from the Portal and the form configured in the iframe. No additional log out button will be displayed for the form.
Configure an IFrame Link in the Portal Configuration Tool
-
Log in to the Portal Configuration tool.
-
Expand the Server node and select your Campus.
-
Select Menu Groups > External Links.
-
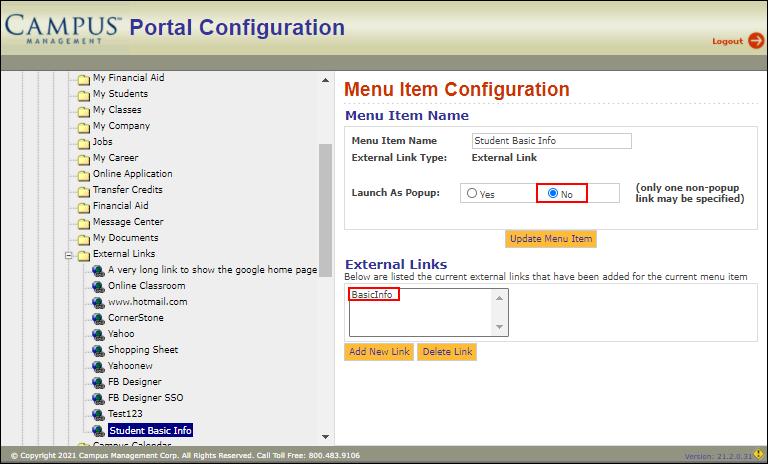
Select the Menu Item Configuration for your form. In our example, the Menu Item is named "Student Basic Info".
-
In the Launch As Popup option, select No. This option displayed the linked form in an IFrame within the Forms Builder window. Click Update Menu Item to save your changes.
Click the menu item ("BasicInfo" in our example) in the External Links list to access additional configuration options.
-
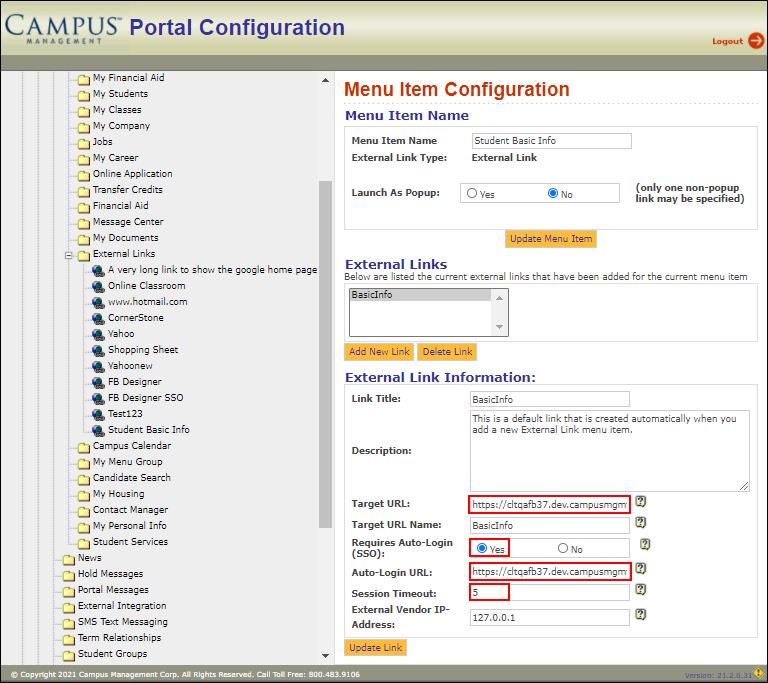
In the External Link Information section, configure the following items:
-
Target URL: Specify the URL for the rendered Forms Builder sequence.
-
Requires Auto-Login (SSO): Select Yes.
When auto-login is enabled, Portal generates a unique GUID for the session. Portal will insert the session data with the Student ID (or Staff ID) along with the AuthGuid value into a data table. The AuthGuid will apply to any URL that is specified in the Target URL and Auto-Login URL fields.
In our example, the AuthGuid will be appended to the Forms Builder sequence URL when a user clicks the external link. The values passed in the iframe element are seen in browser development tools as shown below:
<iframe src="https://<server:domain>:9003/#/renderer/5619?AuthGuid=e28733a4-cfe8-40d6-bf71-3bd9535b645e&TargetURL=https://<server:domain>:9003/#/renderer/5619" id="_ctl0_PlaceHolderMain_iframeContent" title="Links" align="left" frameborder="no" style="WIDTH: 100%; HEIGHT: 680px">
</iframe>
-
Auto-Login URL: Specify the link to the rendered Forms Builder sequence.
-
Session Timeout: Specify a session timeout value in minutes to ensure that the session is closed when the user is inactive.
-
-
Click Update Link to save your changes.
Modify the Workflow to Resolve the AuthGuid (for anonymous sequences)
The following steps were used as a workaround in previous versions to authenticate users in Azure environments. These steps were required due to security issues described in version 4.0 of this topic.
From release 4.1, while it's recommended to use the steps described above to configure a new form sequence, the following steps performed in previous versions remain valid for enabling auto-login (SSO) of previously configured form sequences.
-
Launch Workflow Composer and open the workflow for the Forms Builder sequence that is linked in Portal.
-
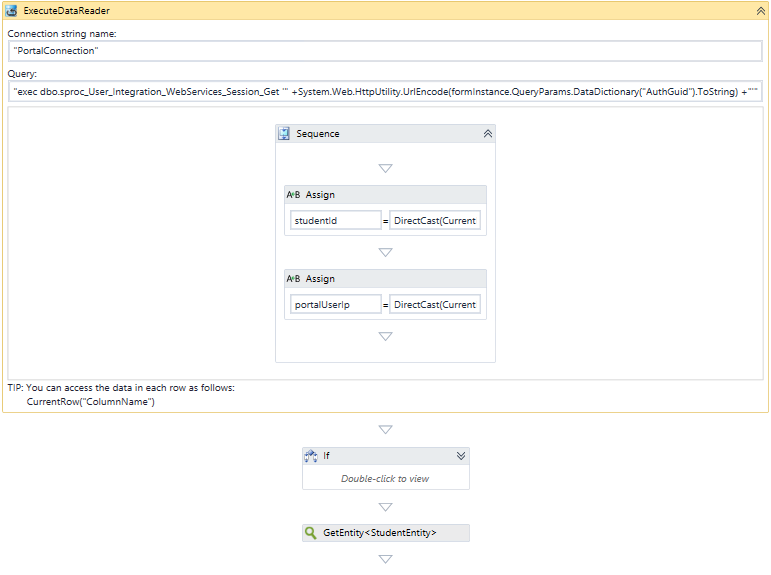
Insert an ExecuteDataReader activity at the top of the workflow.
-
Specify a Connection string name.
-
Specify the following value in the Query field to call a stored procedure:
"exec dbo.sproc_User_Integration_WebServices_Session_Get '" +System.Web.HttpUtility.UrlEncode(formInstance.QueryParams.DataDictionary("AuthGuid").ToString) +"'"
The sproc uses the AuthGuid value provided by Portal in the IFrame URL and retrieves the associated student (or staff) ID from the wpExternalAppSessions table in the Portal database.
The student (or staff) ID value can then be used in a GetEntity<> activity to obtain the student (or staff) entity for further workflow steps.
-
-
( Optional) If desired for additional security, you can include Assign activities to tie the AuthGuid to a Portal user IP address. The IP address is the URL of the Forms Builder Renderer. The IP address is part of the formInstance entity.
Assign To Value studentId DirectCast(CurrentRow("UserID"),Int32) portalUserIp DirectCast(CurrentRow("BrowserIPAddress"),String) However, don’t rely too much on the IP address because student users can be behind a firewall or VPN and the true IP address may not be available. See Collect IP Address.
You can create links to Forms Builder forms as external links in Portal. Forms Builder forms can be used to enable students to fill out forms for various purposes, e.g., event sign-up forms, parking passes, immunization forms, etc. To access these forms, Portal users will log in as student or staff using single sign-on (SSO), select a Portal menu option (e.g., the External Links), and click a link that will bring up a form.
Depending on the options selected in the Portal Configuration tool, a linked form can be displayed as popup, new browser tab, or as an IFrame within the Portal window. When the IFrame option is configured, the Portal user's browser security settings may prevent the user from accessing the form because specific cookies are not allowed.
The security settings can be found in Chrome under Settings > Privacy and security > Cookies and other site data > See all cookies and site data. When exceptions for sites like [*]login.mircosoft.comand and {*}login.windows.net are configured for the browser under "Sites that can always use cookies", Portal will be able to display authenticated Forms Builder sequences in an IFrame. Exceptions for Microsoft cookies are set in many corporate environments, but student users may not have them and may not be able to access authenticated form sequences.
For anonymous form sequences, the Portal link can be configured with auto-login (SSO) enabled, and the sequence workflow can be modified to retrieve the student or staff ID based on the AuthGuid value provided by Portal. See the steps below.
Configure an IFrame Link in the Portal Configuration Tool
-
Log in to the Portal Configuration tool.
-
Expand the Server node and select your Campus.
-
Select Menu Groups > External Links.
-
Select the Menu Item Configuration for your form. In our example, the Menu Item is named "Student Basic Info".
-
In the Launch As Popup option, select No. This option displayed the linked form in an IFrame within the Forms Builder window. Click Update Menu Item to save your changes.
Click the menu item ("BasicInfo" in our example) in the External Links list to access additional configuration options.
-
In the External Link Information section, configure the following items:
-
Target URL: Specify the URL for the rendered Forms Builder sequence.
-
Requires Auto-Login (SSO): Select Yes.
When auto-login is enabled, Portal generates a unique GUID for the session. Portal will insert the session data with the Student ID (or Staff ID) along with the AuthGuid value into a data table. The AuthGuid will apply to any URL that is specified in the Target URL and Auto-Login URL fields.
In our example, the AuthGuid will be appended to the Forms Builder sequence URL when a user clicks the external link. The values passed in the iframe element are seen in browser development tools as shown below:
<iframe src="https://<server:domain>:9003/#/renderer/5619?AuthGuid=e28733a4-cfe8-40d6-bf71-3bd9535b645e&TargetURL=https://<server:domain>:9003/#/renderer/5619" id="_ctl0_PlaceHolderMain_iframeContent" title="Links" align="left" frameborder="no" style="WIDTH: 100%; HEIGHT: 680px">
</iframe>
-
Auto-Login URL: Specify the link to the rendered Forms Builder sequence.
-
Session Timeout: Specify a session timeout value in minutes to ensure that the session is closed when the user is inactive.
-
-
Click Update Link to save your changes.
Modify the Workflow to Resolve the AuthGuid
-
Launch Workflow Composer and open the workflow for the Forms Builder sequence that is linked in Portal.
-
Insert an ExecuteDataReader activity at the top of the workflow.
-
Specify a Connection string name.
-
Specify the following value in the Query field to call a stored procedure:
"exec dbo.sproc_User_Integration_WebServices_Session_Get '" +System.Web.HttpUtility.UrlEncode(formInstance.QueryParams.DataDictionary("AuthGuid").ToString) +"'"
The sproc uses the AuthGuid value provided by Portal in the IFrame URL and retrieves the associated student (or staff) ID from the wpExternalAppSessions table in the Portal database.
The student (or staff) ID value can then be used in a GetEntity<> activity to obtain the student (or staff) entity for further workflow steps.
-
-
( Optional) If desired for additional security, you can include Assign activities to tie the AuthGuid to a Portal user IP address. The IP address is the URL of the Forms Builder Renderer. It is part of the formInstance entity.
Assign To Value studentId DirectCast(CurrentRow("UserID"),Int32) portalUserIp DirectCast(CurrentRow("BrowserIPAddress"),String) However, do not rely too much on the IP address because student users can be behind a firewall or VPN and the true IP address may not be available. See Collect IP Address.