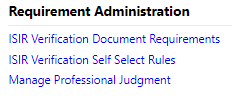
ISIR Verification Document Requirements
The ISIR Verification Document Requirements section of the Administrators menu houses the rule engine that reads the student ISIR or parameters set by the institution to trigger a document requirement for verification, comment codes, and Professional Judgment.
To access Requirement Administration, go to Administrators > Requirement Administration > ISIR Verification Document Requirements.
From the ISIR Verification Document Requirements page, you can search for existing requirements and add new requirements.

Search Requirements
-
Specify the following search criteria as needed:
- Requirement Name
- C-Code
- Override Requirements
- Active Requirements
- ATH (Anthology) Managed
-
Select Search to filter the list.
-
To remove your search criteria, select Clear Search.
Add a Requirement
-
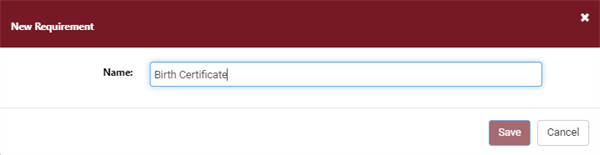
To add a new requirement, select the New Requirement button.
-
Enter a Name for the new requirement and select Save.
-
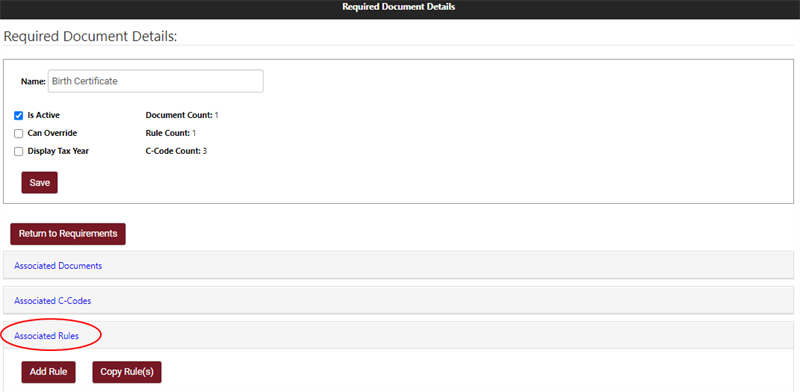
The new requirement will be displayed on the Required Document Details page.
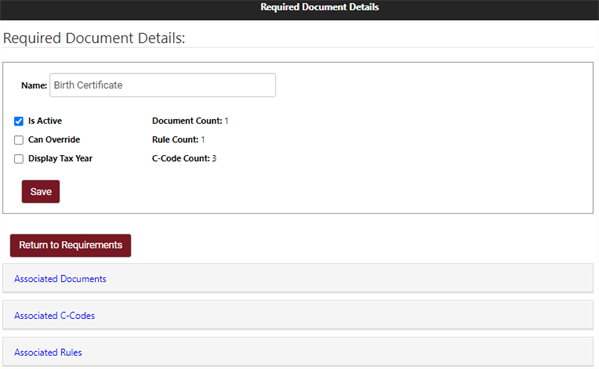
You can set following requirement parameters:
-
Is Active: Indicates whether the requirement is active
-
Can Override: Indicates whether the requirement can be overridden
-
Display Tax Year: Indicates whether the tax year should be displayed
-
Document Count: Number of Associated Documents
-
Rule Count: Number of Associate Rules
-
C-Code Count: Number of Associated C-Codes
-
Edit a Requirement
-
To edit the requirement, select the requirement Name.
-
On the Required Document Details page, expand the following sections and edit the information as needed:
- Associated Documents
- Associated C-Codes
- Associated Rule
-
Select the Save button to capture all changes made to the Required Document Details.
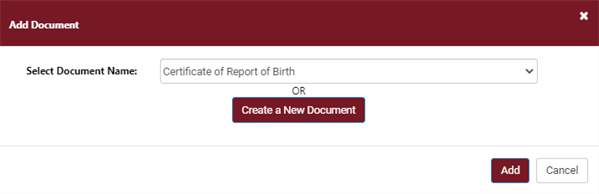
Associate a Document
When reviewing a new or existing requirement you may need to associate one or more documents. You can select an existing document or create a new document.
-
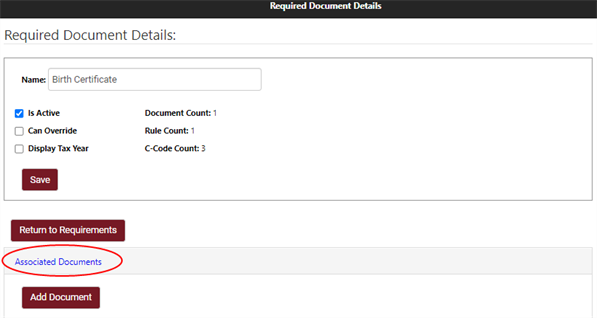
Select the requirement Name.
-
Expand Associated Documents and select the Add Document button.
-
Select the document you would like to add from the Document Name drop-down list and select the Add button.
-
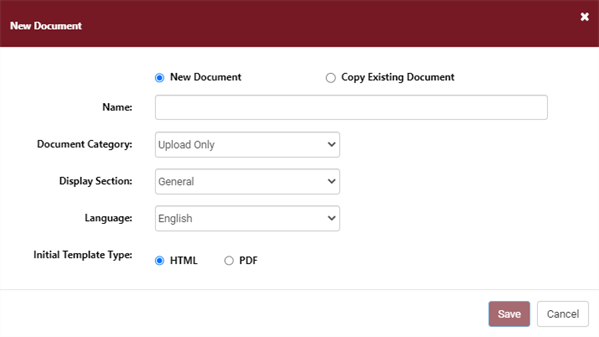
You may also choose Create a New Document.
In the New Document modal, specify the Name, Document Category, Display Section, Language, and Template Type.
-
Select Save.
For more information on Document creation, see Document Administration.
The newly associated document will be listed in the Associated Document section.
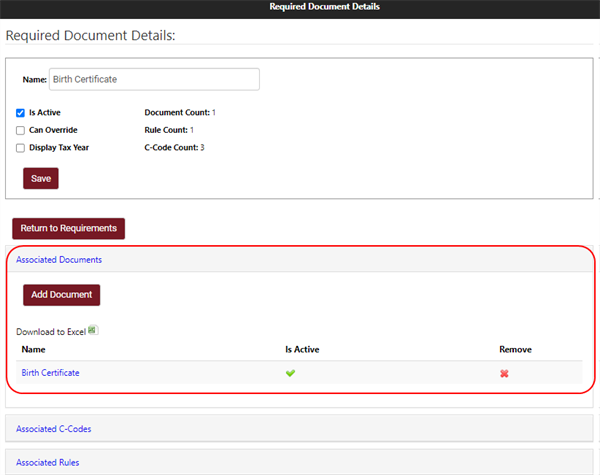
You have the option to download an Excel (![]() ) file of the associated documents.
) file of the associated documents.
Users with appropriate permissions may remove (![]() ) associated documents from the requirement.
) associated documents from the requirement.
Activate or Deactivate a Document
Users can see if a document is active, or inactive, by the icons shown in the Is Active column. A (![]() ) icon indicates that the document is inactive. A (
) icon indicates that the document is inactive. A (![]() ) icon indicates the document is active.
) icon indicates the document is active.
-
To activate or deactivate a document, select the document Name.
-
On the Edit Document page, select or clear the Is Active check box. Select Save.
-
Select Return to Requirements.
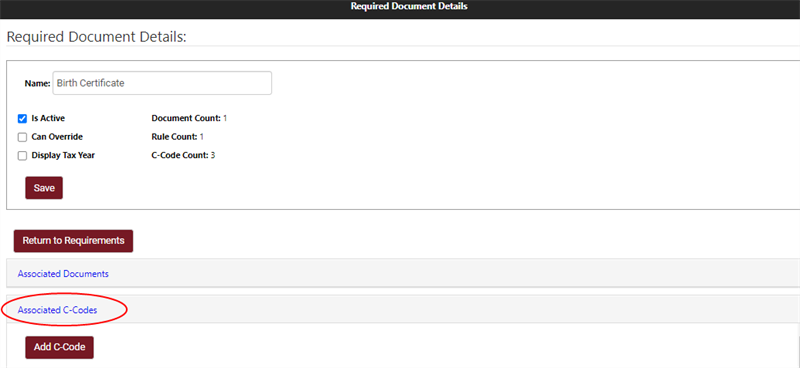
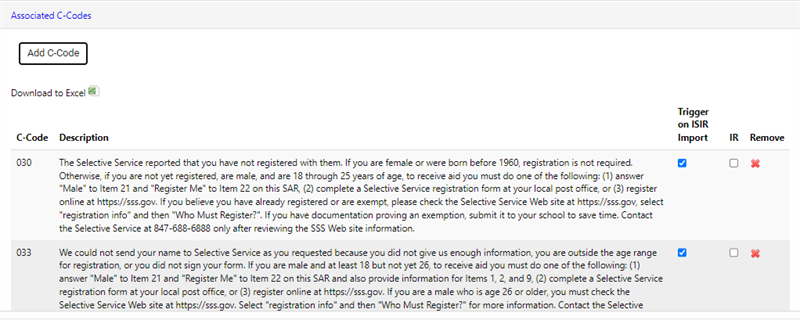
Add Comment Codes
Users may add associated C-Codes to new or existing requirements.
-
Select the requirement Name.
-
Expand Associated C-Codes and select Add C-Code.
-
In the Add Associated C-Codes modal, select the C-Codes you want to associate with the requirement and select Add to continue.
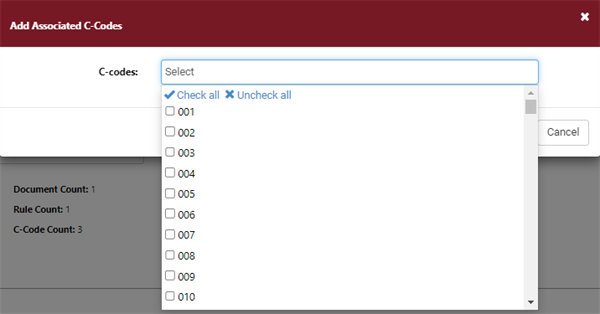
-
The newly associated comment code will be listed in the Associated C-Codes section.
-
When reviewing C-Codes to associate with a requirement, you have the option to select the Trigger on ISIR Import for a selected comment code. Doing so enables the document to trigger in the student RDL upon successful ISIR import with a matching student import. This provides automation in C-Codes/C-Flags that need attention.
-
A C-Code can also be marked for Initial Review (IR). By selecting this check box you are initiating a review of the document requirement added to the student RDL. This document requirement will require a staff user to review prior to student action. This check box is commonly used for C-Flags that the school would review and determine if the requirement can be satisfied internally or if student action is needed.
-
You have the option to download an Excel (![]() ) file of the associated C-Codes.
) file of the associated C-Codes.
Users with appropriate permissions may also remove (![]() ) associated C-codes from the requirement.
) associated C-codes from the requirement.
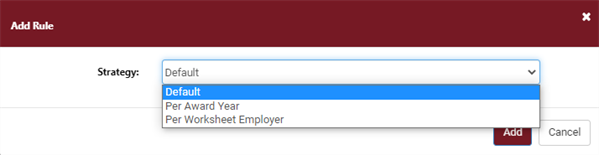
Add a Rule
Users may add associated rules to new or existing requirements.
-
Select the requirement Name.
-
Expand Associated Rules and select Add Rule.
-
In the Add Rule modal, select a rule Strategy from the drop-down list and select Add.
-
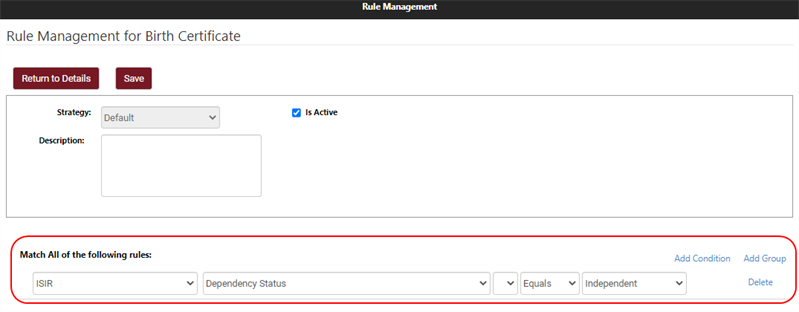
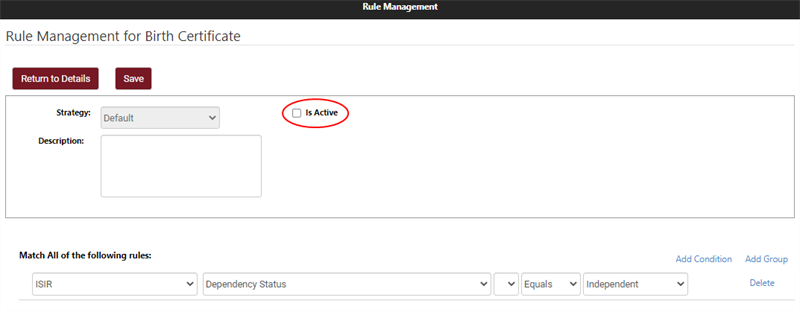
On the Rule Management page, complete the following:
-
Review the selected Strategy and make updates if needed.
-
Select Is Active to validate and initiate the rule.
-
Enter a Description for the specified rule.
-
-
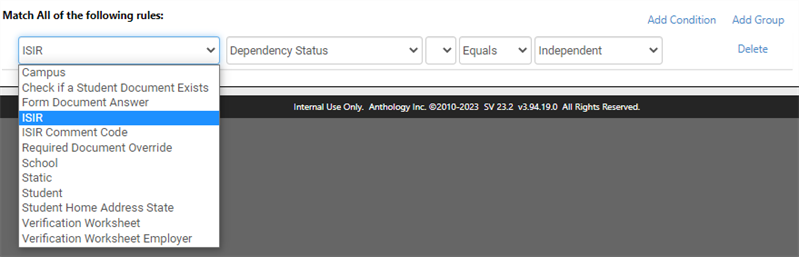
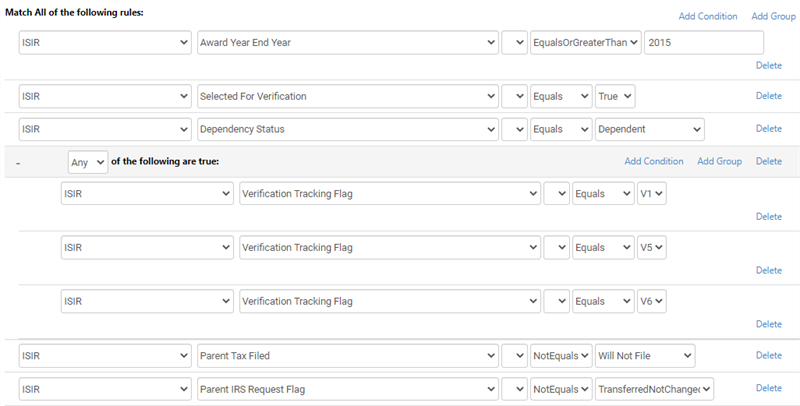
In the Match All of the following rules section, select appropriate values from the drop-down lists. The fields and values displayed in this section are dependent on the selection in the rule basis field on the left.
-
Select Add Condition to build conditions for the given rule. Each selection has additional rule criteria that must be completed to build a complete rule.
-
Select Add Group to build groups for the given rule. To begin building a group, select one of the following:
- All
- Any
- None

-
Select Delete to remove a condition or rule.
-
-
After successful configuration of the rule on the Rule Management page, select the Save button.
-
Select Return to Details to go back to the Required Document Details page.
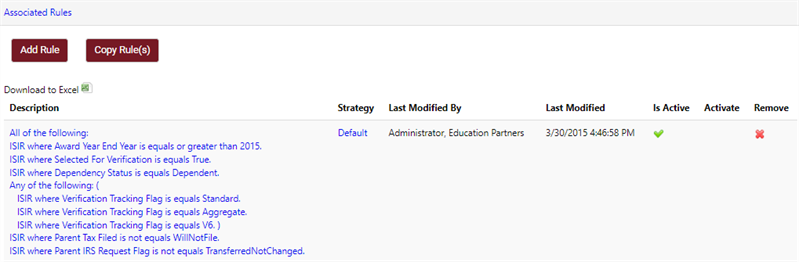
The newly associated rule will be listed in the Associated Rules section.
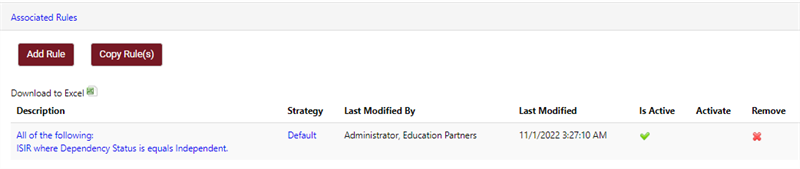
You have the option to download an Excel (![]() ) file of the associated rules.
) file of the associated rules.
Users with appropriate permissions can remove (![]() ) associated rules from the requirement. Users may also activate rules from this area.
) associated rules from the requirement. Users may also activate rules from this area.
Activate or Deactivate a Rule
-
Select the Name of the requirement, expand the Associated Rules section.
-
To activate an associated rule, select the (
 ) icon in the Activate column and select Confirm on the Activate Rule modal.
The rule will now have a (
 ) icon in the Is Active column.
 -
To deactivate an associated rule, select the link on the Strategy field.
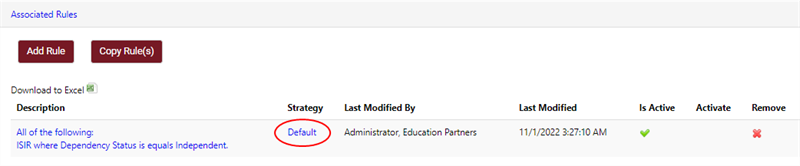
On the Rule Management page, clear the Is Active check box and select Save.
-
Select Return to Details to view the status change.
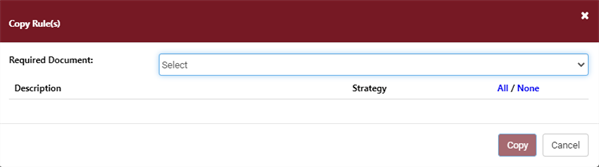
Copy a Rule
The Copy Rule functionality allows schools to copy a rule associated with a different document to then be saved and/or edited with a new associated document. This prevents schools from creating each rule from scratch and can save time with rules administrations. Some examples of when this feature may be used are described below.
Example 1: A client has rules set up for Employer Tuition Assistance Documentation. The user would like to trigger another document with the same rule. For instance, Pay Stub. When the client creates an Associated Rule for Passport, they should be able to search for and select the Birth Certificate associated rule and have it copied over to Passport. From there, they may save the copied rule as is, or choose to edit it.
Example 2: Anthology Inc. has an out of the box rule, but the client handles it a little differently. They would like to just slightly change the EP rule to fit their needs without having to build their own rule from scratch. They should be able to add an associated rule and copy over EP's existing document rule.
The Copy Rule option is found in the Associated Rules section of the Required Document Details page.
-
Select Copy Rule.
-
In the Copy Rule(s) modal, select a Required Document.
Note: Only required documents that have rules defined are shown.
-
When a required document is chosen, the corresponding rule(s) which have rule conditions defined are shown (rules without rule conditions are not shown). Select the All/None check box for the rules to be copied.
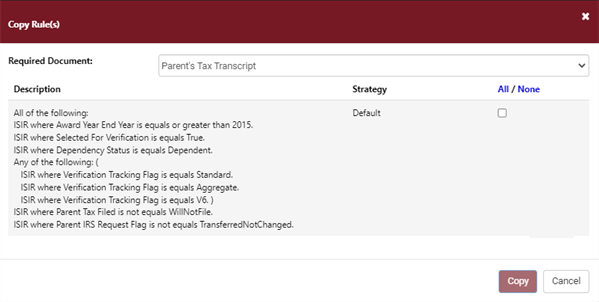
-
The selected rule(s) will be displayed under Associated Rules. From here, the rule can be edited and/or activated.
-
To edit the rule, select the Description text. You can add or edit conditions. Once completed, select Save.
-
To activate the rule, select the
icon under Activate. Then confirm activation.