Documents
Users with the required permission can navigate to the Administrators site section and select Document Administration > Documents to open the Document Management page.
Required Permissions:
-
System: Can Edit Document Types
-
System: Can Manage Form Documents
The Document Management page provides options to add documents, search for existing documents, and view a list of all documents meeting search criteria.
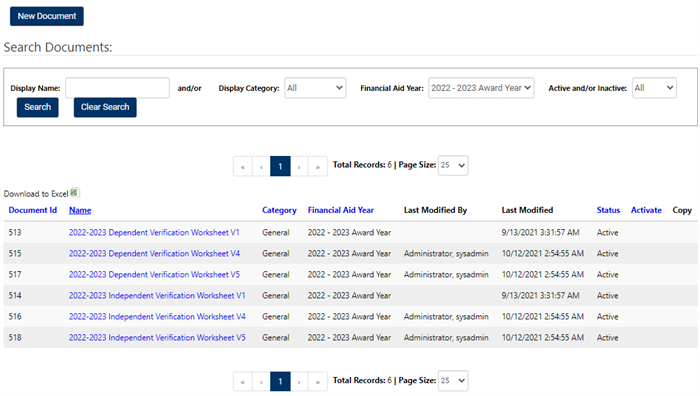
Search Documents
You can filter the list of documents using the options located at the top of the page. For example, to locate an existing document:
-
Enter text in the Display Name field or select a document category in the Display Category drop-down.
-
Select a Financial Aid Year if applicable.
-
Select the Search button to apply the filter to the document list.

When the Active Documents drop-down is selected, the list displays only active documents.
-
To return to an unfiltered list, select the Clear Search button.
New Document
-
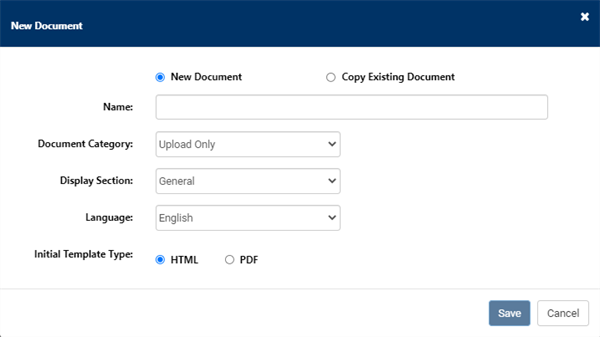
To create a new document, select New Document at the top of the page.
-
This opens the New Document dialog, where you define the initial parameters of the new document.
Document Parameters
There are initial parameters that you specify when you create a new document item in the document library.
-
New Document - Select if the document creation is for a New Document
-
Copy Existing Document - Select if the new document creation will copy an existing document. The selection option shortens to Name and Document when this option is selected.
-
Name- Enter a name for the document. You can change this name for an existing document. New document versions inherit the current name.
-
Document Category - The document category determines how the document item is used and the merge fields that are available for creating document versions.
Important: The assigned category for the document item cannot be changed after creation.
-
Upload Only - Select this category for a document that must be uploaded by the student and is not provided as a form or template in the Student Portal.
Note: You would not select this category to create a document library item with an associated document version or a form document.
-
Student - Select this category for a document item to be presented in the Student Portal.
-
FP Verification - Select this category for a document item to be included in the FA Verification workflow.
-
-
Display Section - This section defines the placement of the document in the Student Portal and Associate Portal.
-
General - Select this option to display the document in the General section.
-
Enrollment - Select this option to display the document in the Enrollment section.
-
Financial Aid - Select this option to display the document in the FP (Financial Planning) RDL (Required Documents List). This is appropriate for documents that satisfy a requirement in financial planning.
-
E-Form - Select this option to display the document as an electronic form entry. This is appropriate for documents that capture data that is not already recorded in the system or documents that are not part of the enrollment process or the FP RDL (on-demand e-forms). E-Forms can be added to the Enrollment process and the FP RDL.
-
-
Language - Set this to change the language for the document. The default is English. Your options depend on the supported languages configuration for your system.
-
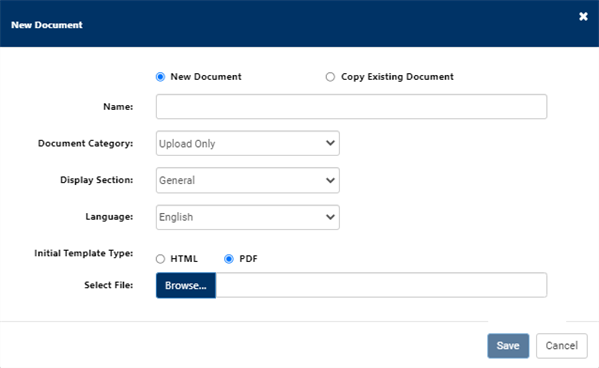
Initial Template Type - Specify the initial document version as an HTML or PDF document.
If you select PDF, select Browse and navigate to the PDF file you want to upload.
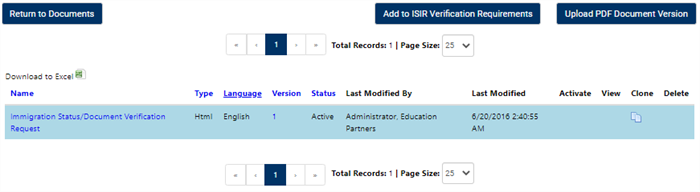
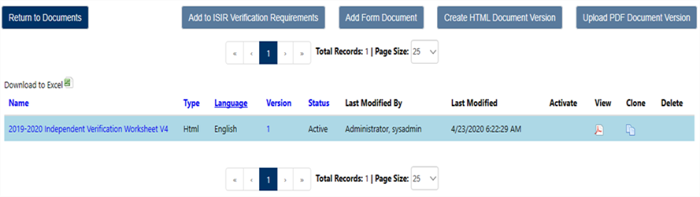
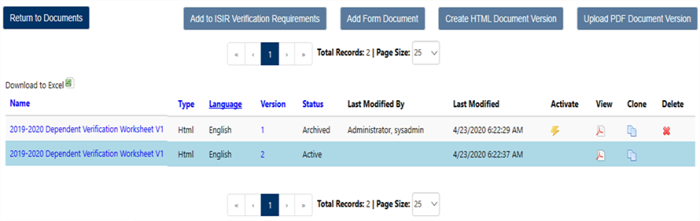
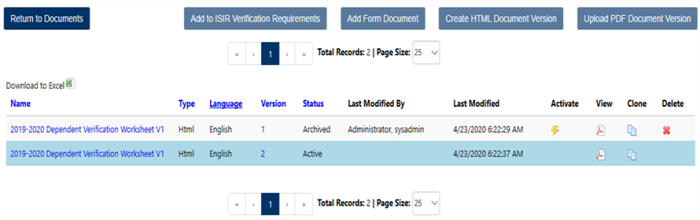
The administrator can view a grid with documents in the "Upload only" document category. The Upload PDF Document Version button is available to upload a new version of a PDF. The administrator can also activate, view, and delete versions of documents. Active versions will be downloaded at Student portal.
-
-
Select Save to add the new document.
Define a New Document
After document item creation, you can define additional parameters for the new document:
-
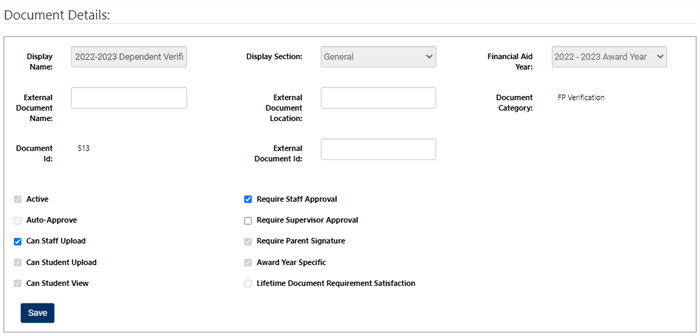
On the Document Details page, select appropriate options to specify more detailed parameters for the document and to construct the content for the document.
-
Active - When selected, the document is activated for use. For a Financial Aid, Verification, and General documents, an active document is triggered for a Required Documents List (RDL) based on the ISIR Verification Rules configuration.
Important: As a best practice, do not select the Active option until your document setup and configuration is complete and ready for implementation within the verification workflow.
-
External Document Identification Number, Name, and Location
You can specify values for the document naming convention (file name and location) that is used for transmission to external document management systems (such as SchoolDocs and ImageNow) for verification documents. If you do not have an integration with an external document system, you do not need to specify the External Document Name or the External Document Location fields. Please be sure to list the External Document Id for Anthology Student integration or external document systems.
-
Document Approval Options - The approval options work in combination to manage approvals for the document:
-
Select Requires Staff Approval to require a staff user with approval permissions to approve the document after it is submitted/signed in the RDL.
-
Select Requires Supervisor Approval to require a staff user with supervisory approval permissions to approve the document after it is submitted/signed in the RDL and approved by the first level staff user.
-
Select Auto Approve to activate automatic approvals.
-
If the document requires staff approval, the staff’s approval status is automatically set to approved.
-
If the document requires supervisor approval, the supervisor’s approval status is automatically set to approved.
-
If the document does not require staff approval or supervisor approval, the status is marked as Not Required (N/A on the RDL).
-
-
-
View and Upload Options
If the document is something that can or must be produced by another source and uploaded, you can select the Can Staff Upload and Can Student Upload check boxes. Additionally, select the Can Student View option to enable document view in the Student Portal. Select Save to capture your changes to the document parameters.
-
Document Specific Requirements
Submit a Support Request to select Require Parent Signature to require parent notification and signature for completion of the form. Once Support updates the setting, a check mark will appear in the box.
For documents using the FP Verification categories, you can set options for award years. If the document applies to a specific financial aid award year, select the Award Year Specific check box. This activates the Financial Aid Year option at the top of the page. Use this option to select the award year for the document.

-
Select Lifetime Document Requirement Satisfaction to require the document only once. The document will be used to clear future requirements over multiple award year.
-
-
Select Save to capture your changes to the document parameters.
Create an HTML Document Version
To create an HTML version of the document:
-
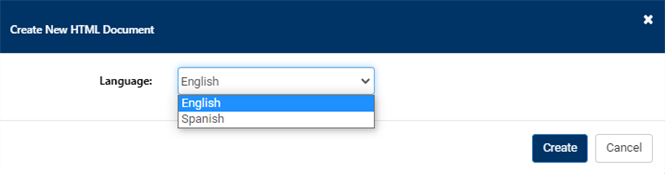
Select Create HTML Document Version in the lower-right corner of the page.
-
In the Create New HTML Document dialog, select the Language and select Create.
-
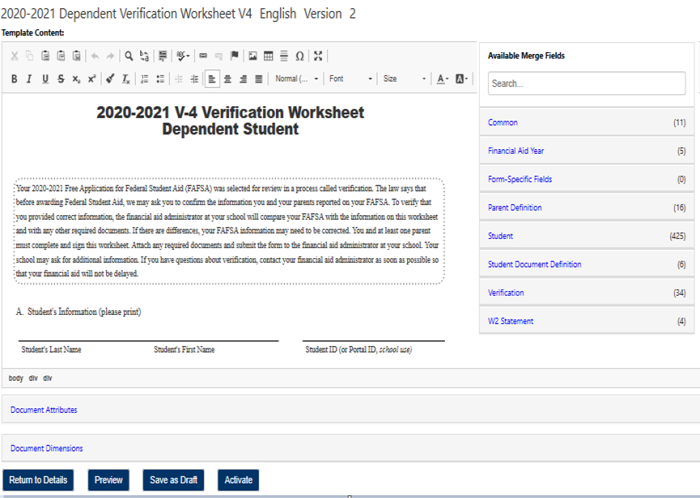
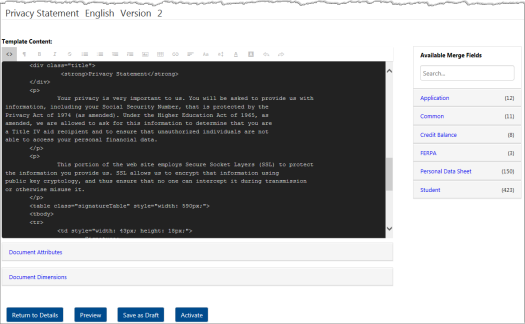
The Add Document Version page opens and provides a text editor where you can make your revisions. You can simply begin typing in the Template Content space, copy/paste your content into the space, and drag/drop items from the Available merge Fields list.
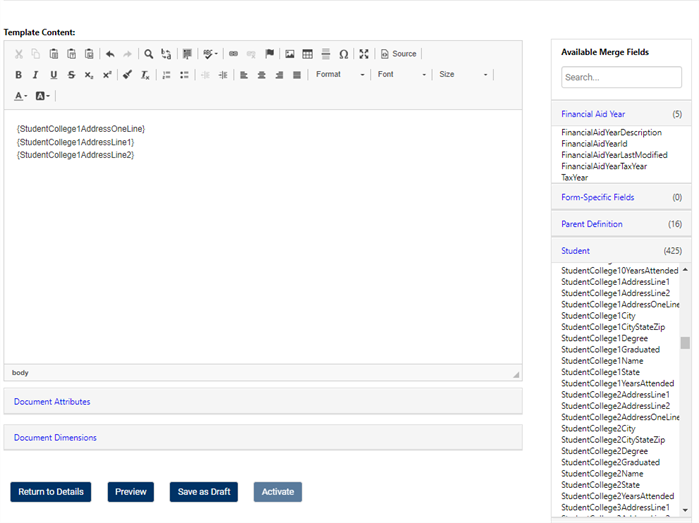
-
Select Preview to review your changes and select Save as Draft to keep your changes.
- Select Return to Details to return to the Document Detail page.
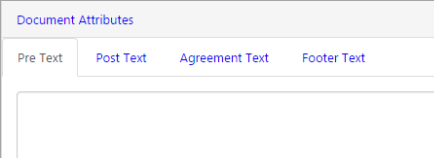
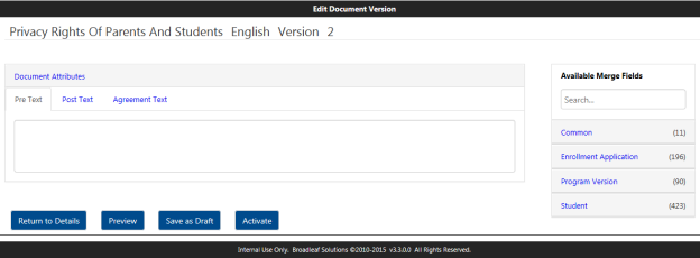
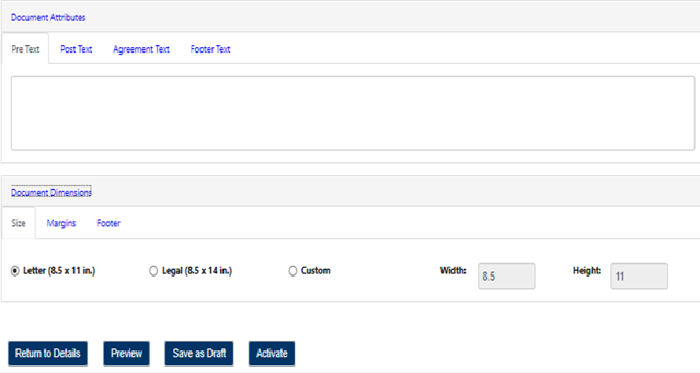
Document Attributes
The Document Attributes functionality is available for the user to enter the text to be presented prior or post completion of the document. You can also specify Agreement Text and Footer Text to support the presentation of the document.
-
Pre Text – Is present above the document.
-
Post Text – Is presented below the document.
-
Agreement Text – Is presented as an add-on to the document to ask for a student's agreement on the document. For example, you might specify the following agreement text: By electronically signing this document you agree to the terms of the document.
-
Footer Text - Is presented in the footer section of the document.
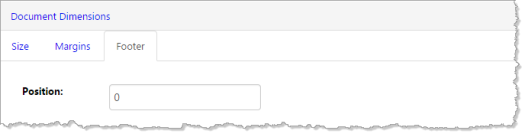
Document Dimensions
Use the Document Dimensions feature to change the size, margin, and footer of the new or existing document.
Size

Margins

Footer
Upload a PDF Document Version
You can also upload a PDF version of the new document for additional revisions.
-
Select Upload PDF Document Version at the bottom-right corner of the page.

-
In the Upload PDF dialog, select Browse and select the PDF file for upload. Select the Language (if needed) and select Upload.
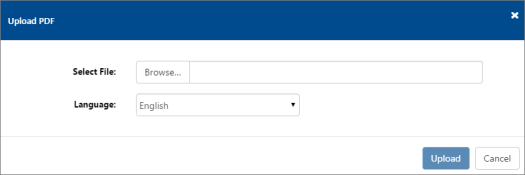
Important: You do not have the option to revise the template content after upload. The PDF document should have the merge fields configured prior to upload. For more information, see Edit an Existing PDF.
The same Document Attributes are supported for the uploaded PDF document version as the HTML document version (see Document Attributes).
-
Select the Preview button to view the document.
-
The system produces a download of the PDF file for your review. After review, you can choose to Save as a Draft or Activate the document for use in the portal.
Edit an Existing Document
-
After locating the document in the Documents list, select the name (displayed in blue) to select the document.
The portal displays document details and selections. The information indicates if the document exists as a PDF or HTML, and this will determine how to best edit the document.
-
Edit the existing Document Details section as needed.
-
Select Save. This saves any edits to the existing information. For more information, see Define a New Document.
Edit an Existing PDF
You cannot edit the uploaded PDF file within the portal. However,
-
You can view and edit the source file (such as a Word document), save it as a new PDF file, and then upload that revised file as a new PDF Document Version in the portal.
— Or —
- If you have a licensed copy of the Adobe Acrobat Pro software, you can download the current PDF from the portal, make revisions, and then upload that revised file as a new PDF Document Version in the portal.
Revisions in the PDF can include the supported merge fields. You can copy the available merge field values in the Document Version Edit page and add them in the revised PDF as text form fields.
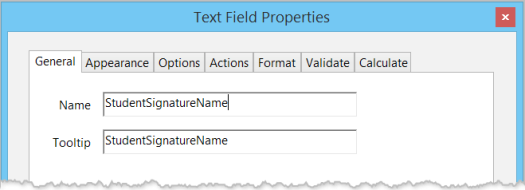
Important: The Name in the Text Field Properties must be an exact match to the available merge filed in the portal, including capitalization. However, you can define and edit the Document Attributes directly in the portal. The Document Attributes can also include the available merge fields (also known as STL document stamps)
-
To begin the editing workflow for an existing PDF document, select the
 icon in the View column.
 This downloads the PDF file to your local system for display, including any form fields. You can make edits directly in the PDF.
Important: If your PDF document originated from a Word document and you want to create a new PDF from an updated version of that document, you can simply save the updated document as a PDF. If there are any existing merge fields defined for the active version, you can view the current and updated PDF files in Acrobat Pro and copy the fields to the new document rather than creating new fields.
-
When your edits are complete, select Upload PDF Document Version to upload the new version into the portal.
-
When the upload is complete, the portal directs you to edit your document version. Here you can edit any Pre Text, Post Text, or Agreement Text fields.
You can view the existing document version to determine if these text fields are used. If they are used in the previous version, they will also need to be included on the new version as well, unless they are removed.
Available Merge Fields will not be used for PDFs on this screen, as the merge fields should be complete when the new version is uploaded.
-
You can preview the new version, save it as a draft, or activate it. When the new document version is saved as a draft or activated, it is displayed in the Details page.
Select Return to Details.
-
You can activate or delete the draft from this page by selecting the icons in the Activate and Delete columns.
-
Activating the new version makes it available in the portal in place of the previous document to be completed by portal users.
-
Once a document version has be used by a student, it cannot be Deleted, it can be cloned, and a new version can be created.
-
Edit an Existing HTML Document
You can edit an HTML document directly in the portal. The existing version can be viewed, cloned to create a cloned document to edit for the new version, and then saved. Additionally, you can copy and paste HTML from another source into the portal to save the content as a new HTML version.
-
To begin editing an existing HTML version, select the
 icon in the Clone column.
 This copies the existing document and opens the copy in the Document Version page, where you can edit the existing content on screen, drag additional merge fields, and preview the result as needed.
-
To view the document as raw HTML, select the < > icon on the Template Content toolbar. You can edit the content in this mode if you prefer.
-
At the bottom of the page, you can view and edit the Document Attributes and Document Dimensions for the HTML document version.
-
You can preview the new version, save it as a draft, or activate it.
-
When the new document version is saved as a draft or activated, it is displayed in the Details page (select Return to Details).
-
If the document version is saved as a draft, the status is Pending and you can make additional edits by selecting the document name.

-
-
You can activate or delete the draft from the Details page by selecting the icons in the Activate and Delete columns.
Activating the new version makes it available in the Student Portal in place of the previous document to be completed by student users.