Configurations to Send Emails From the Portal
The topics in this section describe the configurations that must be performed on Sitefinity for sending emails using Google or Outlook account from the Portal.
Configurations for Sending Emails from a Google Account
Prerequisite
-
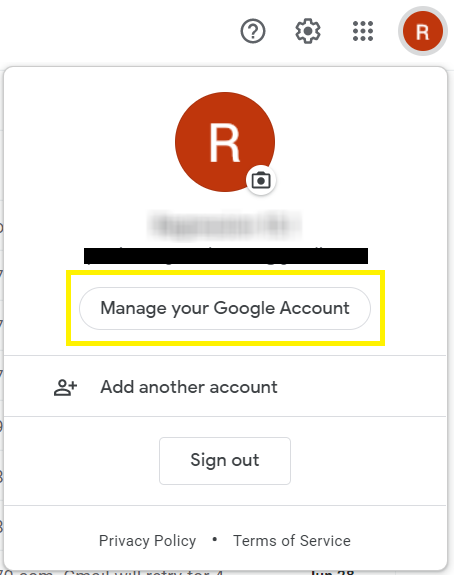
Log in to the Google account, and go to the Manage your Google Account Setting.
-
In the Settings > Security > locate 2-Step Verification.
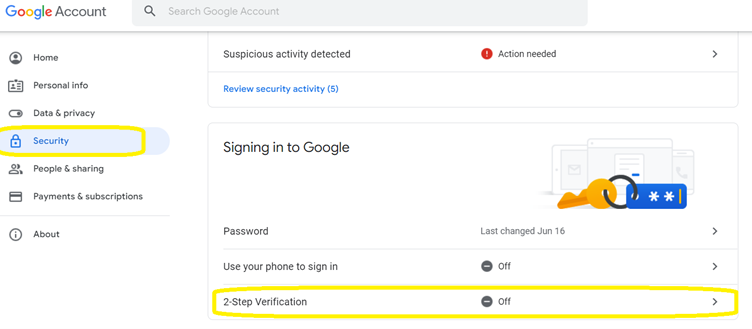
-
Click > and in the next page click the Get Started button.
-
In next page provide the phone number and select Text or Phone.
-
You will be prompted to provide an OTP. Enter the OTP provided by Google.
The 2-step verification is completed.
-
Navigate to the previous page by clicking the back button on the browser and click Settings > Security.
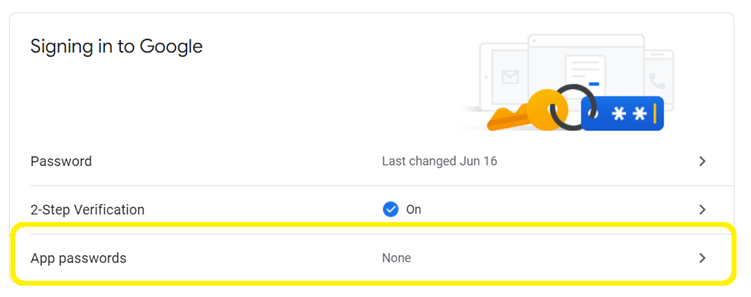
-
On the App passwords option click > and perform the following steps:
-
In the App passwords page, in the Select app field, select Other (Custom name).

-
Specify a name for the application and click Generate.
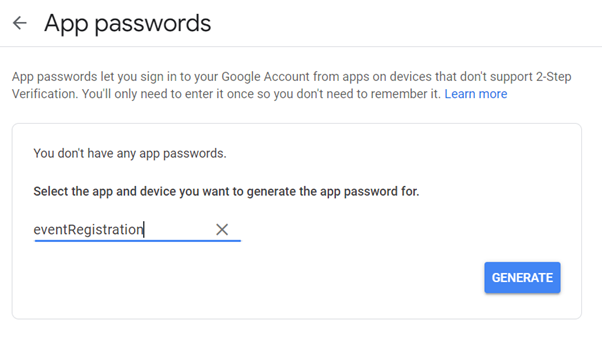
-
Copy the app password that is generated for reference.
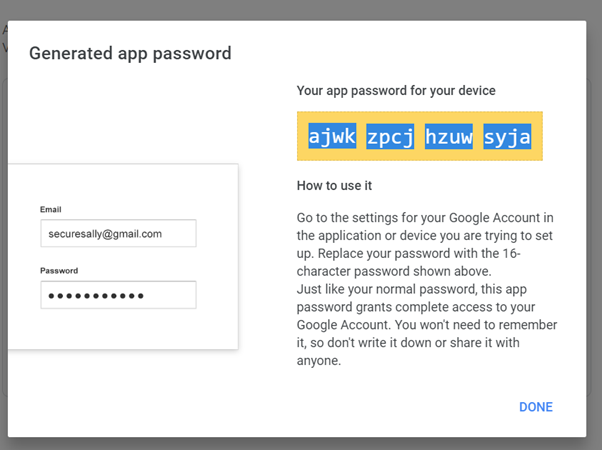
-
Click DONE.
-
Update the Email Settings on Sitefinity for Gmail
-
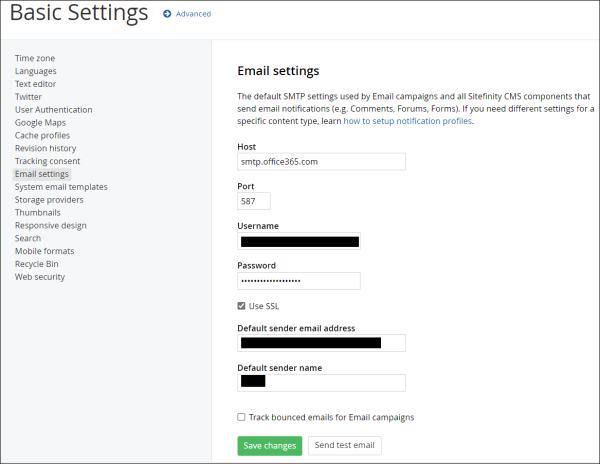
Launch the Sitefinity URL, and navigate to Administrators > Settings to view the Basic Settings.
-
Click Email Settings to view the Email settings page and update the field values for Gmail. For details, see the Sitefinity Documentation.
Note: In the password field, specify the App password for the Gmail account.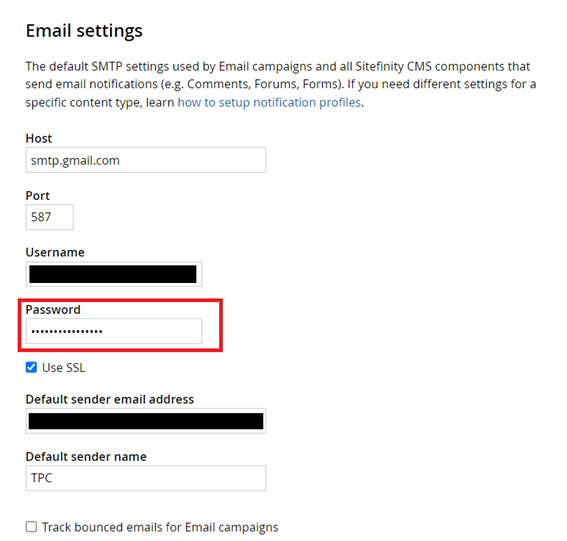
Configurations for Sending Emails from a Microsoft Outlook Account
The following configurations must be performed to enable sending emails from a Microsoft Outlook account using the OAUTH2 authentication:
Prerequisite
-
Using administrator credentials, login to https://entra.microsoft.com/.
-
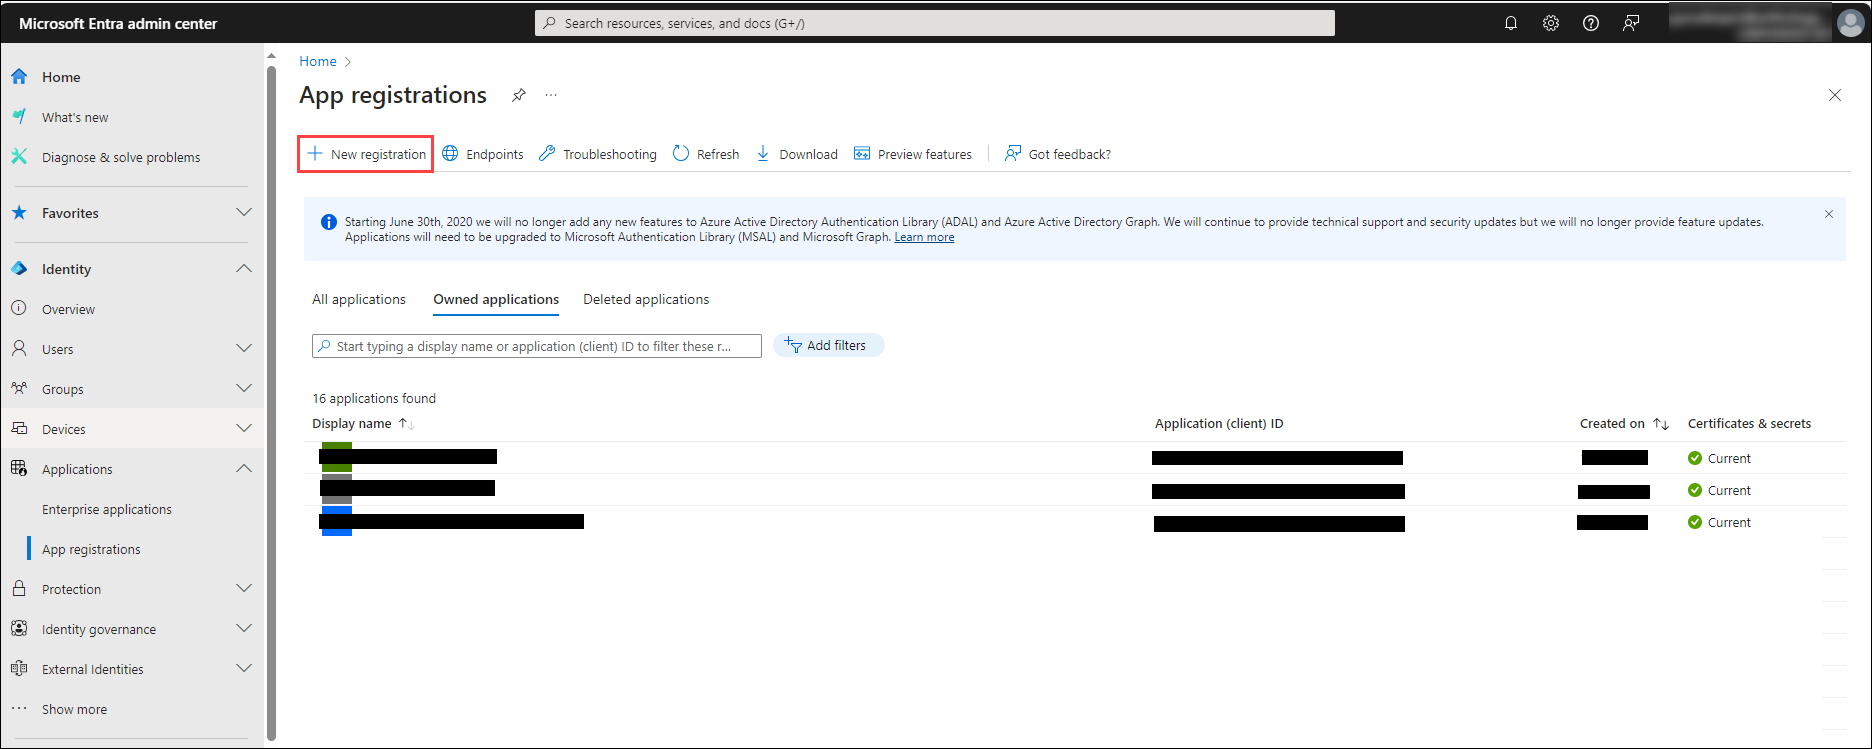
Navigate to Applications > App Registrations, and click New Registration.
-
In the Name field, enter a name for the application, for example - EngageApp, and click Register.
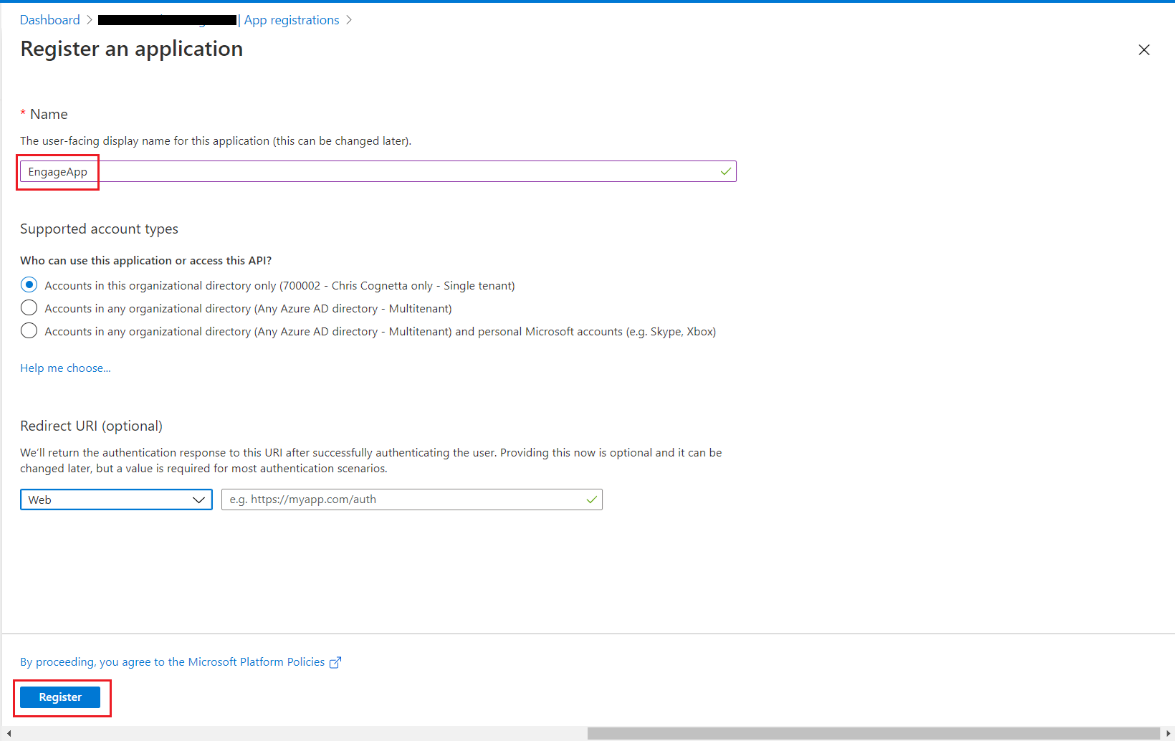
The EngageApp application is registered.
-
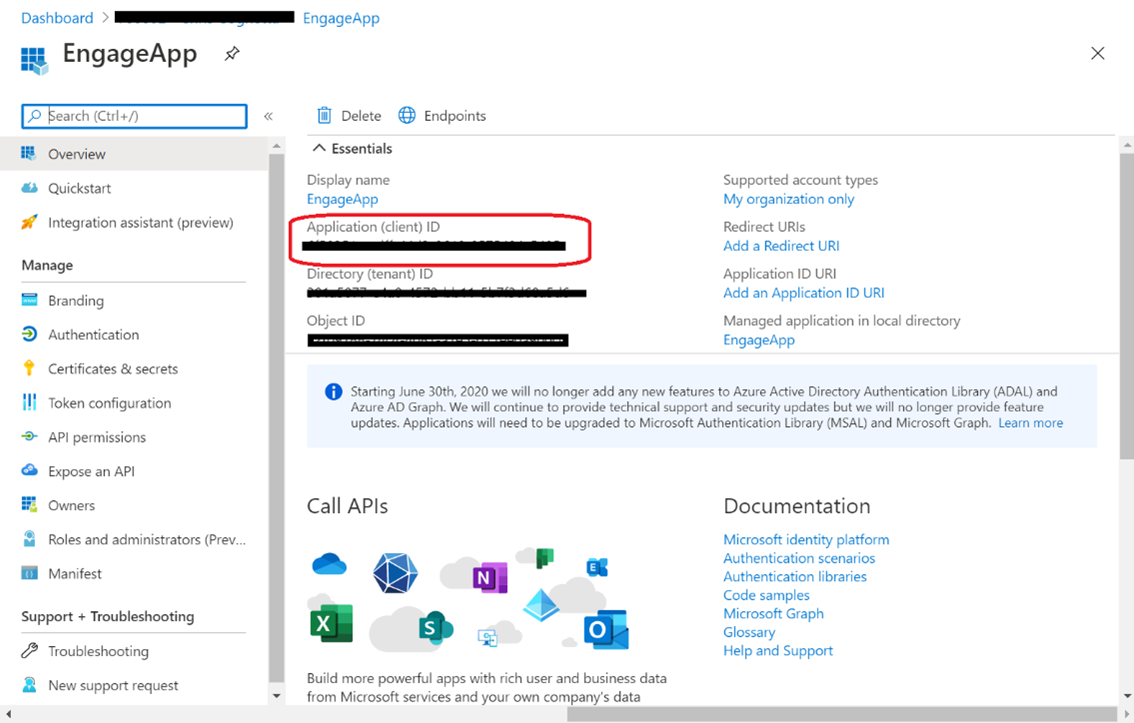
Make a note of the Application (client)ID.
-
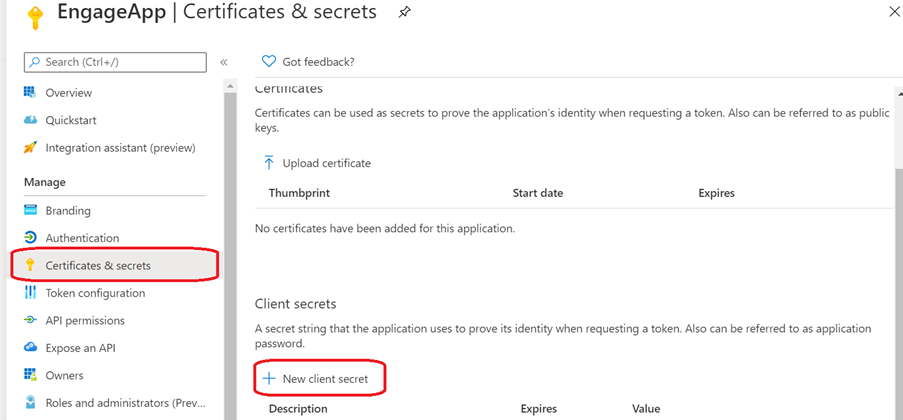
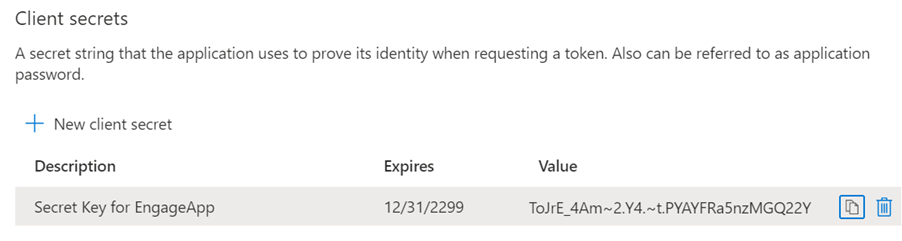
Click Certificates & secrets > New Client secret.
-
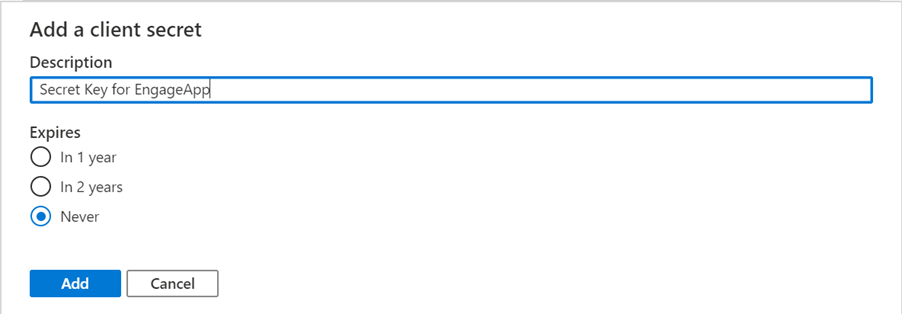
In the Add a client secret page, specify a description and select a duration for the client secret, and click Add.
-
Copy the Client secrets that is displayed and save it for later.
-
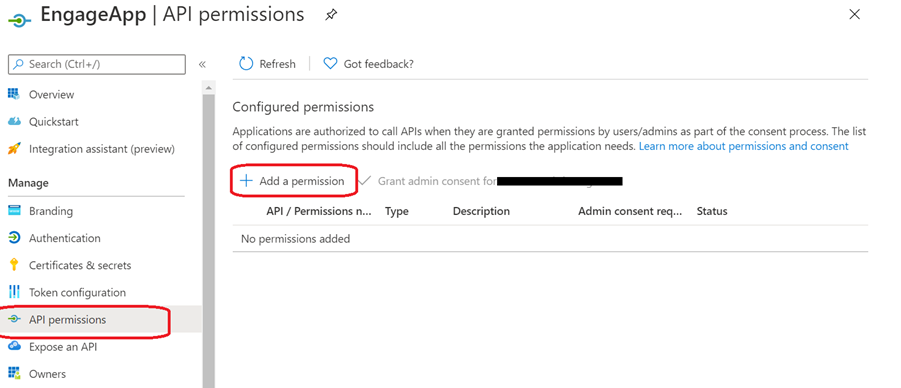
Navigate to the application page, click API permissions and click Add a permission.
-
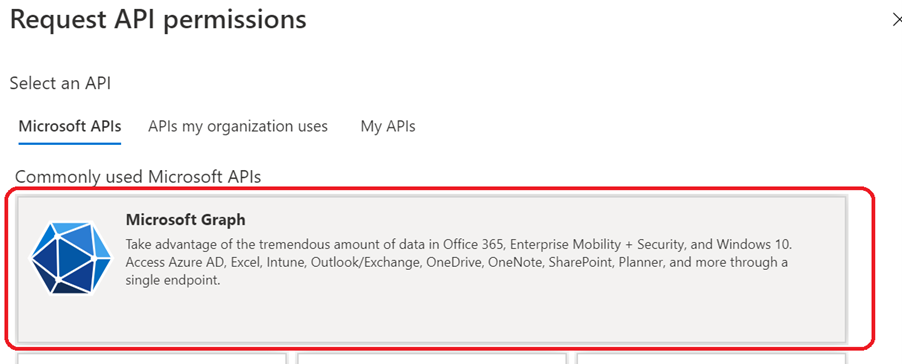
Under the Microsoft APIs tab, select Microsoft Graph.
-
To use the Microsoft Graph APIs for authentication, perform the following steps:
-
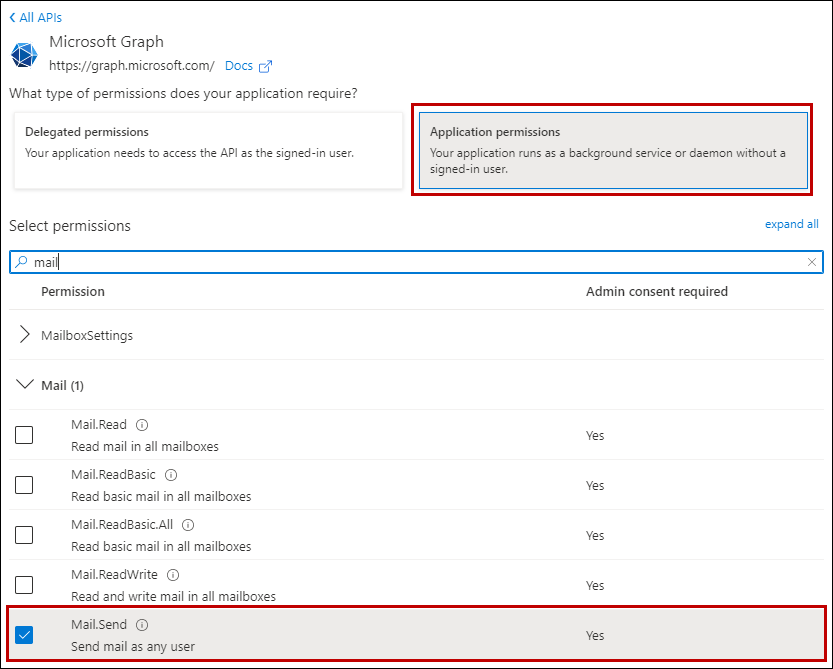
Select Application permissions > Mail.Send permission, and then click Add permissions.
-
Click Grant admin consent for <application> option to grant the required permissions.
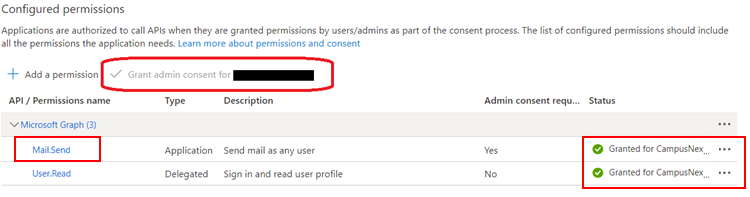
-
-
To use outlook APIs for authentication, perform the following steps:
-
Select Delegate permissions > SMTP.Send, offline_access, openid, and User.Read permissions, and click Add permissions.
-
Click Grant admin consent for application option to grant the required permissions.
-
-
Navigate to the Application registration page of the EngageApp on the Azure Portal.
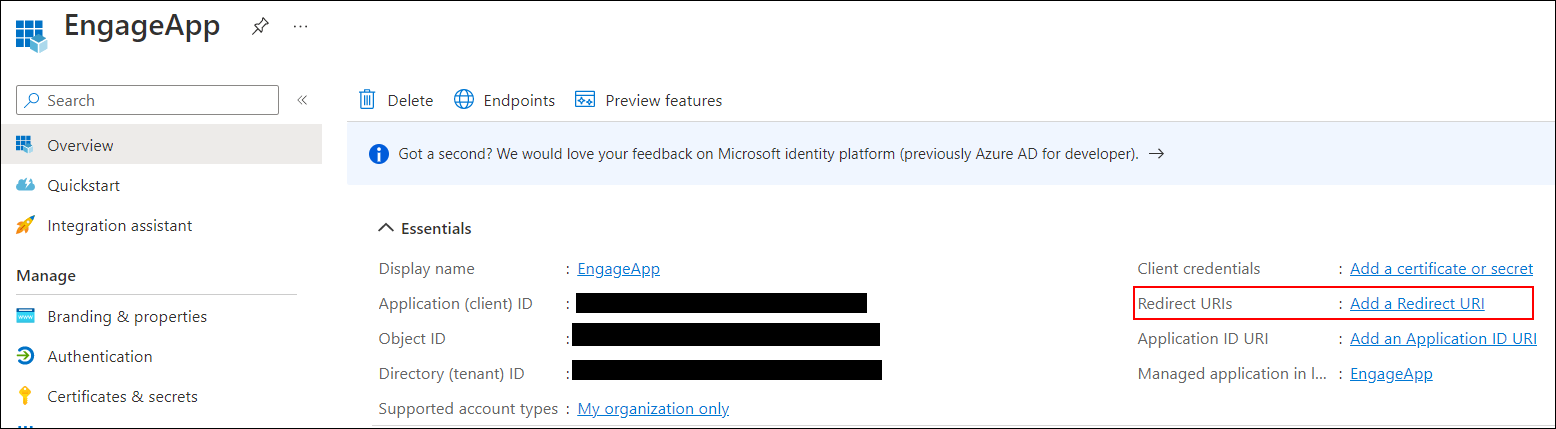
-
In the Redirect URIs field, click Add a Redirect URI.
Note: The Redirect URI is required for authenticating the outlook email account when the Authorization_code option is configured on the Sitefinity settings. For details, see Configure the OauthEmailSender Settings on Sitefinity.
-
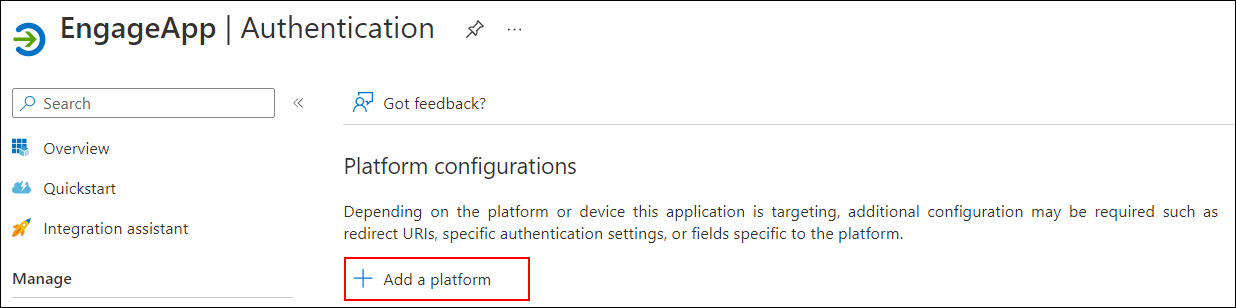
In the Platform configurations section, click Add a platform.
-
In the Configure platforms page, click the Web tile.
-
In the Configure Web page, specify the URL for authentication in the following format after replacing the Portal URL text with the actual Portal URL:
https://Portal URL/smtpSetup
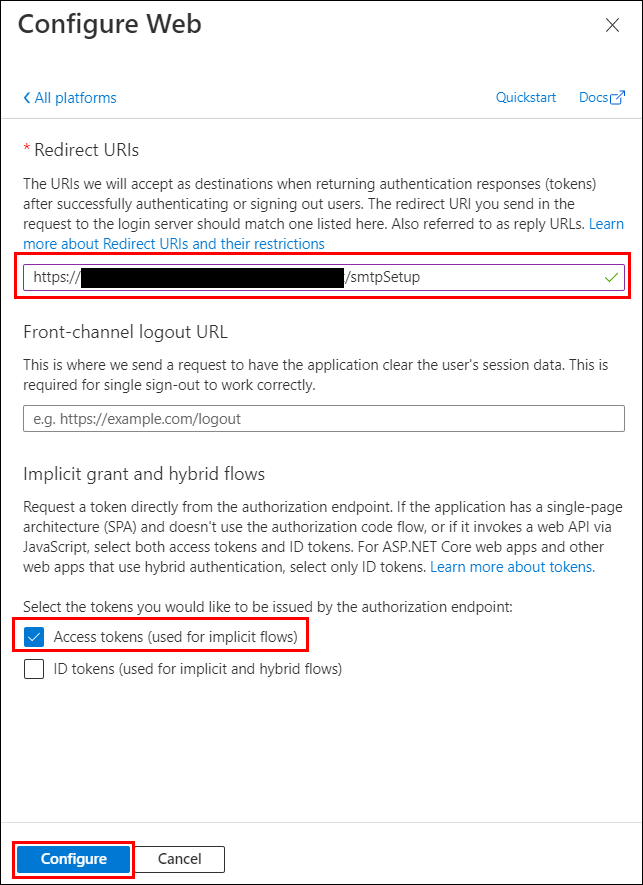
-
Select the Access Tokens (used for implicit flows) check box.
-
Click Configure.
-
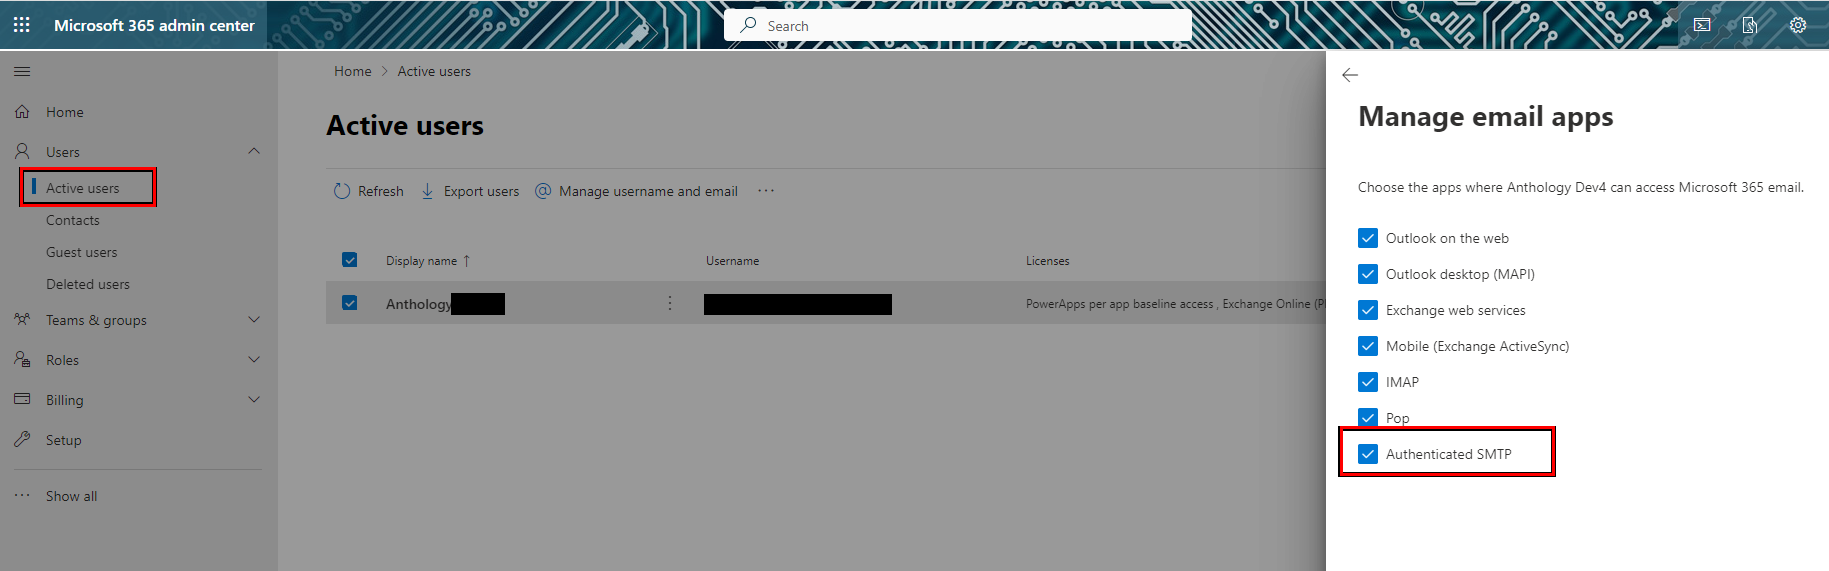
Login to the Microsoft 365 admin center (admin.microsoft.com) using the outlook user account that will be used for sending emails from the Portal.
-
On the left pane, click Users > Active users.
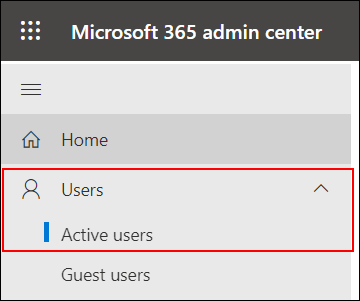
-
Click on the display name of the outlook user account to view a pop-up dialog box on the right.
-
In the dialog box, click the Mail tab.
-
In the Manage email apps dialog, select the Authenticated SMTP check box.
Configure the OauthEmailSender Settings on Sitefinity
The configurations on the OauthEmailSender page on Sitefinity is used to authenticate and send emails from the outlook email account using the OAuth2 authentication protocol.
-
Open the Sitefinity URL and go to the Advanced Settings page (under Administrations > Settings > Advanced).
-
Click the OauthEmailSender setting to view the OauthEmailSender page.
-
In the Authentication Flow field, select one of the following values:
-
Authorization_code - When this option is selected, the outlook API and permissions are used to authenticate and send emails from the outlook user account. The authorization code needs to be generated to complete the configuration.
-
Client credentials - When this option is selected, the Microsoft Graph API and permissions are used to authentication and send email from the outlook user account
 Configurations for the 'Authorization_code' Authentication Flow
When Authorization_code is selected in the Authentication Flow field, specify values in the following fields:
-
Client Id - Specify the Client ID of the application registered on the Azure portal.
-
Client Secret - Enter the Client Secret value of the application registered on the Azure portal.
-
Tenant Id - Specify the Tenant ID specified for the application registered on the Azure portal. It is the portal URL.
-
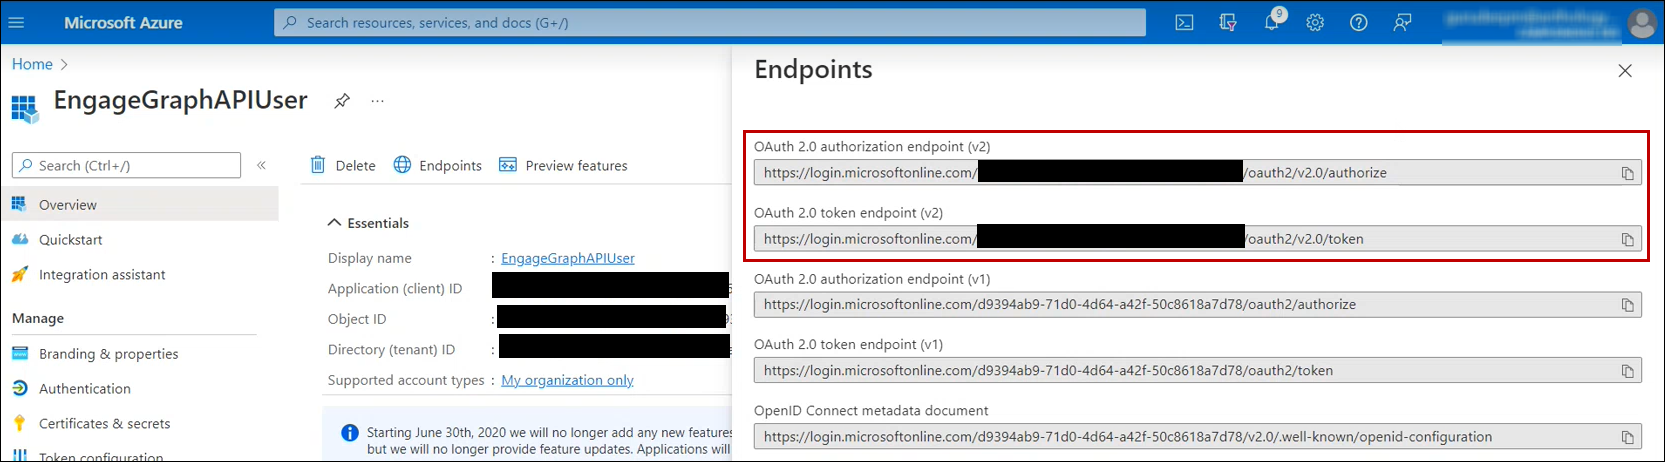
Authorization Endpoint - Specify the value of the OAuth 2.0 authorization endpoint (v2) field associated with the application registered on the Azure Portal.
-
Authorization Code - Do not edit this field. It will be automatically populated through user authorization by going to {protalurl}/smptAuthorize. See step k for instructions.
-
Token Endpoint - Specify the value of the OAuth 2.0 token endpoint (v2) field associated with the application registered on the Azure Portal.
-
Authorization Scope - This field is pre-filled with the value, openid offline_access https://outlook.office.com/.default. Do not edit this field.
-
Token Scope - This field is pre-filled with the value, https://outlook.office.com/.default. Do not edit this field.
-
Last Token - This field is automatically populated and is used to cache the last token. Do not edit this field.
-
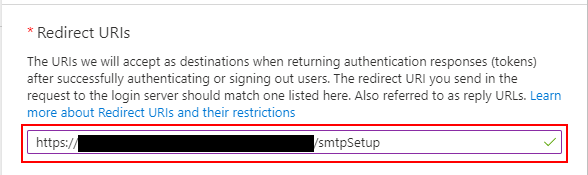
Redirect Uri - Specify the Redirect URI added to the application registered on Azure portal. For details, see the Register an Application on Azure Portal in the prerequisite section above.
The format of the redirect URI will be as follows, where the Portal URL is the actual Portal URL:
https://Portal URL/smtpSetup
Example: If the Portal URL is https://ExamplePortalURL.com, the Redirect URI will be as follows:
https://ExamplePortalURL.com/smtpSetup
-
In another browser tab, type the following URL after replacing the Portal URL placeholder text with the actual Portal URL and press the Enter key to generate the Authentication code:
https://Portal URL/smtpAuthorize
You will be prompted to enter credentials, enter credentials of the user setup to send email and continue.
The authentication code is generated and it will be added in the Authentication code field on the OauthEmailSender settings page.
Note: If an error occurs while generating the Authentication code, navigate to the OauthEmailSender page and in the Authentication Scope field replace https://outlook.office.com/.default withhttps://outlook.office.com/SMTP.Send and try again.
Configurations for the 'Client credentials' Authentication Flow
When Client credentials is selected in the Authentication Flow field, specify values in the following fields:
-
Client Id - Specify the Client ID of the application registered on the Azure portal.
-
Client Secret - Enter the Client Secret value of the application registered on the Azure portal.
-
Tenant Id - Specify the Tenant ID specified for the application registered on the Azure portal. It is the portal URL.
-
Token Endpoint - Specify the value of the OAuth 2.0 token endpoint (v2) field associated with the application registered on the Azure Portal.
-
Token Scope - Specify the URL of the graph API as follows:
https://graph.microsoft.com/.default
Note: The Authorization Endpoint, Authorization Code, Authorization Scope, Last Token, Redirect Uri fields need not be edited for the Client credentials Authentication Flow.
-
-
Click the Save Changes button.
Configure a Custom Profile for Sending Email Notifications
-
Navigate to the Sitefinity Advanced Settings page.
-
Click Notifications > Profiles.
-
In the Profiles page, click the Create new button and select SMTPProfileSenderElements.
-
In the Profiles page, specify the following field values:
Note: Fields from the Profiles page that are not listed below need not be configured and can be skipped.-
DefaultSenderEmailAddress - Specify the sender email address.
-
DefaultSenderName - Specify the sender name for the email.
-
Host - Specify one of the following values depending on the type of Authentication Flow configured:
-
smtp.office365.com - For Authentication_code.
-
https://graph.microsoft.com/v1.0 - For Client credentials.
-
-
Port - Specify 587.
-
UseAuthentication - Select this check box.
-
Username - Specify the username associated with the credentials.
-
Password - Specify the password for the username. This field should not be blank.
-
UseSSL - Select this check box.
-
ProfileName - Specify a custom name for the profile.
-
SenderType - Specify one of the following values depending on the type of Authentication Flow configured:
-
CmcEmailSender.OAuthMailSender - For Authentication_code.
-
CmcEmailSender.GraphApiEmailSender - For Client credentials.
-
-
ProfileType - smtp
-
-
Click the Save Changes button.
Update the Default Profile With the Custom Profile Name
-
Navigate to the Sitefinity Advanced Settings page.
-
Click Notifications > DefaultProfiles > smtp.
-
In the smtp page, in the ProfileName field specify the custom profile name.
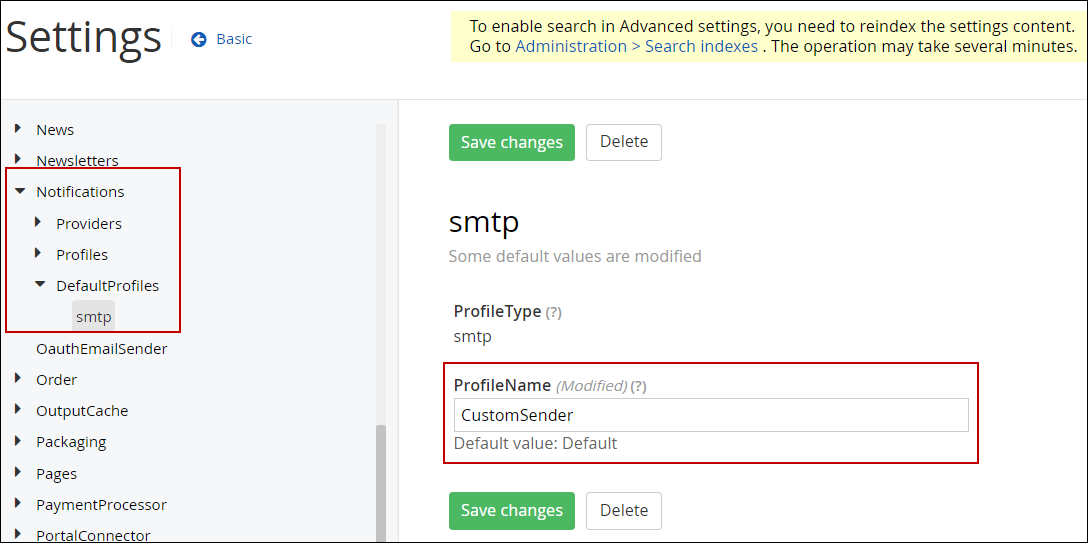
-
Click the Save Changes button.
Update the Sender profile Field in the Security Notifications Settings
In the Sender profile field (under Security > Notifications settings) specify the default profile name that is configured for the SMTPProfile type in the DefaultProfiles setting.
-
Open the Sitefinity URL and go to the Advanced Settings page (under Administrations > Settings > Advanced).
-
Click Security > Notifications.
-
In the Notifications page, in the Sender profile field, specify the sender profile name that is configured for the SMTP Profile type in the DefaultProfiles settings.

-
Click the Save changes button.
Configuring Email Address for Sending Confirmation and Successful Registration Emails
To configure the sender's email address to send the confirmation and successful registration emails to portal users, the following two security parameters must be configured in the Sitefinity Advanced Settings page:
-
confirmationEmailAddress
-
successfulRegistrationEmailAddress
To configure the parameters, perform the following steps:
-
Navigate to the Sitefinity Advanced Settings page.
-
Click Security > Membership Providers > Default > Parameters.
-
On the Parameters page, click Create New.
-
Specify values in the following fields for the new parameter:
-
In the Key field, specify confirmationEmailAddress, for sending the confirmation email.
-
In the Value field, specify the email address that is configured in the Username field in the Email Settings page.
-
-
Click the Save changes button.
-
Repeat steps 3 to 5 to add the successfulRegistrationEmailAddress parameter.