Register Students into a Course
This workflow finds students with a status of 'Future Start' and registers the students into an introductory course when their status changes.
-
Start the Workflow application from your desktop.
-
On the Home tab, click New Event Workflow.
-
In the Entities area:
-
Click
 next to Cmc.Nexus.Contracts.
 -
Click
 next to Cmc.Nexus.Sis.Academics.
 -
Click Student Enrollment Period (StudentEnrollmentPeriod).
-
-
In the Events area, click Saved (SavedEvent).
-
Specify a Name for the workflow and click OK.
-
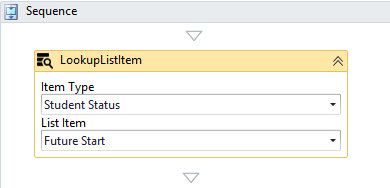
Drag a LookupListItem activity it into the sequence.
-
In the Item Type field, select Student Status.
-
In the List Item field, select Future Start.
-
In the Variables pane, create a lookup type variable (StudentStatus) to contain the results of the lookup.

-
-
Drag an If activity into the sequence.
-
In the Condition field, specify the following expression:
entity.HasChanged(StudentEnrollmentPeriod.StudentStatusIdProperty) and entity.StudentStatusId.Value() = StudentStatus.Id
-
-
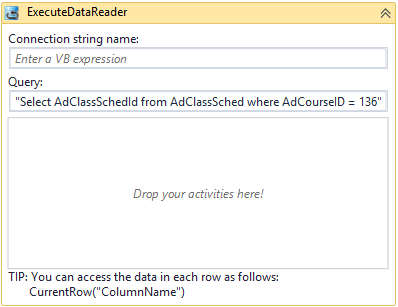
Drag an ExecuteDataReader activity into the Then branch of the If condition.
-
In the Queryfield, specify the following string:
"Select AdClassSchedId from AdClassSched where AdCourseID = 136"

-
-
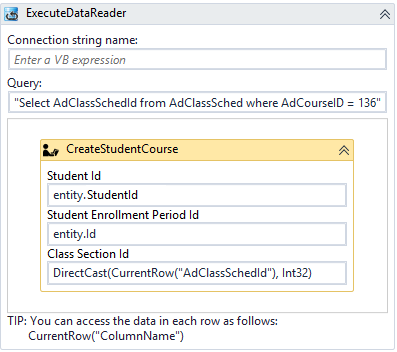
Drop a CreateStudentCourse activity into the ExecuteDataReader activity.
-
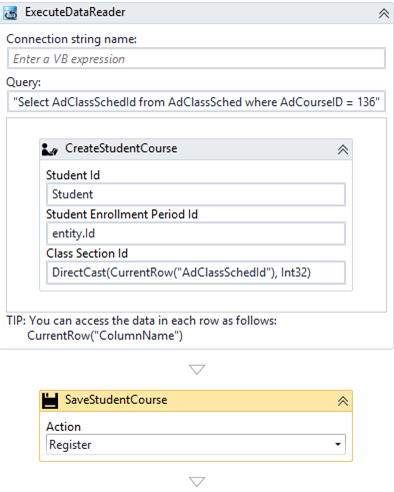
In the Student Id field, specify Student.
-
In the Student Enrollment Period Id field, specify entity.Id.
-
In the Class Section Id field, specify DirectCast(CurrentRow("AdClassSchedId"), Int32).
-
In the Variables pane, create a variable to hold the Course object that you are creating and enter the variable name in the Properties pane for this activity.

-
-
Drag a SaveStudentCourse activity into the sequence below the ExecuteDataReader activity.
-
In the Action field, select Register.
-
Enter the variable that holds the Course object that you are creating in the Properties pane for this activity.

-
-
Check your workflow. Scroll through the workflow or use the fit to screen button located at the bottom of the Designer pane to see the whole workflow based on your screen resolution.
-
Click Publish. The New Workflow Definition Version window is displayed.
-
If you want the workflow to be run as soon as the event occurs on the entity, select Enable This Workflow Version, otherwise leave the check box cleared.
-
Click Save, then Cancel to close the publisher window.