Configuration
| For details about the installation of Workflow Composer, please refer to Installation Manager Help. |
Once Workflow Composer 3.x is installed, you need to specify whether it accesses the databases via direct connections or via a Workflow Web API.
-
In an Anthology Cloud 2.0 environment, configure the Workflow Web API Connection. The Workflow Web API replaces the Citrix connections used previously in cloud environments.
-
In on-premise or Azure (non-Anthology Cloud 2.0) environments, configure Direct Database Connections.
The configuration needs to be done only once when Workflow Composer is installed the first time. The settings are retained during upgrades.
The System tab in the ribbon of Workflow Composer provides a Configuration option that enables you to change the initial configuration.
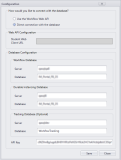
Direct Database Connections
If you are using Workflow Composer with on-premises databases connections:
-
Select Direct connection with the database.
-
Specify the server names and database names for your database connections.
-
The Workflow Database is the database that supplies values to your workflow activities. It can be an Anthology Student or CampusNexus CRM database.
-
The Durable Instancing Database typically uses the same server and database as the Workflow Database.
- (Optional) The Tracking Database is named "WorkflowTracking" by default. It can be on the same server as the Workflow Database and the Durable Instancing Database.
-
-
In the API Key field, specify the key you use to access Anthology workflow activities and contracts packages.
-
Click Save.
-
Click Yes to proceed. Workflow Composer will restart.
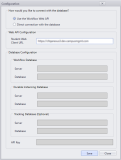
Workflow Web API Connection
If you are using Workflow Composer in an Azure cloud environment with Anthology Cloud 2.0:
-
Select Use the Workflow Web API.
-
Specify your Student Web Client URL, i.e., https://<server>.<domain>:<port>. This URL provides access to the server where the Workflow Web API is deployed.
The remaining fields are disabled.
Workflow Composer 3.1 and later supports dual tenancy in Azure AD. This enables Anthology support staff to log in to a customer environment to diagnose an issue. Anthology staff append account/login/cmc to the Anthology Student URL value to use a different authentication context for the same environment.
Tenant Student Web Client URL Sign in Logo Azure AD Tenant (Customer) https://<server>.<domain>:<port>.campusnexus.cloud/ 
Support Tenant (Anthology Staff) https://<server>.<domain>:<port>.campusnexus.cloud/account/login/cmc 
-
Click Save.
-
Click Yes to proceed. Workflow Composer will restart.
When you use the Workflow Web API, you must log in to your Anthology Cloud 2.0 account in the Azure Active Directory (AAD).
In case of a service interruption or incorrect configuration, a message similar to the following will be displayed. You will have the option to return to the Configuration window.
“The system is unable to perform authentication. You may need to contact your System Administrator.
However, the issue may be the configuration, would you like to review?"
Your user profile in the Anthology Cloud 2.0 AAD must be associated with a role.
-
The Contributor role allows you to add/publish, delete, and edit workflows.
-
The Reader role allows you to view workflows.
As a Reader, you can modify a workflow and save it to the file system. But you cannot publish it. If you try to publish or delete a workflow or persisted instance, Workflow Composer returns the message: "You are not authorized to perform this action."
If you are not associated with either role, you will need to contact a System Administrator as you will not have access to the application.
Install Activities and Contracts
After you have configured Workflow Composer, install the Activities and Contracts required for you environment. See Package Manager.