A summary list of pertinent configuration settings that will impact the business logic/validation follows:
-
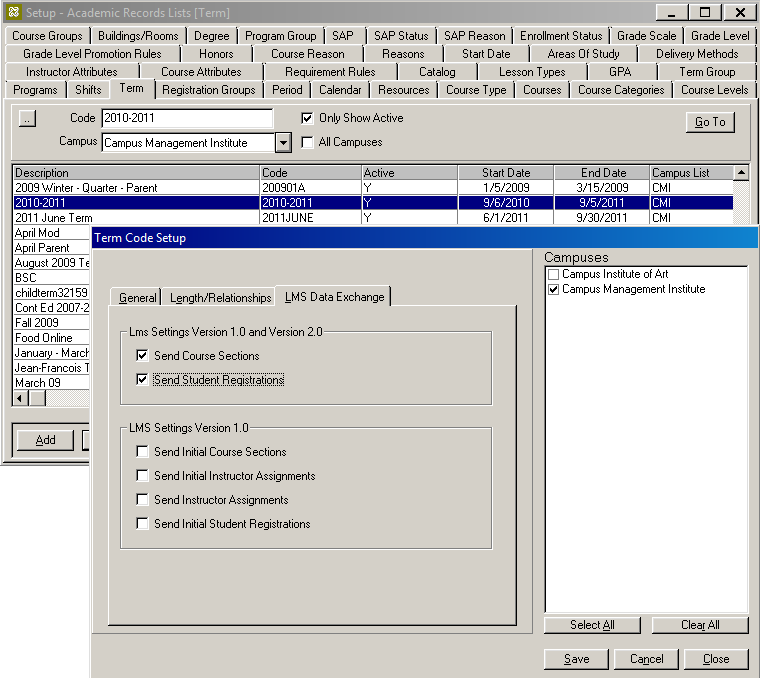
Navigate to Lists > Academic Records > Term > Edit.
Note: Terms are defined within Anthology Student. Important elements created with terms are:
- Start Date
- End Date
- Term Usage Configuration
- Perpetual Term Configuration
- Campuses
-
Select the LMS Data Exchange tab.
- Verify that the Term is associated with the correct Campus.
- Verify that the check boxes are selected for the LMS Settings desired.
-
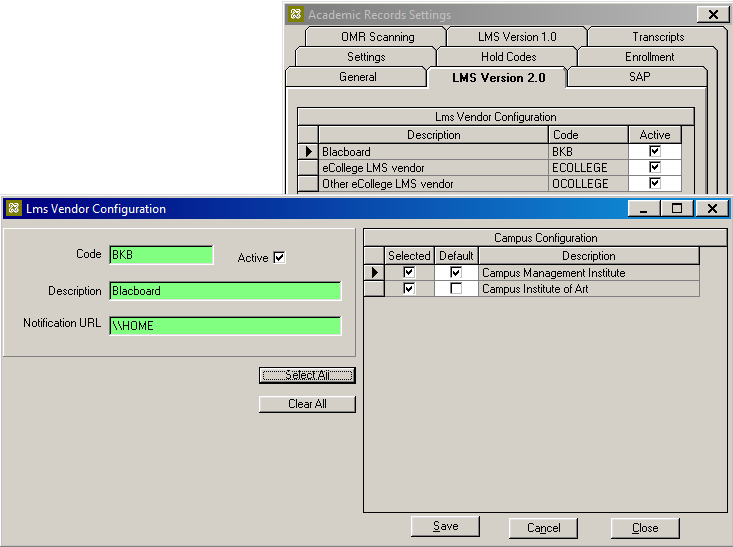
Select the LMS Version 2.0 tab and create or edit an LMS Vendor.
- Verify that Active is selected for this Vendor.
- Select Campuses associated with this LMS Vendor. A Vendor can be associated with many Campuses.
- Select Default Vendor for any of the Campuses selected. A Campus can only have one default Vendor.
-
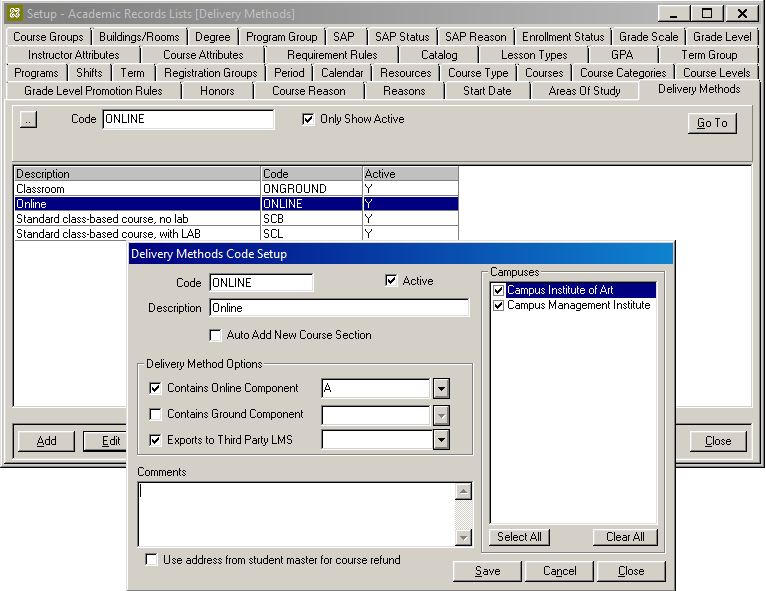
Navigate to Lists > Academic Records > Delivery Methods > Edit.
-
Select the Delivery Method tab then create or edit a Delivery Method.
- Verify that Active is selected for this Delivery Method.
- Verify that Export to Third Party LMS is selected.
- Select the Campuses associated with this Delivery Method.
-
Navigate to Daily > Academic Records > Schedule Classes > Edit.
Note: Class schedules are defined by term within Anthology Student.
Classes are created with the following important elements:
- Course
- Instructor
- Section
- Start date
- End date
- Student count
- Schedule (optional days and times)
- Delivery method
- Campuses.
-
Verify that a Section Delivery Method has been configured.
-
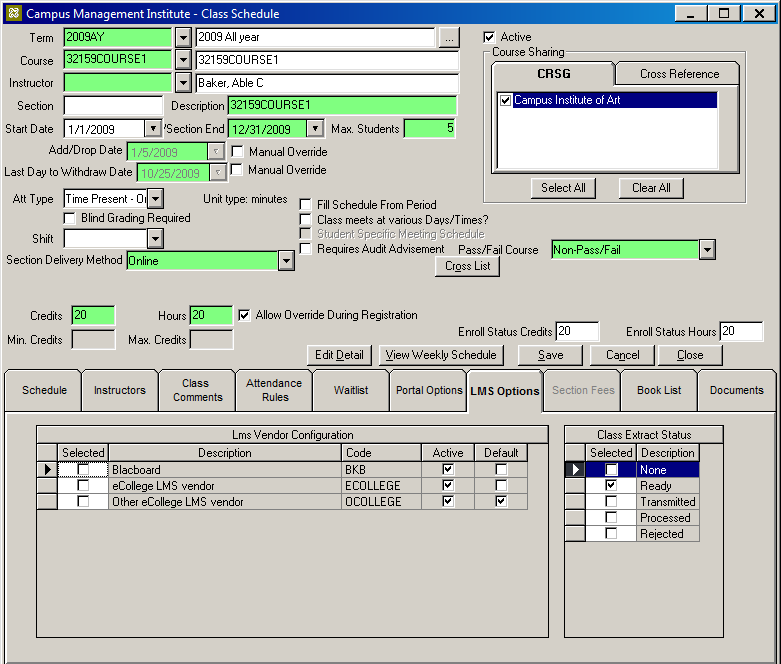
Select the LMS Options tab.
-
Verify that the LMS Vendor Configuration contains the following:
-
The LMS Vendor is Active.
Note that the Active flag can not be changed from this form. Use Setup > Academic Records > LMS > Edit. -
The LMS Vendor Configuration has an LMS Vendor selected or one of the vendors has been configured as a default vendor for this campus.
Note that the Default flag cannot be changed from this form. Use Setup > Academic Records > LMS > Edit.
-
-
Optionally, change the Extract Status for a Course Section.
Course Section Extract Status will be automatically set to Ready and an entry into the Real-Time Notifications table will be generated upon any of the following events.
- A new Course Section is added.
- The Teacher, Start or End Dates are modified.
- An Extract Status is manually changed from any state to Ready.
-
Navigate to View > Academic Records > Schedule.
-
For the LMS Options tab to be displayed, several settings that must be met:
- The status of a student Degree Course must be in a state of ‘S’, ‘C’, ‘P’, ‘D’ or ‘L’.
(C = Current, D =Dropped, F = Future, L = LOA, S = Scheduled, P = Grade Posted) - The delivery method must have the Extract to LMS property set to true.
- The Course Section must be associated with an LMS Vendor OR the campus the student is enrolled in must be associated with a default LMS.
- The status of a student Degree Course must be in a state of ‘S’, ‘C’, ‘P’, ‘D’ or ‘L’.
-
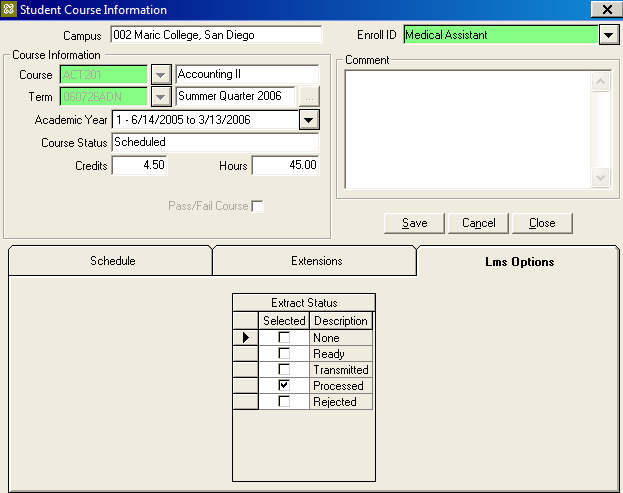
Select the LMS Options tab.
Optionally change the Extract Status for a Schedule.
Schedule Extract Status will be automatically set to Ready and an entry into the Real-Time Notifications table will be generated upon any of the following events:
- A Schedule status goes from ‘F’ to ‘S’
- A Schedule status goes from ‘S’. ’C’ or ‘L’ to ‘D’
- An Extract Status is manually changed from any state to Ready.
-
Navigate to Setup > Staff > Staff Members > User Info > Academic Records.
The Allow user to Override Closed term setting specifies if the user has permission to perform registration/grading functions on a term that has been closed. If the user selects a course section to post a final grade that is associated with a term that is closed, the setting for this flag determines if the user is allowed to override and continue with the process of posting a final grade for the course. This setting is stored in SyStaff.OverrideCloseTerm.
-
Navigate to Lists > Academic Records > Grade Scale > Grades.
Various properties are configured for each letter grade that is associated with a grading scale. These properties are used within the post final grades and update final grade business logic to determine how the letter grade received for the course will impact the GPA for a student, credits attempted/earned, and SAP processing. Additionally, a letter grade can be flagged as only being used for courses that are dropped and/or audited.
-
Navigate to Lists > Academic Records > Programs > Program versions > Course List.
The Repeat property on the Course Category grid is used to specify if logic should automatically execute to add a course back into a student enrollment’s degree audit table with a status of Future when a grade is posted for a course and the grade does not meet the criteria for counting the course as satisfying the requirement towards program completion.
If this property is checked, then, when a final grade is posted for a course associated with the selected course category, logic determines if the course will be automatically added back into the degree audit table with a status of Future. This flag is stored in AdProgramCourseCategory.RepeatDroppedFailedCourse.
Continue with Other Configuration Touch Points.