| Steps to Use iServices in a Visual Studio Project |
This topic contains the following sections.
- Add a Reference for WSE 3.0
- Add Web References for iServices
- Updating the Web Reference
- Add Code in the General Declarations
To integrate an application that is developed in Visual Studio .NET with CampusNexus CRM using iServices, you must perform the following steps:
Adding a reference to the Microsoft.Web.Service3.dll file of Microsoft WSE 3.0 enables User Authentication for the User to use the iServices methods for performing operations in CampusNexus CRM. To add this Reference, follow these steps:
-
Open Visual Studio .NET. To do so, select Start, All Programs, Microsoft Visual Studio 2012.
-
In Visual Studio .NET, open your application Project or create a new Project in Visual Studio 2012.
-
In the Solution Explorer, right-click on the References node, and select Add Reference from the shortcut menu.
The Reference Manager - <Application Name> dialog box is displayed.
-
Click the Browse button.
The Select the files to reference dialog box is displayed.
-
Locate the Microsoft.Web.Services3.dll file on your computer, and click the Add button.
-
Click OK.
Microsoft.Web.Services3.dll is added as a Reference in the Visual Studio Project in the References node.
Adding a Web Reference enables your application to locate an iService and obtain its service description. The service description is essential for your application to communicate with the iService. When you add a Web Reference, a proxy class is created that interfaces with the iServices, and provides a local representation of the iServices.
You must add the Web Reference for every iService you want to use with the application.
The Web Reference URL must be in the following format:
http://<WebServerName>/<Name of the iService>/<iservice>.asmx where:
-
<WebServerName>is the name of the server computer on which iServices are installed.
-
<Name of the iService> is the name of the specific iService. For example, ContactiService.
-
<iservice>.asmx is the .asmx file of a specific iService. For example, Contact.asmx.
Steps to Add a Web Reference
-
In the Visual Studio window, navigate to the Solution Explorer pane. If the Solution Explorer is not displayed in your window, select Solution Explorer from the View menu.
-
In the Solution Explorer, right-click on the References node, and select Add Service Reference from the shortcut menu.
The Add Service Reference dialog box is displayed.
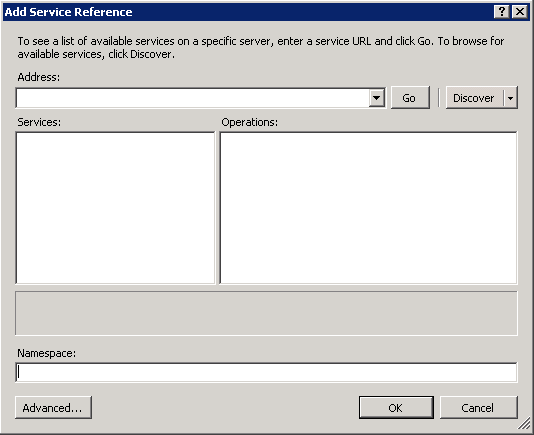 Figure 2: The Add Service Reference Dialog Box
 -
Click the Advanced button.
The Service Reference Settings dialog box is displayed.
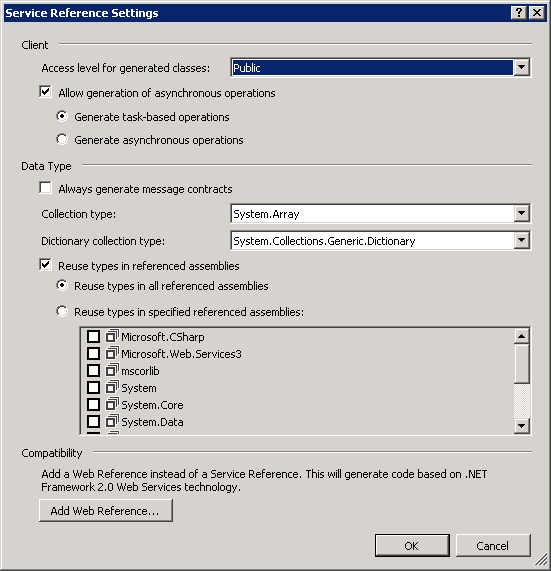 Figure 3: The Service Reference Settings Dialog Box
 -
Click the Add Web Reference button.
The Add Web Reference dialog box is displayed.
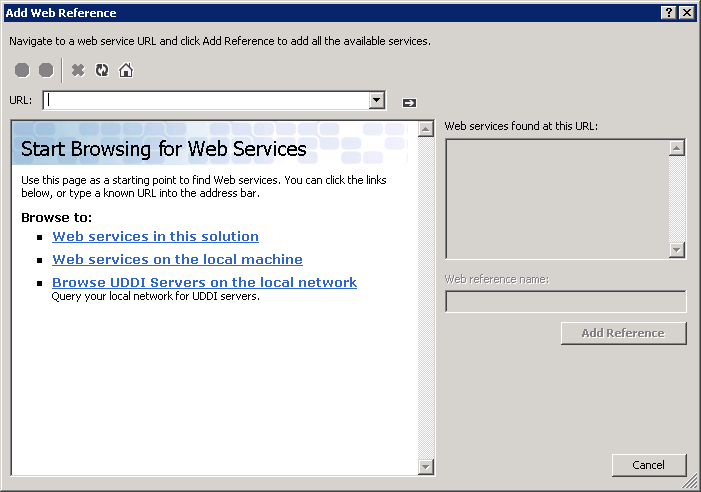 Figure 4: The Add Web Reference Dialog Box
 -
In the URL field, specify the Web Reference URL for the iService you want to use.
-
Click Go.
-
In the Web reference name field, specify a web reference name for the selected iService.
For example, if you have used the ContactiService, you can specify ContactWebService as the Web reference name.
The Web reference name specified in this step will become the namespace for the iService class in your application.
-
Click the Add Reference button. The Web Reference is added in the Web References node for the selected iService.
-
Repeat steps 2 to 8 to add a Web Reference for all the iServices you want to use.
After adding the Web References for each iService, you must ensure that the iServices class is inherited by Microsoft.Web.Services3.WebServicesClientProtocol in the Reference.cs file.
To do so:
-
In the Solutions Explorer of your project, navigate to the Web References node of the Project.
-
Select the iService Web Reference name that you created in the Add Web References for iServices topic.
For example, you have created the Web Reference name as ContactiService, select ContactiService.
-
Locate the Reference.cs file and open it for editing.
 Note
NoteIf the Reference.cs file is not visible, click the Show All Files option from the Explorer Toolbar Options.
Alternatively, you can locate the Reference.cs file of an iService Web Reference under the Web References folder of your project in Windows Explorer.
-
Ensure that the selected iServices class is inherited by Microsoft.Web.Services3.WebServicesClientProtocol.
By default, the inheritance code must appear as follows in the Reference.cs file:
C#public partial class ContactWebService : Microsoft.Web.Services3.WebServicesClientProtocol
However, if the following code is displayed for the inheritance, replace the below code with the above code in the Reference.cs file:
C#public partial class ContactWebService : System.Web.Services.Protocols.SoapHttpClientProtocol
After you have added all the References, you must add declarations to the general declarations area of your Project.
-
In the Solutions Explorer, select the file in your project where you will perform an operation using iServices.
-
In the General Declarations area of the file, specify the following code:
C# Code Snippetusing Microsoft.Web.Services3.Security; using Microsoft.Web.Services3.Security.Tokens; using Microsoft.Web.Services3;
-
Write the code for the operation you want to carry out. For information on writing the code to call an iService method, see the Steps to Call an iService Method topic.