Sign in and Sign out
Each portal segment (e.g., Applicant Portal, Student Portal, Faculty Portal) requires a username and password.
Sign in
-
Type the Portal URL in the address bar of your browser.
-
Select the name of a portal. For example, select Student Portal. The login page is displayed.
-
Type the Username assigned to you for the Portal.
-
Type the Password for your username.
Institutions can control whether the Forgot Your Password link is displayed.
Administrator Notes
The portal administrator can configure whether the Forgot Your Password link is displayed or not. This option is controlled through the Page Transactions configuration for the Portal login pages in the Portal Configuration tool.
The portal administrator can also configure a system generated email response to the student through the Send Login Credentials functionality.
-
When this is functionality is turned on, the system registers when a student has forgotten the password and/or username, then confirms if the user's social security number is on record or if the student already has an activated account. If so, a message is displayed for the student stating that the account already exists and the Login Credentials email is sent to the student's Email Address.
-
If the functionality is turned off, a message is displayed for the student stating that the account already exists and no email is generated and sent.
If you forgot your password:
-
Select Forgot Password.
-
Enter your Username and Email Address.
-
Select Submit. Your security questions are displayed.
-
Answer the security questions and select Submit.
A message will indicate that your password has been reset, and an email with the new password will be sent to you.
-
-
Select Sign In. The home page of the selected portal is displayed.
Password policies can be set depending on the needs of your institution. The policies may include a maximum password age. If a maximum password age is configured, a message is displayed prior to the expiration date, reminding you to change your password.
As an Applicant, once you have enrolled in any of the courses offered by the institution, you can log in to the Student Portal.
Sign out
-
Select Signout.
-
Close your browser window.
Password Expiration Settings
Administrators can use the Portal Configuration tool to specify whether passwords will expire after a certain time and whether a password expiration warning is displayed.
The reminder for users to change their passwords is not displayed if the following settings are applied:
-
Portal is configured so that passwords never expire.
-
The Suppress Password Expiration Warning option is set to True.
Auto Logout Time for User
The idle session time out is applied in the Staff, Student, Applicant and Employer portals, Portal Configuration tool, and Portal Admin Console for all applicable users.
Auto-logout logs users out from all the tabs and windows of the same browser. The auto-logout configuration timer starts after inactivity of 120 seconds. For example, if the Auto-logout timer in Site settings is configured for 7 minutes, users are logged out after 9 minutes of inactivity which would be the total time of Default Inactivity Timer and Configured Timeout.
The session is refreshed and the timer is reset if activity is detected. If no activity is detected after the completion of timer, users will be prompted with the message  .
.
If auto-logout is not configured, the system applies the auto-logout time of 3600 seconds (1 hour) and tracks inactivity for 1 hour and 2 minutes.
As a Portal administrator, you can configure the session timeout for all applications (e.g., LMS systems) in the Portal Admin Console.
-
In the Portal Admin Console, under Settings and Environment, select Site Settings.
-
Search for Timeout in the Filter field.
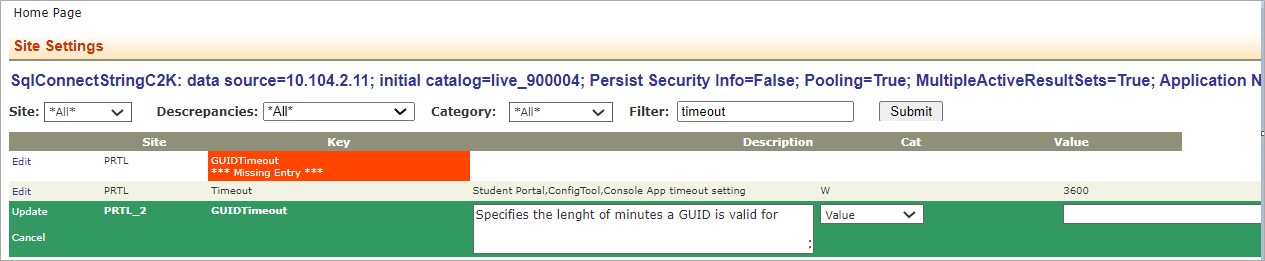
-
Specify the Auto logout Time value in seconds.
-
Select Update.
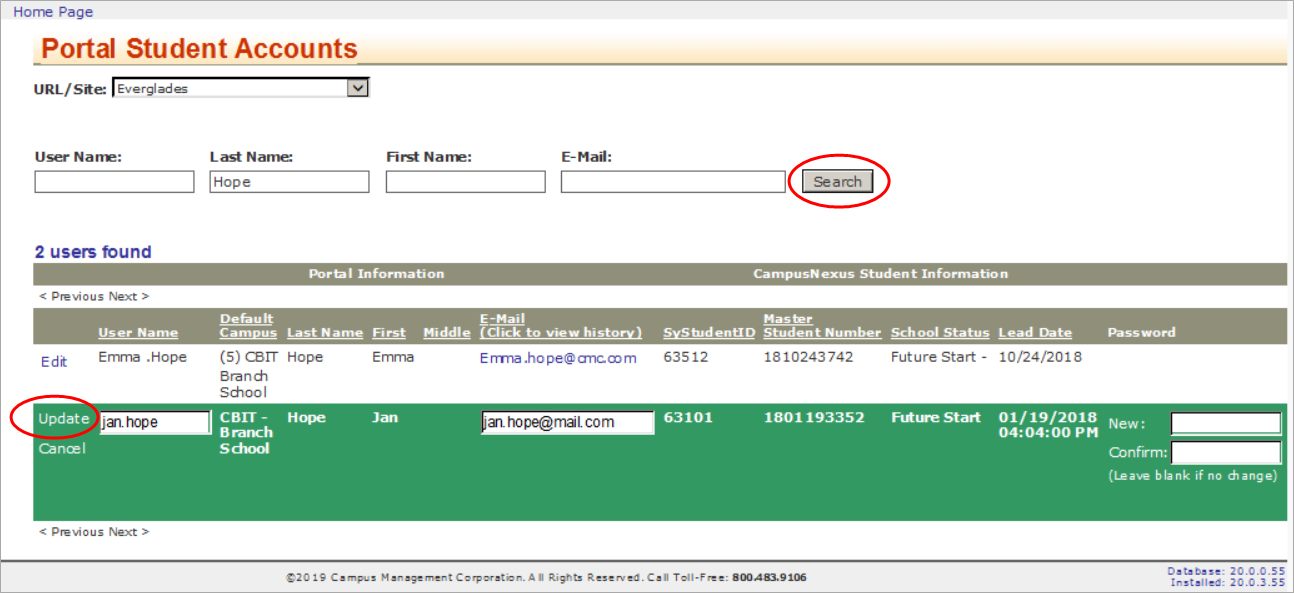
Update User Account
Administrators can edit a user's account information via the Portal Admin Console. The Portal Admin Console updates are propagated to all Anthology Student processes that use this information. When an administrator updates an account, a notification with the updated username is sent to user. The email notification will be sent to the user when the UserName is updated.
-
In the Portal Admin Console, under Administration, select Student Users.
-
Locate your site in the URL / Site drop-down list.
-
Search for the account you want to edit. You can search by Username, Last Name, First Name, or Email address.
-
Select the user record from the search results and select Edit.
-
Update the account information as needed and select Update.
When the Portal uses database authentication, the administrator is can edit:
- Email address and username for Applicant users
- Username for Student users
When Active Directory (AD) or Azure AD authentication is used, the administrator cannot edit any details for a Portal user account.