Account Information
The Account Information page allows you to manage your student account for all enrolled programs. The information is arranged in seven tabs. You can view your account balance and payment schedule, make a payment online, view or print statements, view the subsidiary statement (ledger), view estimated tuition discounts and register bills. You can sort the details of your payments by date.
If the Portal for your institution is configured to display pending charges, the Account information page will display two grids: Account Details and Pending Charges.
-
Records in the Account Details grid are sorted by transaction number in descending order by default.
-
Records in the Pending Charges grid are sorted in ascending order by transaction date by default.
The student account information that is displayed online is an exact representation of the student ledger card in Anthology Student (displaying actual and not pending charges). Statements are only generated for students who owe a balance on the date the student billing statement wizard is run in Anthology Student.
As an administrator you can use the Portal Configuration tool and configure Portal to display pending charges.
-
Navigate to Page Transactions > Student Account Summary > Student/Fin/accountinformation.aspx.
-
Select Show Pending Charges and select Update at the bottom of the page.
When Portalis configured to show pending charges, the pending charges are aligned based on the date & time the charge was added.
View Your Account Information
-
Navigate to My Finances > Account Information. The Account Information page is displayed. The Account Details tab is selected by default.
-
Select the link for the program in the list to view the details, payment schedule, and to make payments for that program.
Note: Account Details across all enrollments is displayed along with Pending Charges column.
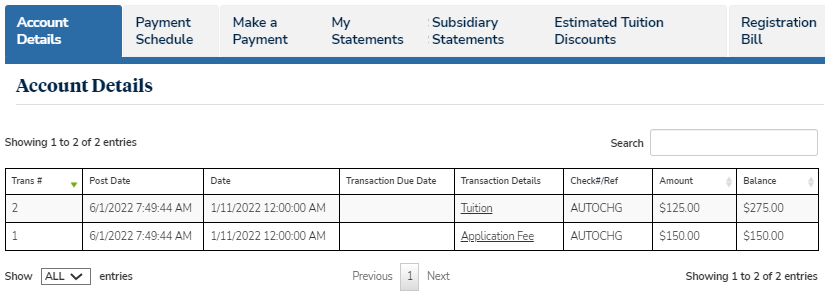
The records are sorted in descending order based on the transaction date & time value posted in the student ledger.
Select Next and Prev to browse through the grid pages or type a page number in the Go to page box and select Go.
Use the Show _entries drop-down list to set the number of rows displayed in the grid. Use the Search option to locate specific items within the grid.
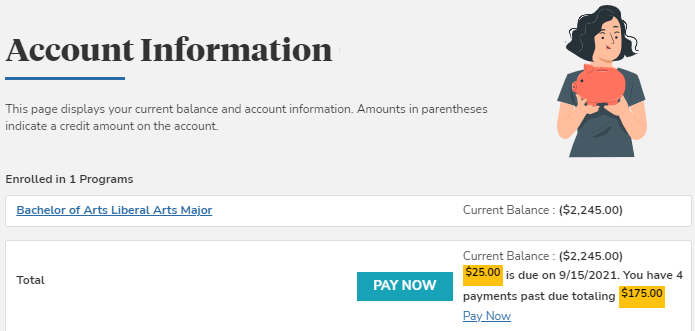
The balance column shows the actual point-in-time account balance for a given transaction.

-
Select the Date column header to sort your transaction details by date.
-
When a payment is made, a link is displayed in the Transaction Details field. Select this link to download the receipt of the transaction as a PDF document.
-
Select Next and Prev to browse through the pages of your transaction details, or type the page number in the Go to page box and select Go.
-
As a Portal administrator, you can manage whether or not you want to display the Pay Now option.
-
Log in to the Portal Configuration tooland select your campus.
-
Navigate to Page Transaction>Student Account Summary.
-
On the Campus Configuration page, locate the Pay Now option section and select one of the following options:
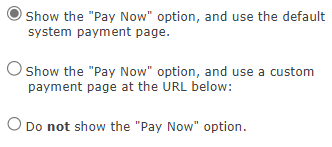
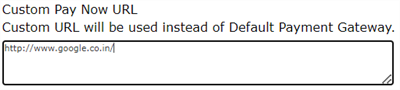
Note: You can specify a custom URL of your choice for the Pay Now option. The custom URL opens in a new tab.
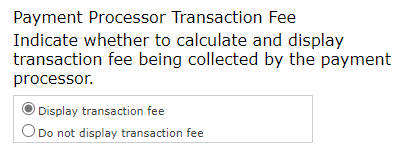
You can manage whether or not you want to display the transaction fee being collected by the payment processor and disclose the information related to the transaction fee.
-
Navigate to Page Transaction>Student Make a Payment/Pay Online.
-
On the Page Configuration > Student Payment page, locate the Payment Processor Transaction Fee option section and select one of the following options:
-
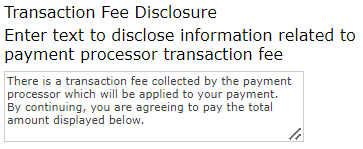
If you want to disclose the information related to the transaction fee, locate the Transaction Fee Disclosure option and enter the required text:
-
Select Update to save your changes.