Authentication and Single Sign-On
The Portal being delivered as part of Anthology Student version 18.2.0 (and later) supports two methods for authentication and single sign-on (SSO).
-
The current method of configuring security in the Portal Config tool by calling the CMCSecurityService API and passing the GUID back.
The current authentication process involves the Portal database. Passwords are stored in the wpuser table and are decrypted in the SyStaff table to retrieve a valid token for interacting with the APIs from the Staff Portal.
-
The new method of claims-based authentication using the custom Security Token Services (STS).
The custom STS built by Anthology Inc. has SSO functionality built-in. The SSO functionality allows any web application relying upon the same STS to have SSO between them. These web applications can be Anthology Inc.’s web applications such as Anthology Student and Portal, or custom web applications developed by Integration Services or clients.
Portal authentication relies on the Staff STS (common for all Anthology products) and Student STS. The Staff STS and Student STS eliminate the need to decrypt the stored password in the SyStaff table. Both Student and Staff STS support the Active Directory (AD) and Database (DB) mode.
Staff STS is used for authentication in:
- Staff Portal
- Admin Console
- Portal Configuration Tool
The Staff account is created in Portal based upon staff group association.
Student STS is used for authentication in:
- Student Portal
- Employer Portal
- Applicant Portal
What is Security Token Service (STS)?
Security token service is the service component that builds, signs, and issues security tokens according to the WS-Trust and WS-Federation protocols. It is possible to use a cloud STS such as a LiveID STS, a pre-built STS such as Active Directory® Federation Services (AD FS) 2.0, or if you want to issue custom tokens or provide custom authentication or authorization, you can build your own custom STS using Windows Identity Foundation (WIF).
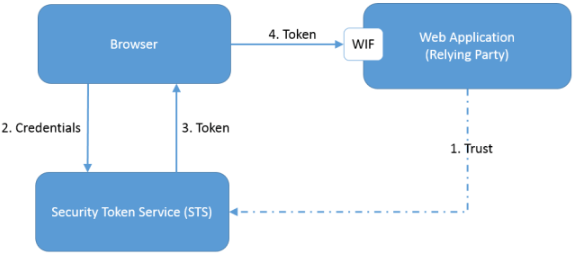
There are three main components in a typical federated authentication scenario. The following diagram shows the relation between them:
-
The Web Application is a claims-aware Web Application with trust established on the STS. This Web Application will use WIF to identify and route unauthenticated requests to STS.
-
The end user provides credentials to STS and STS authenticates the user.
-
Upon successful authentication, STS generates a token for the user.
-
The user is redirected to the claims-aware Web Application with a token. The Web Application uses WIF to validate and parse the token.
Beginning with .NET 4.5, Windows Identity Foundation (WIF) has been fully integrated into the .NET Framework. Having the WIF classes directly available in the framework itself allows a much deeper integration of claims-based identity in the .NET platform, making it easier to use claims.
The following section and reference links describe how to make your application work with STS (i.e., claims-aware) and how to build a new claims-aware application.
Configure ASP.NET MVC for Claims-Based Authentication
In the six steps below, you will add configuration entries to the Web.config file of your ASP.NET MVC web application to make it claims-aware. The same Web.config changes can be applied to other types of .Net Web Applications as well.
-
Add the following configuration section definitions to the Web.config configuration file. These define configuration sections required by WIF. Add the definitions immediately after the <configuration> opening element:
<configSections>
<section name="system.identityModel" type="System.IdentityModel.Configuration.SystemIdentityModelSection, System.IdentityModel, Version=4.0.0.0, Culture=neutral, PublicKeyToken=B77A5C561934E089" />
<section name="system.identityModel.services" type="System.IdentityModel.Services.Configuration.SystemIdentityModelServicesSection, System.IdentityModel.Services, Version=4.0.0.0, Culture=neutral, PublicKeyToken=B77A5C561934E089" />
</configSections>
-
Add a <location> element that enables access to the application’s federation metadata:
<location path="FederationMetadata">
<system.web>
<authorization>
<allow users="*" />
</authorization>
</system.web>
</location>
-
Add the following configuration entries within the <system.web> elements to deny users, disable native authentication, and enable WIF to manage authentication:
<authorization>
<deny users="?" />
</authorization>
<authentication mode="None" />
-
Add the following WIF related configuration entries and ensure that your ASP.NET application’s URL and port number match the values in the <audienceUris> entry, realm attribute of the <wsFederation> element, and the reply attribute of the <wsFederation> element. Also, ensure that the issuer value fits your STS URL.
<system.identityModel>
<identityConfiguration>
<audienceUris>
<add value="http://localhost:9090/" />
</audienceUris>
<issuerNameRegistry type="System.IdentityModel.Tokens.ConfigurationBasedIssuerNameRegistry, System.IdentityModel, Version=4.0.0.0, Culture=neutral, PublicKeyToken=b77a5c561934e089">
<trustedIssuers>
<add thumbprint="1234567890ABCDEFGHIJKLMNOPQRSTUVWXYZ1234" name="YourSTSName" />
</trustedIssuers>
</issuerNameRegistry>
<certificateValidation certificateValidationMode="None" />
</identityConfiguration>
</system.identityModel>
<system.identityModel.services>
<federationConfiguration>
<cookieHandler requireSsl="false" />
<wsFederation passiveRedirectEnabled="true" issuer="http://SignIn.MyUrl.edu/" realm="http://localhost:9090/" reply="http://localhost:28503/" requireHttps="false" />
</federationConfiguration>
</system.identityModel.services>
-
Add a reference to the [System.IdentityModel] assembly (Version: 4.0.0.0).
-
Compile the solution to make sure there are no errors.
Integrate Application Specific Logic or Claim
Once you receive a valid token from STS, you may want to do some additional authorization or populate other application-specific claims. There are many events available for supplementing application-specific logic. The following two events can be used to add an application-specific claim or do any particular cleanup when signing out.
protected void WSFederationAuthenticationModule_SessionSecurityTokenCreated(Object sender,
SessionSecurityTokenCreatedEventArgs e)
{
// TODO: Tap into Token Created event to do application specific logic
// This event will be called after login
var claimsIdentity = (ClaimsIdentity) e.SessionToken.ClaimsPrincipal.Identity;
SetAppClaims(claimsIdentity);
}
/// <summary>
/// TODO: Any custom logic that has to happen upon signout
/// This event will be called even if the sign out is being done from other RP applications
/// </summary>
/// <param name="sender"></param>
/// <param name="e"></param>
protected void WSFederationAuthenticationModule_SigningOut(object sender, SigningOutEventArgs e)
{
}
References
How To: Build Claims-Aware ASP.NET MVC Web Application Using WIF (MSDN): http://msdn.microsoft.com/en-us/library/hh291061.aspx
Windows Identity Foundation: https://msdn.microsoft.com/en-us/library/hh377151.aspx