Integration Prerequisites
The Anthology Student web app and Portal require the configurations detailed below to enable Learning Management System (LMS) integration and Single Sign-On (SSO).
When the LMS option is enabled in the Anthology Student:
-
Integration is triggered based on the event and data is passed or updated in the Blackboard LMS
-
Inbound (from Blackboard):
- Participation/Attendance
- Grades (Mid Term and Final)
-
-
The delivery methods are selected in Anthology Student and then data is passed/updated in Blackboard
-
Outbound (from Anthology Student):
- Users
- Terms
- Course/Class sections
- Student registrations
- User Assignment Actions > Course membership – Role assignments)
- Organization hierarchy
-
Anthology Student Settings and Configuration
The Anthology Student web app needs to be set up for LMS. In addition, terms, delivery methods, and class scheduling need to be configured for data transfer to the LMS.
Settings
The Anthology Student Settings configuration is required to create or configure the LMS vendor to be used for SSO. The LMS vendor must exist and be associated with the courses before you can use SSO or push academic data to the LMS vendor.
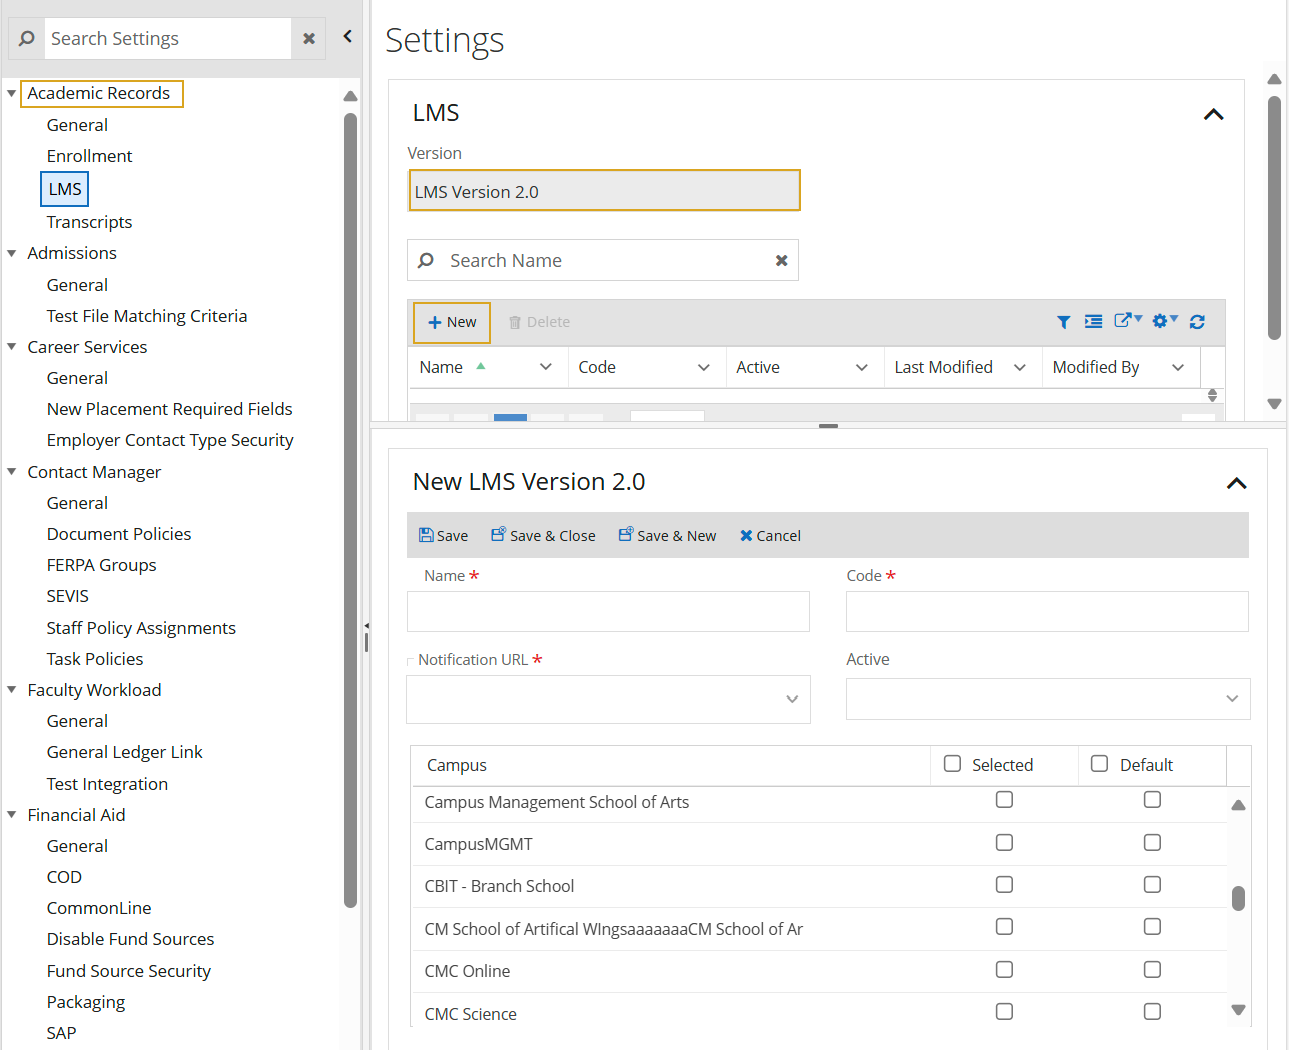
To create an LMS vendor in Anthology Student:
-
Log in to Anthology Student and select Settings > Academic Records > LMS.
-
In the Version field, select LMS Version 2.0 and select New.
-
Complete the LMS Vendor Configuration form as instructed in the below bullet points and select Save.
-
Enter a unique Code to identify the LMS vendor.
-
Enter a Name to identify this LMS vendor.
-
Enter something in the Notification URL. This field cannot be left blank.
-
Select the Campus location(s) that will be included.
-
Terms
The Term configuration is required to enable specific courses within the terms to pass course section data to the LMS vendor. If the term is not configured with the required values, the information will not be passed.
To create or configure the LMS Term settings in Anthology Student:
-
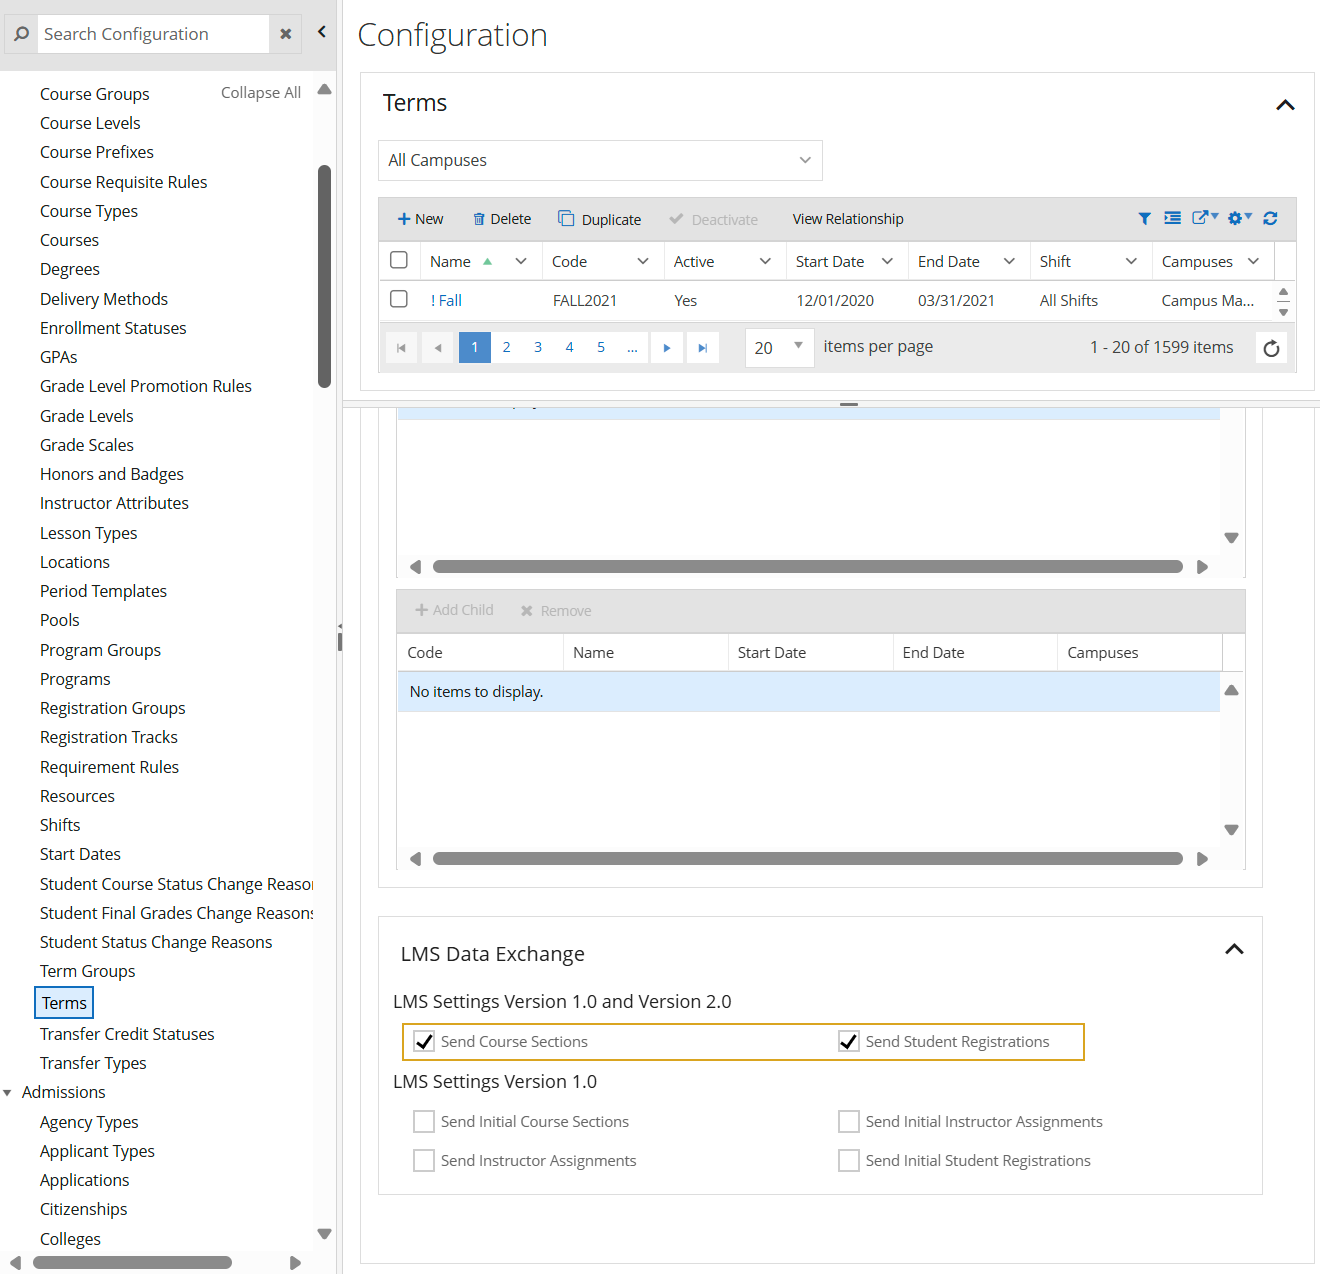
In Anthology Student, select Configuration > Academic Records > Terms.
-
On the Terms page, select New or select a record and Edit.
-
In the LMS Data Exchange section at the bottom of the page, select Send Course Sections and Send Student Registrations and select Save.
Selecting the ‘Send Course Sections’ and ‘Send Student Registrations’ check boxes enables the integration to transfer course, student, and faculty data to the LMS.
Delivery Method
The Anthology Student Delivery Method configuration is required to enable specific courses to pass course section data to the LMS vendor. If the delivery method is not configured with the required values, the information will not be passed.
To create or configure the LMS Delivery Method settings in Anthology Student:
-
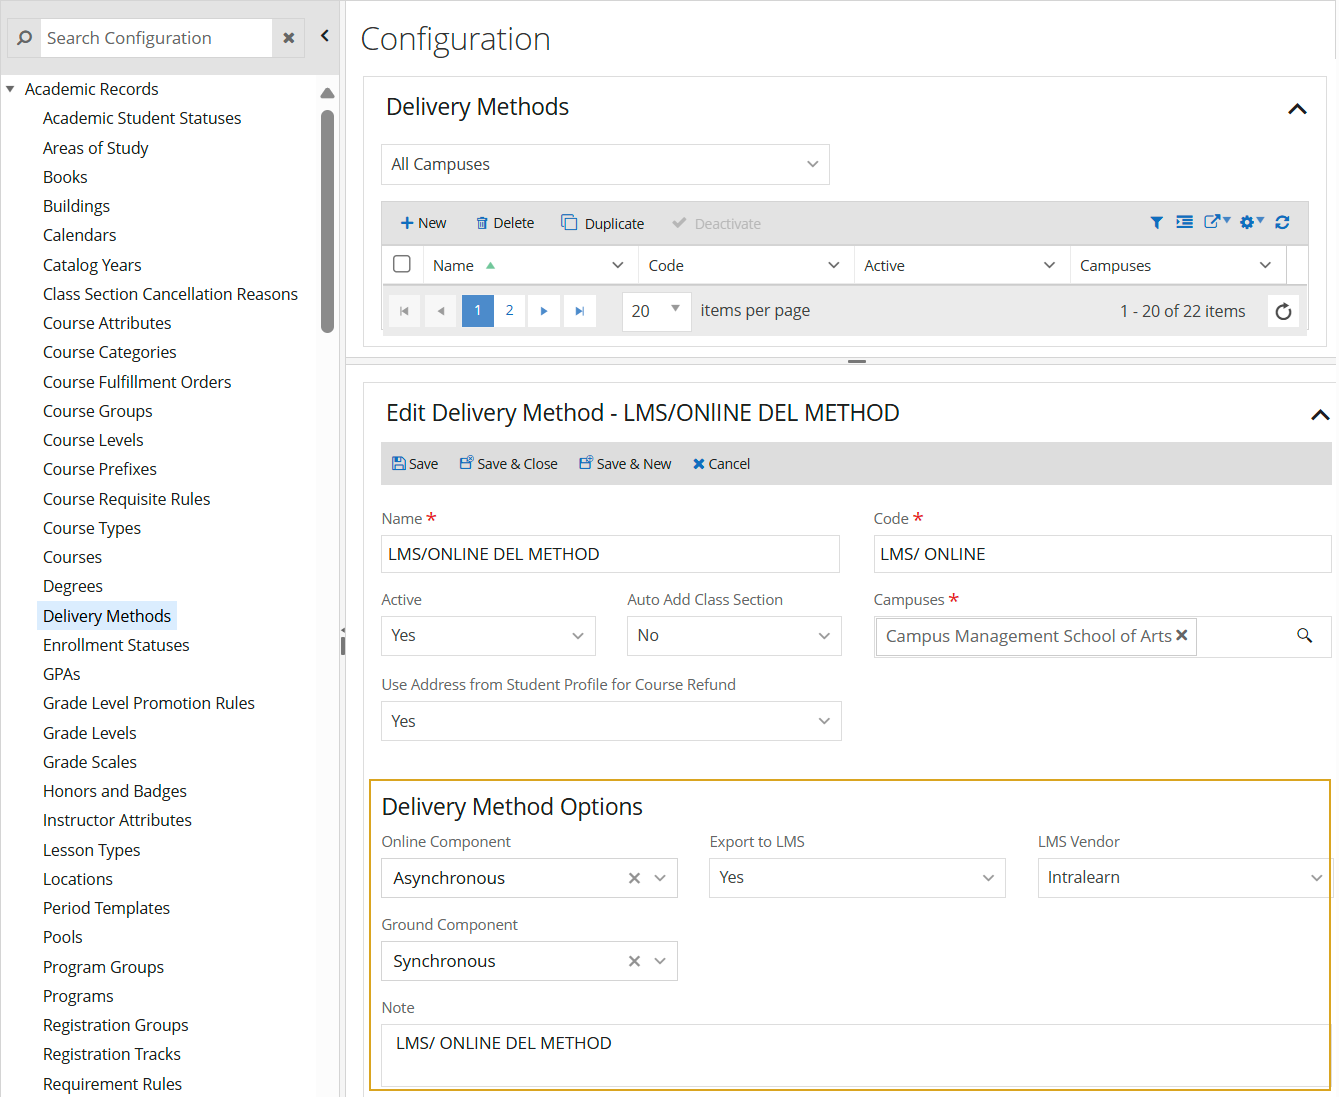
In Anthology Student, select Configuration > Academic Records > Delivery Methods.
-
On the Delivery Methods page, select New or select a record and Edit.
-
Complete the Delivery Methods form as instructed in the below bullet points and select Save.
-
Enter a unique Code to associate with the new delivery method.
-
Enter a recognizable Name of the delivery method.
-
Select all the Campuses where this delivery method will be applicable.
-
If the course contains the Online Component and Ground Component, select the Asynchronous option from the drop-down lists.
-
In the Export to LMS field, select Yes, so courses can be exported to a third-party LMS.
-
Class Scheduling
The Anthology Student Class Scheduling configuration is required to pass course section data for specific courses to the LMS vendor. If the class section is not configured with the required values, the information will not be passed.
To create or configure the LMS Class Section settings in Anthology Student:
-
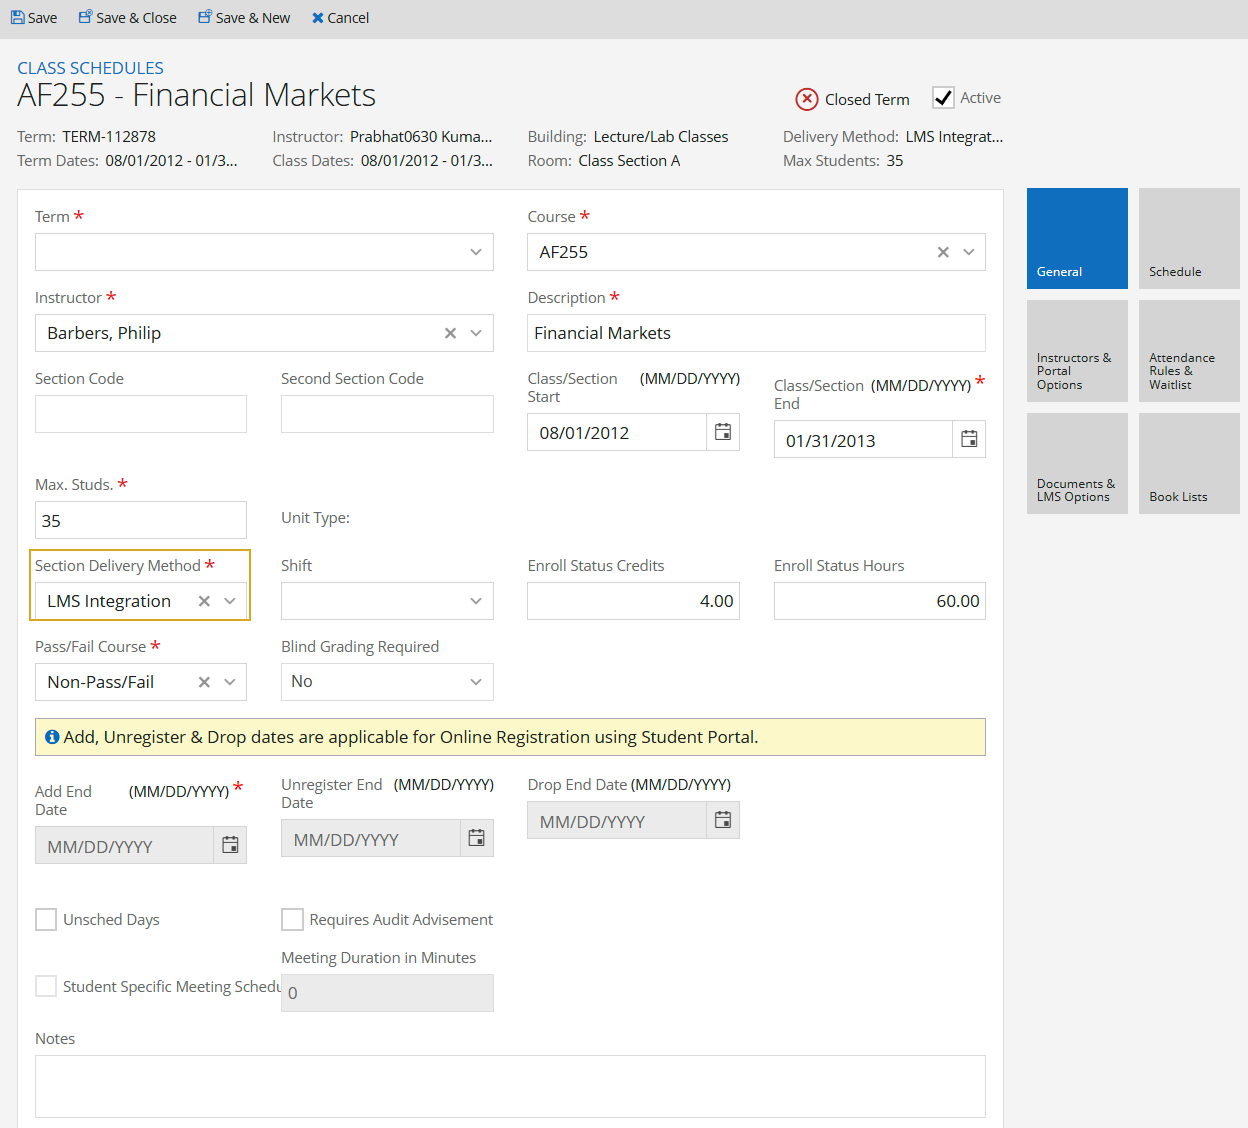
On the home page of Anthology Student, select Class Scheduling.
-
Select New or select a record and Edit.
-
In the Section Delivery Method field, select the delivery method previously configured for LMS.
-
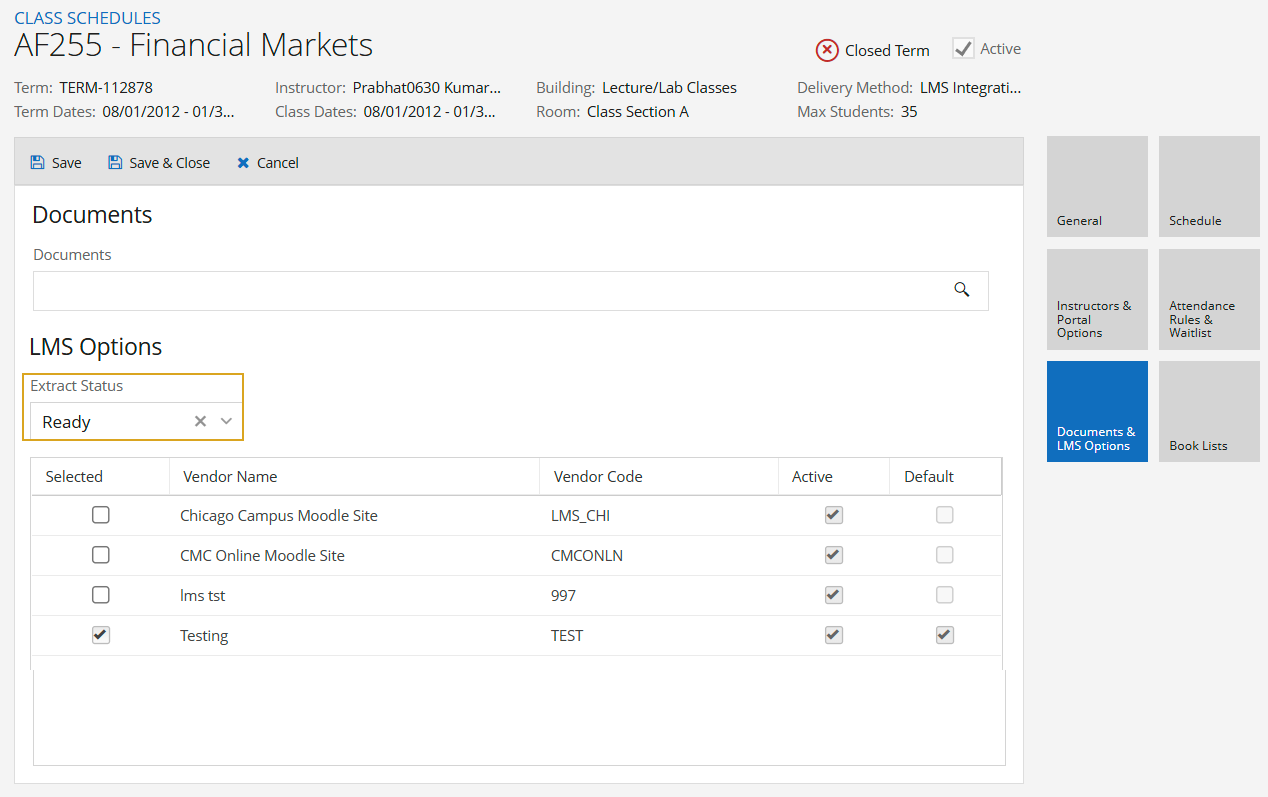
Select the Documents & LMS Options tile. This tile is available only after saving a class schedule.
-
In the LMS Configuration section, select the previously configured LMS vendor.
-
In the Extract Status field, select Ready and select Save.
Portal Configuration
The Anthology Student Portal needs to be configured to enable the LMS for all Portal users and to provide a menu link for the LMS page.
Enable LMS for Portal Users
The Portal configuration is required to provide access to the newly configured LMS settings. It requires accessing the Portal Configuration Tool and enabling the LMS settings.
To enable the LMS settings in the Anthology Student Portal:
-
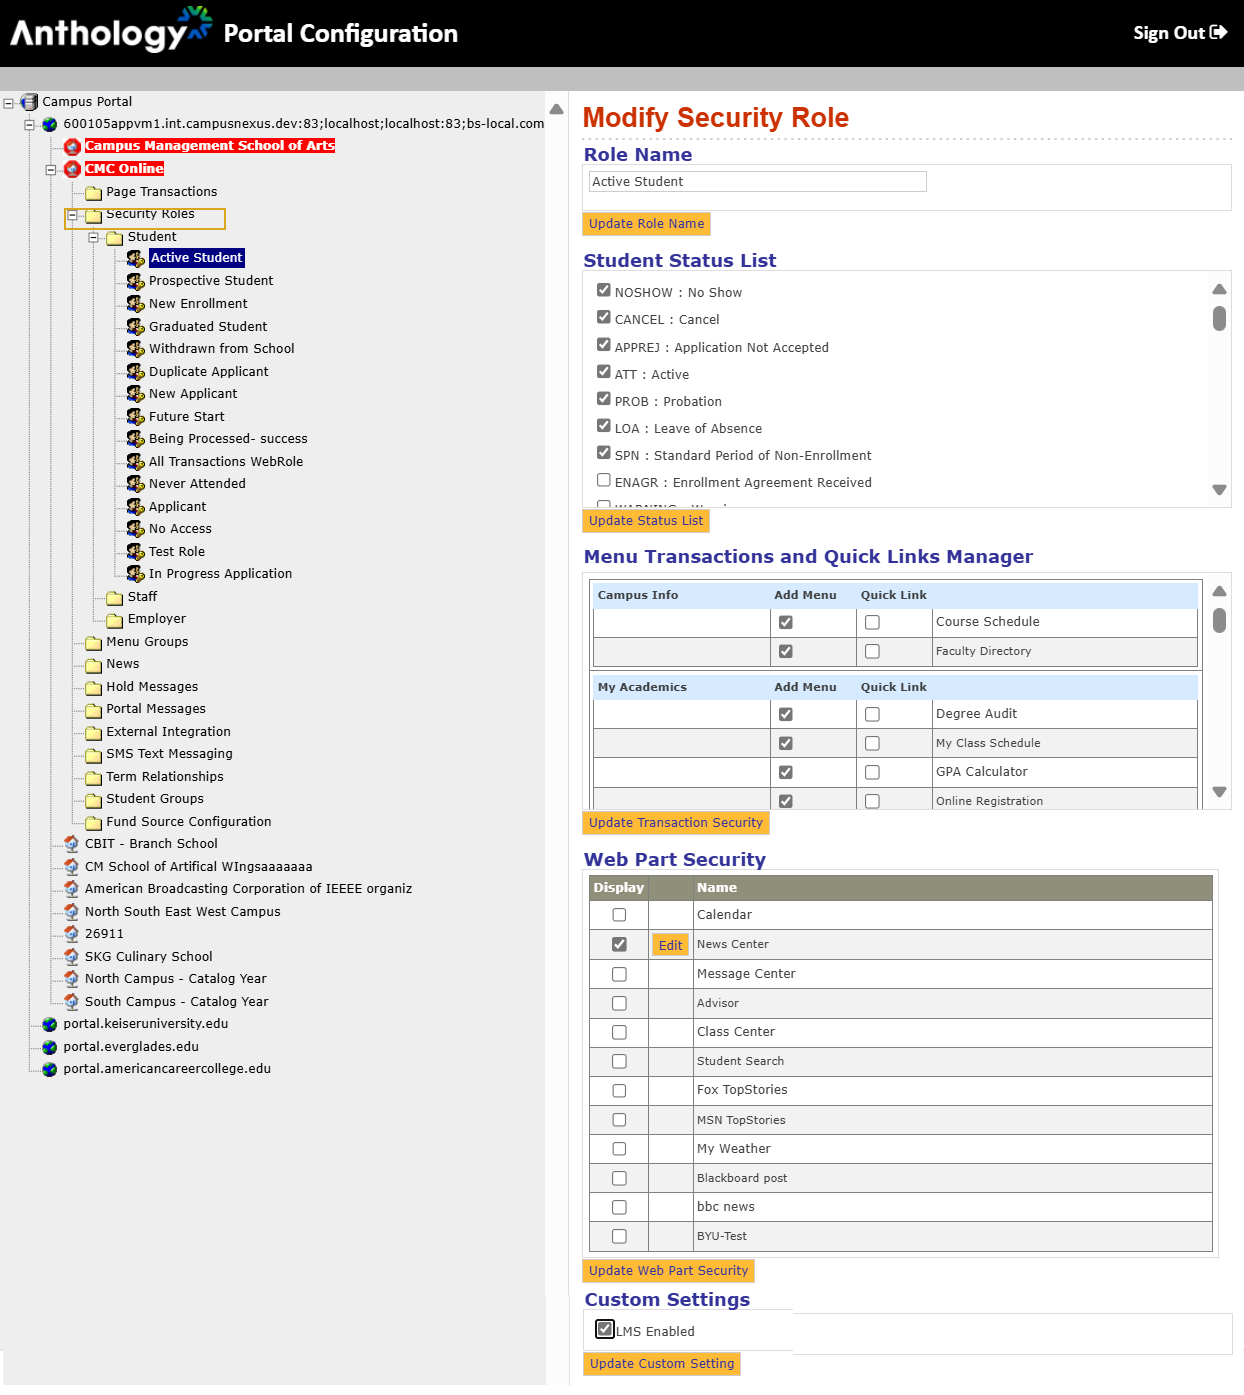
Log in to the Portal Configuration Tool as a System Administrator.
-
Select the Campus and navigate to Security Roles > Student > Active Student.
-
Under the Custom Settings at the bottom of the page, select the LMS Enabled check box.
This process will make the SSO links available to the user logged in to the Anthology Student Portal.
-
Repeat step 3 for all Student and Staff groups to be enabled with the LMS setting (i.e., links in the Anthology Student Portal).
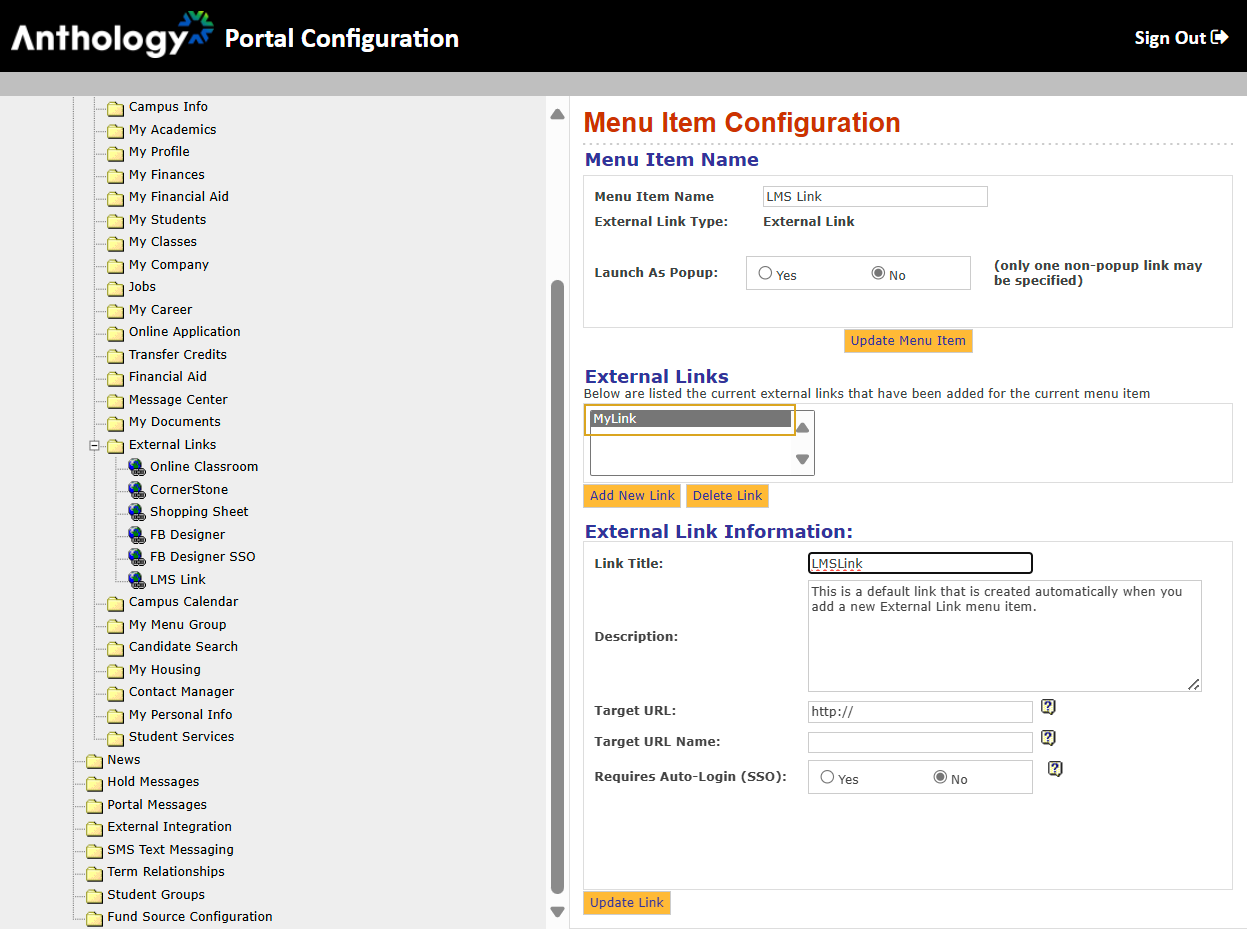
Set Up Navigation Link (External Link)
The Portal's top header bar and direct course link are auto-generated per the configuration above. The navigation menu requires additional configuration to create an “External Link” for the LMS.
To create an External Link in the Anthology Student Portal:
-
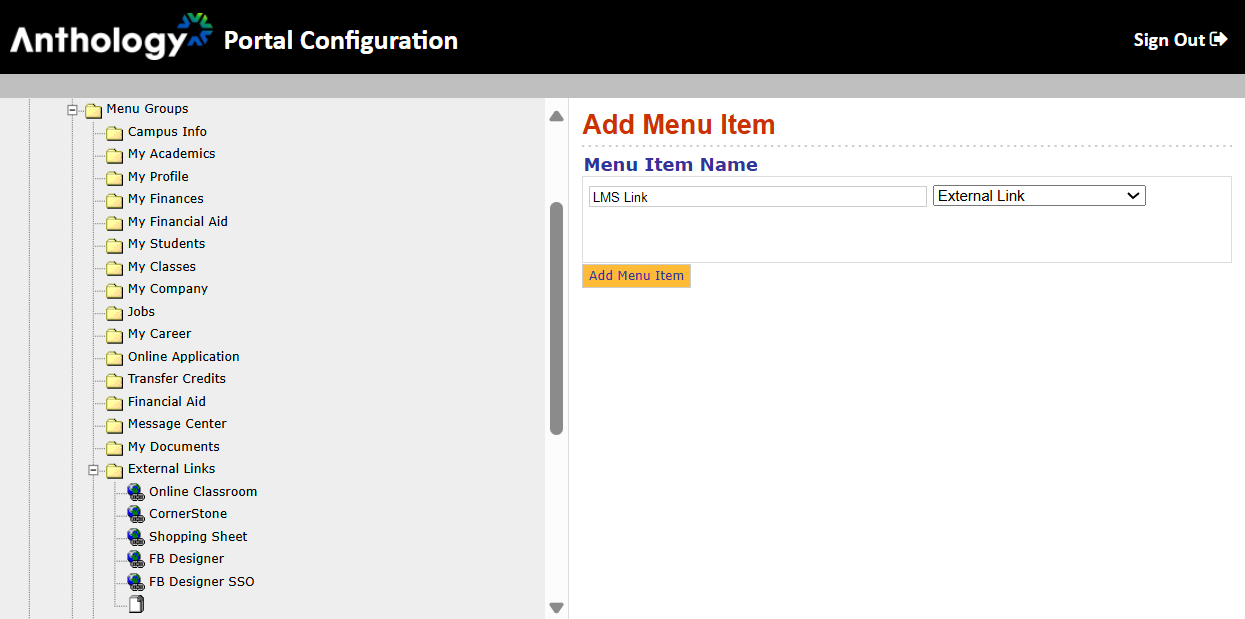
Log in to the Portal Configuration Tool as a System Administrator.
-
Select the Campus and navigate to Menu Groups > External Links.
-
Right-select the External Links item and select New Menu Item.
Note: Customers can add External Links to any Menu Groups as well as multiple Menu Groups. This functionality can also be used to redirect users to additional websites (aside from the SSO controller page). For example, they can redirect to Google, MSN, ESPN, or the Home page.
-
Specify a Menu Item Name and select External Link in the drop-down. Select Add New Item.
-
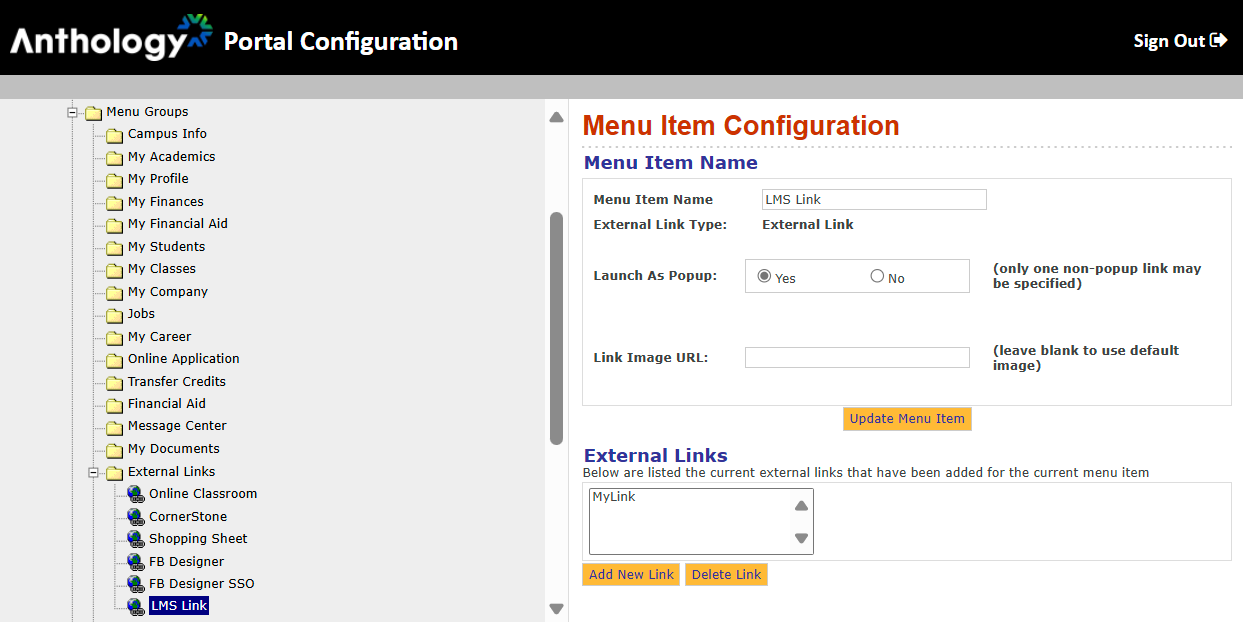
On the Add Menu Item page, select Add New Item. ’The new menu item will be added to the Menu Group.
-
Select the new menu item in the tree on the left side. The Menu Item Configuration for the new respective menu item will appear on the right.
-
Select whether you would prefer the link to open in a new browser or within the Anthology Student Portal work area. Select Update Menu Item.
-
Select the link in the External Links section. The External Link Information section is displayed. Complete the Menu Item Configuration page as instructed below.
-
Specify the Link Title or leave the default description designated.
-
Specify a Description or leave the default description designated.
-
Specify the Target URL. This is the URL to redirect the user to the controller page that processes the SSO request.
-
Specify the Target URL Name.
-
For Requires Auto-Login (SSO), select the No. The controller will handle the SSO; this configurable value is not applicable.
-