OI Sync Agent

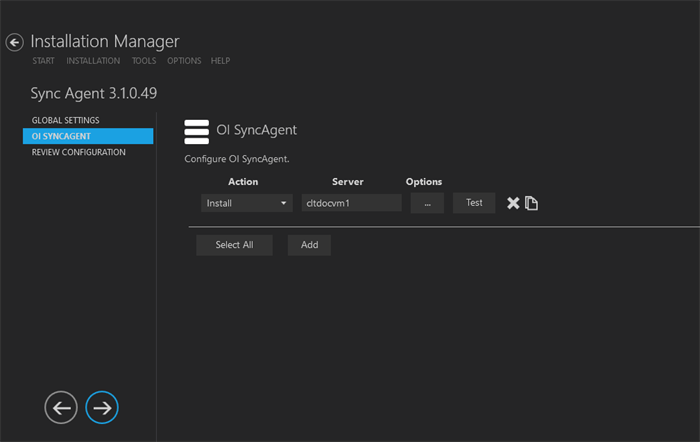
This screen enables you to select the actions to be taken by Installation Manager (e.g., install, uninstall) and to specify the database and configuration options for the Occupation Insight Sync Agent.

Set Up the OI Sync Agent

  1. In the Installation menu, click OI Sync Agent. The OI Sync Agent configuration screen is displayed. Closed

    Warehouse Settings Screen

  2. Click Add to add a line to the Settings screen.

  3. Select an appropriate Action. The following Action values are available:

    • None – Performs no action.

    • Install – Performs a fresh installation or upgrade of a component. You can install or upgrade multiple components at the same time.

    • Uninstall – Removes all subcomponents on that machine and uninstalls the component from Programs and Features.

    Optional: Click Select All to set the Action field to Install for all components listed on this screen. Click Unselect All to set the Action field to None.

  4. In the Server field, enter the name of the server that hosts the Occupation Insight Sync Agent.

  5. Click Options (ellipsis) icon to view and edit the Options form.

    Warehouse Options - CNS tab

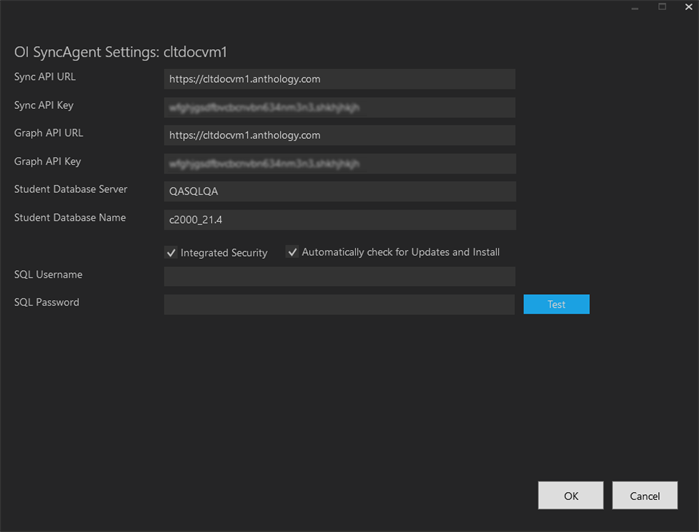
    OI Sync Agent Settings
    Field Description
    Sync Api URL Specify the URL for the Occupation Insight Sync API.
    Sync Api Key Enter the key used access the Occupation Insight Sync API.
    Graph API URL Specify the URL for the Occupation Insight Graph API.
    Graph API Key Enter the key used access the Occupation Insight Graph API.
    Student Database Server Name of the Anthology Student database server used by Occupation Insight.
    Student Database Name Name of the Anthology Student database used by Occupation Insight. Click Test to verify access to the database.
    Integrated Security Select the Integrated Security check box or specify the SQL Username and Password in the fields below.
    Automatically check for Updates and Install This option is selected by default. It enables the Occupation Insight Sync Agent to check for and install updates. The auto update option streamlines the upgrade process for customers who utilize the agent in their on-premises Anthology Cloud 1.x or Anthology Cloud 2.x environments. If a customer wants to opt out of the auto update functionality, clear the check box while installing the Sync Agent for that customer.

    Note: If the auto-update option is cleared while installing Sync Agent 3.1, and the customer later wants auto update switched on, the Sync Agent will need to be uninstalled and reinstalled with the auto-update option selected.

    SQL Username Specify the user name for the Anthology Student database.
    SQL Password Specify the password for the Anthology Student database.
  6. Click OK to save changes on the Options form. The form is closed.

  7. Click Delete icon to delete a selected line.

  8. Click Test to ensure the setup for the corresponding line is correct. If a test on a particular line fails, check all associated fields and click Test again.

  9. If all tests pass, click right arrows.