To enable CampusNexus CRM Web Client to use the same instance of Workflow Composer that is connected with Anthology Student, configure the settings on the Student Web Client screen.
These settings will update Server Name and DB Name in the Workflow connection string of the following:
-
web.config file of the Web Client
-
config file of each iService
Steps
-
Set up the Student Web Client.
-
In the Installation menu, click Student Web Client. The Student Web Client Settings screen is displayed.

-
Click Add to add a line to the Settings screen.
-
Enter the Machine Name for the component to be installed.
-
In the Port field, enter the port number or accept the default (9500).
-
Click
 to copy a line. Edit the copied line as needed.
Copy as many lines as needed to create the iService components required for the installation.
-
Click
 to view or edit the Options form.
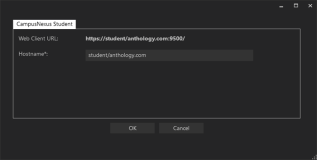
-
Specify the Hostname for the Anthology Student Web Client.
The Hostname will become part of the Web Client URL
-
Click OK to save changes on the Options form. The form is closed.
-
Click
 to delete a selected line.
 -
Click Test to ensure the setup for the corresponding line is correct. If a test on a particular line fails, check all associated fields and click Test again.
-
If all tests pass, click
 .
.


When upgrading Web Client and iServices, if Student Web Client that was associated with the previous version of Web Client and iServices is no longer required:
-
In the Student Web Client Settings screen, click
. -
Upgrade Web Client and iServices.