The Web Client Notification component is used to send notifications about chat sessions, incoming phone calls and interactions, and broadcast messages to end users.
Prerequisites
Identify and install the prerequisite software. See Software Requirements by Component — Notification Server.
Set Up Notification Servers
-
In the Installation menu, click Notification Server. The Notification Server Settings screen is displayed.

-
Click Add to add a line to the Settings screen.
-
Select an appropriate Action. The following Action values are available:
-
None – Performs no action.
-
Install – Performs a fresh installation or upgrade of a component. You can install or upgrade multiple components at the same time.
-
Uninstall – Removes all subcomponents on that machine and uninstalls the component from Programs and Features.
-
Reinstall – Retries to install a subcomponent.
-
Add – Installs an additional component on the computer where one or more components already exist. You can add only one component at a time.
-
Remove – Uninstalls a single component. You can remove only one component at a time.
Optional: Click Select All to set the Action field to Install for all components listed on this screen. Click Unselect All to set the Action field to None.
-
-
Enter the Machine Name for the component to be installed.
-
Select a Database from the Database list.
-
Click
 to copy a line. Edit the copied line as needed.
 -
Click
 to view and edit the Options form.
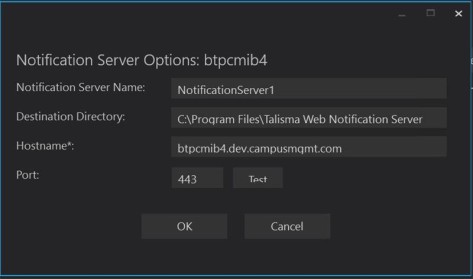
-
In the Notification Server Options form, complete the following fields as applicable:
- Notification Server Options Name
- Destination Directory
- Host name of notification server
- Port used by notification server
-
Click OK to save changes on the Options form. The form is closed.
-
Click
 to delete a selected line.
 -
Click Test to ensure the setup for the corresponding line is correct. If a test on a particular line fails, check all associated fields and click Test again.
-
If all tests pass, click
 .
.

Postinstallation Tasks
The following code in the web.config file that is available in the <Talisma Web Notification Server installation folder>\Web.config path enables you to specify the Web Client URL that will use the functionality of the notification service to send notifications to Web Client users.
-
Navigate to the following code using a text editor (e.g., Notepad).
<system.webServer>
   <httpProtocol>
      <customHeaders>
      <add name=”Access-Control-Allow-Origin” value=”*” />
      </customHeaders>
   </httpProtocol>
</system.webServer> -
Replace the asterisk (*) with the Web Client URL and then save and close the web.config file.