Install an instance of Web Client and Web Notification Server from Installation Manager. For more information on the installation process, see Installation Manager Help. Perform the following tasks after the installation is complete.
A typical Web Client Installation requires the following components:
- Web Notification Server
- Windows Notification Service
- Cmc.Crm.Workspaces
- Staff STS
- Security Web Service
To install a second instance of Web Client to connect to a different database on the same computer, the components must be recreated manually.
Host the Web Notification Server in IIS
-
Copy the Web Notification Server installation folder to a desired location.
-
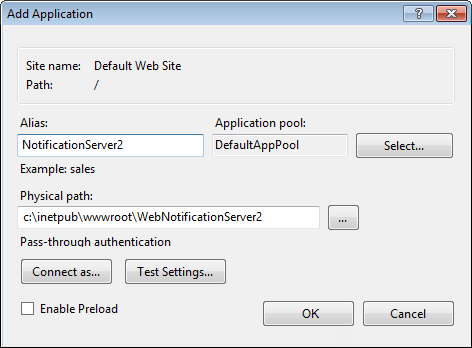
In IIS, host this folder as a Web Application. In the Default Web Site’s context menu, select Add Application.
-
In the Add Application dialog box, specify the alias of your choice in the Alias field and then select the required application pool. Ensure that you select an application pool of type .Net 4.5 in integrated mode.
-
In the Physical path field, specify the folder path where the files will be copied.
Note: The application pool must be configured for a user with administrator privileges.
-
Click OK.
Update the Web.config File
-
In the Web.config file that is available in the new Web Notification Server installation folder, navigate to the following code:
<client>
<endpoint address="net.tcp://localhost:8083/TLWebNtfSvr/NotificationRequestService" binding="netTcpBinding" bindingConfiguration="NetTcpBinding_IRequestNotification" contract="WebNtnRequestService.IRequestNotification" name="NetTcpBinding_IRequestNotification" />
</client>
-
Change the port (bold text) to an unused port address.
-
Save and close the file.
Create Another Instance of Windows Notification Service
-
Create a copy of the WebNotificationService installation folder to a desired location.
-
Launch the command prompt window with administrator rights.
-
Type the following command:
sc create <Web Notification Service Name> binPath="\"<WebNotificationServiceInstallFolder>\TLWebNtfSvr.exe\"" DisplayName="<Web Notification Service display name>".
-
Replace <Web Notification Service Name> and <Web Notification Service display name> with names of your choice. Ensure that the specified text is not used by any other windows service on the computer.
-
Replace <WebNotificationServiceInstallFolder> with the folder path created in step 1, and then press ENTER. The new service will be displayed in the Service window.
-
Right-click the service and set the following configurations:
-
In the General tab: Configure the Startup type to Automatic
-
In the Log On tab: set appropriate log on credentials.
-
Configure the TLWebNtfSvr.exe.config File
-
In the new Web Notification Service folder, open the TLWebNtfSvr.exe.config file and navigate to the following code:
<service name="TLWebNtfSvr.Service.NotificationRequestService" behaviorConfiguration="TLWebNtfSvrBehavior">
<endpoint address="net.tcp://localhost:8083/TLWebNtfSvr/NotificationRequestService" binding="netTcpBinding" bindingConfiguration="PlainNotification" contract="TLWebNtfSvr.Interface.IRequestNotification" />
<endpoint address="mex" binding="mexTcpBinding" bindingConfiguration="" contract="IMetadataExchange" />
<host>
<baseAddresses>
<add baseAddress="net.tcp://localhost:8083/TLWebNtfSvr/NotificationRequestService" />
</baseAddresses>
</host>
</service>
-
Change port 8083 (bold text) to the port used to configure the Web.config file of the of Web Notification Service.
-
Navigate to the following code:
<service name="TLWebNtfSvr.Service.NotificationPostService" behaviorConfiguration="TLWebNtfSvrBehavior">
<endpoint name="netTcp" address="net.tcp://localhost:8082/TLWebNtfSvr/NotificationPostService" binding="netTcpBinding" bindingConfiguration="PlainNotification" contract="TLWebNtfSvr.Interface.IPostNotification" />
<endpoint name="mexTcp" address="mex" binding="mexTcpBinding" bindingConfiguration="" contract="IMetadataExchange" />
<host>
<baseAddresses>
<add baseAddress="net.tcp://localhost:8082/TLWebNtfSvr/NotificationPostService" />
</baseAddresses>
</host>
</service>
-
Change port 8082 (bold text) to an unused port.
-
Save and close the file.
Updates in the Notification Service Folder
-
In the new Web Notification Service folder, locate the Web.config file.
-
Perform the steps described in Configure the Web.config File.
-
Run the following query on the Main Database computer to fetch the internal user details.
Select tLoginName, tPassword from tblTlDataBases where nDBID = 1
Note the user name and password returned from this query.
-
Open the Web.config file in a text editor and navigate to the following code:
<appSettings>
<add key="ServerConfig" value="<Server>" />
<add key="userName" value="TalismaAdmin" />
</appSettings> -
Replace the value of <Server> with the server you need to connect to.
-
Navigate to the following code:
<connectionStrings>
<add name="CrmDbConnection" providerName="System.Data.SqlClient" connectionString="Data Source=<Server>;Initial catalog=<DbName>;Trusted_Connection=No;UID=<UserID>;PWD=<Password>;Connect Timeout=120;Max Pool Size=500;Min Pool Size=0;MultipleActiveResultSets=True" />
</connectionStrings>
-
Replace the values < Server>, <DbName>, < UserID>, and < Password> with appropriate values.
-
Save and close the file
-
Restart the service if it is already running.
Configure the Security Web Service
-
Copy the Security Web Service installation folder to a desired location.
-
In IIS, host this folder as a Web Application. In the site’s context menu, select Add Application.
-
In the Add Application dialog box, specify the alias of your choice in the Alias field and then select the required application pool. Ensure that you select an application pool of type .Net 4.5 in integrated mode.
-
In the Physical path field, specify the folder path where the new Security Web Service folder has been copied.
Note: The application pool must be configured for a user with administrator privileges.
-
Click OK.
Updates in the Security Service Web Folder
-
In the new Security Web Service folder, locate the Web.config file.
-
Perform the steps described in Configure the Web.config File.
Configure Staff STS
-
Copy the Staff STS installation folder to a desired location.
-
In IIS, host this folder as a website. In the site’s context menu, select Add Website.
-
In the Add Website dialog box, specify the site name of your choice in the Site name field and then select the required application pool. Ensure that you select an application pool of type .Net 4.5 in integrated mode.
-
In the Physical path field, specify the folder path where the new Staff STS folder has been copied.
Note: The application pool must be configured for a user with administrator privileges.
-
In the Binding section, specify an unused port number.
-
Click OK.
Configure the Web.config File
-
In the second instance of the Staff STS folder, locate the Web.config file.
-
Locate the SecurityServiceCollection section in the path configuration\SecurityServiceConfigSection.
-
In the key <add name=”CRM” address=”<CRM Security Service URL>”>, replace <CRM Security Service URL> with the URL of the new Security Web Service configured in the previous procedure.
-
Save and close the file.
Configure the Cmc.Crm.Workspaces Application
-
Copy the Cmc.Crm.Workspaces installation folder to a desired location.
-
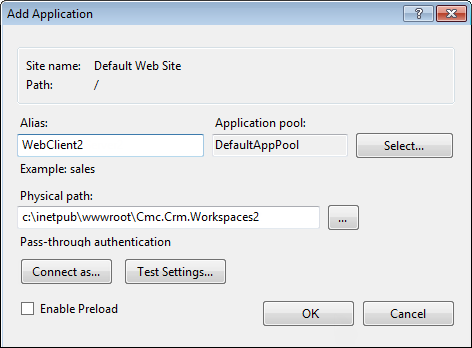
In IIS, host this folder as a web application. In the Default Web Site’s context menu, select Add Application.
-
In the Add Application dialog box, specify the alias of your choice in the Alias field and then select the required application pool. Ensure that you select an application pool of type .Net 4.5 in integrated mode.
-
In the Physical path field, specify the folder path where the files will be copied.
Note: The application pool must be configured for a user with administrator privileges.
-
Click OK.
Configure the Web.config File
-
Using a text editor, open the Web.config file that is available in the new Web Client folder, and navigate to the following code:
<add key="ServerConfig" value="<ServerName>/<DbName>" />
-
Replace the value of <ServerName> and <DbName> with the server and database name that you need to connect to.
-
Navigate to the following section:
<add key="NotificationServerConfig" value="http://<MachineName>/<WebNotificationServerAlias>/NotificationRequest.ashx" />
-
Replace the value of WebNotificationServerAlias with the alias used while creating the new Web Notification Server.
-
Navigate to the following section:
<system.identityModel>
<identityConfiguration>
<audienceUris>
<add value="<Workspaces URL>" />
</audienceUris>
<issuerNameRegistry type="System.IdentityModel.Tokens.ConfigurationBasedIssuerNameRegistry, System.IdentityModel, Version=4.0.0.0, Culture=neutral, PublicKeyToken=b77a5c561934e089">
<trustedIssuers>
<add thumbprint="XXXX" name="STS" />
</trustedIssuers>
</issuerNameRegistry>
</identityConfiguration>
</system.identityModel>
<system.identityModel.services>
<federationConfiguration>
<wsFederation passiveRedirectEnabled="true" requireHttps="false" issuer="<Staff STS Url>" realm="<Workspaces URL>" />
<cookieHandler requireSsl="false" />
</federationConfiguration>
</system.identityModel.services>
-
Replace the <Workspaces URL> with the new Web Client URL and <Staff STS URL> with the new Staff STS URL configured previously.
-
Save and close the file.
Updates in the Web Client Folder
-
In the second instance of the Web Client folder, locate the Web.config file.
-
Perform the steps described in Configuring the Web.config File.