The Web Client is supported to work in a Network Load Balancing Services (NLBS) environment. This article describes steps that are required to configure Web Client in an NLBS environment. When NLBS is implemented, the configuration ensures that requests received in multiple Web Client computers are distributed and the load is balanced across all computers.
The configuration requires that multiple Web Client computers must all be connected to a computer on which the NLBS service is hosted. The following figure illustrates this configuration:
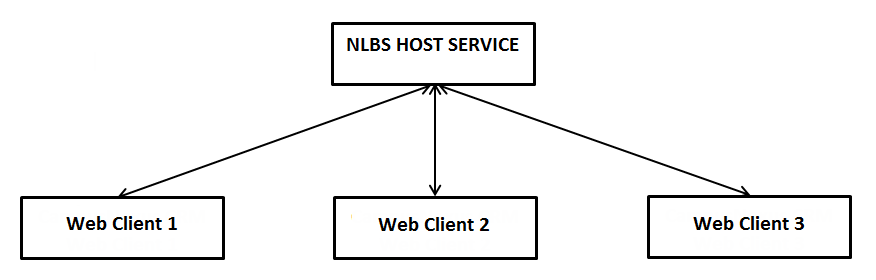
In this scenario, user requests are routed to different Web Client computers to ensure that the load is balanced among all computers.
Prerequisites
The same STS certificate must be installed on the NLBS service host computer and the Web Client computers.
Modify Configuration in the Web.config File
In the Web.config file, modify configurations as indicated in this section on each Web Client computer. The Web.config file is available in the following paths
-
<system drive>:\inetpub\wwwroot\cmc.crm.workspaces - The Web.config file in this path is applicable to Web Client on a Windows computer.
Navigate to the indicated code snippets and change the highlighted code to its modified value.
Make the following configuration changes in the Web.config file that is applicable to Web Client on a Windows computer. The text in red must be replaced with the NLBS configured URL.
-
<add key="issuer" value="https://Staff STS URL/Identity/connect/token"/> -- The Staff STS URL. The above URL must not be changed unless Staff STS is in NLBS mode.
<add key="realm" value="http://<Web Client URL>/"/> -- This is the Workspace URL.
-
<add key="OAuthEndPoint" value="https://Staff StS URL/Identity/connect/token"/>
The above URL must not be changed unless Staff STS is in NLBS mode.
Note: After the code changes are saved, perform these steps on the following node on each Web Client computer:
- cmc.crm.workspaces
-
In the Internet Information Services Manager (IIS), click the node in the Connections pane.
-
In the right pane, double-click Machine Key.
In the Validation key and Decryption key areas, clear the following option:
- Automatically generate at runtime
-
Click Generate Keys in the Actions pane. Key values are generated in the Validation key and Decryption key areas. Copy these keys and apply then on all Web Client computers which are participating in the NLBS configuration. Across all Web Client computers, ensure that values are identical in both areas.
-
In the Advanced Settings dialog (click the Web Client website in the Connections pane and then click Advanced Settings in the Action pane), the value in the ID field must be identical in the NLBS nodes:

Setting Up Non-Sticky Support
Non-sticky support in an NLBS environment is efficient and speeds up communication because Web Client resources are optimally utilized and scale up appropriately. Non-sticky support can be configured in IIS and Azure environments. To enable non-sticky support, make the following changes to the Web.config file that is available in the path <system drive>:\inetpub\wwwroot\cmc.crm.workspaces.
When Web Client is Hosted on an IIS Web Server
-
Navigate to the following code in the Web.config file:
<sessionState mode="InProc" stateConnectionString="tcpip=<web client>:42424" sqlConnectionString="data source=127.0.0.1;Trusted_Connection=yes" cookieless="false" timeout="20" />
-
Ensure that the value of the sessionState mode parameter is changed from InProc to StateServer. Make this change on all computers where Web Client is installed.
-
A single instance of the ASP.Net State service is required to run across all Web Client computers. On computers where the service is not running, in the Web.config file replace the text <web client> (in the tcpip parameter of sessionState) with the name of the Web Client computer where the service is running.
-
Navigate to the following code:
<add key="AttachmentSharedFolder" value=”” />
Update the value field with the network path where attachments will be saved.
-
Save the Web.config file.
Where Web Client is Hosted in an Azure Environment
-
Navigate to the following code in the Web.config file:
<add key="AttachmentSharedFolder" value="" />
<add key="AzureStorageAccountName" value="" />
<add key="AzureStorageKey" value="" />
Specify appropriate values for the following parameters:
-
AttachmentSharedFolder: The Web Client attachments Azure storage folder path
-
AzureStorageAccountName: The user name to access the Azure storage location
-
AzureStorageKey – the password to the Azure storage location
-
-
Uncomment configuration 1 and comment configuration 2:
Configuration 1
<!--<sessionState mode="Custom" customProvider="MySessionStateStore">
<providers>
Configuration 2
<!-- <sessionState mode="InProc" stateConnectionString="tcpip=127.0.0.1:42424" sqlConnectionString="data source=127.0.0.1;Trusted_Connection=yes" cookieless="false" timeout="20" />
-->
-
Locate the following code and specify values for the indicated parameters:
<add name="MySessionStateStore" type="Microsoft.Web.Redis.RedisSessionStateProvider" host="" accessKey="" ssl="false" port="" />
</providers>
</sessionState>
-
Host: The name of the redis computer
-
accessKey: Type the key value
-
port: Port that will be accessed by redis
-
-
Save the Web.config file.
-
If the sessionstate request does not communicate with the sessionstate service in a load-balanced environment even if the "Windows Firewall" is disabled or it’s turned on and the TCP port is enabled through inbound rules, update the “AllowRemoteConnection” registry key value from 0 to 1 on the session-state server where the "ASP.NET state” service is running. It must be updated in the following path to accept remote requests:
HKEY_LOCAL_MACHINE\SYSTEM\CurrentControlSet\Services\aspnet_state\Parameters\AllowRemoteConnection
-
The Startup Type value of the ASP.NET state service Windows service must be set to Automatic.
Important: Ensure that Web Client and other components (in Azure – IaaS) all have identical time zone settings.