The Web Client component supports browser-based access allowing agents to access critical CampusNexus CRM functions through the Internet from anywhere in the world.
Prerequisites
Identify and install the prerequisite software. See Software Requirements by Component — Web Client.
-
Before installing the Web Client for CampusNexus CRM, uninstall previous versions of Web Client.
-
The Web Client for CampusNexus CRM version 11.0 or later requires the Staff STS component to be installed. Go to the Start screen and select Package Manager. Download the Staff STS package and install it. For more details, see Staff STS.
As a result of the installation, the following appSettings are added to the web.config of the web service.
<appSettings>
<add key="ServerConfig" value="<server>/<MainDB>" />
<add key="UserName" value="<UserName>" />
<add key="CoreLogging" value="1" />
</appSettings>
The Staff STS uses this new web service to authorize and authenticate CampusNexus CRM Web Client Staff logins.
<SecurityServiceCollection>
<add name="<name>" address="<URL>" enabled="false" />
<add name="CRM" address="http://StaffSTSServiceServer/<VirtualDirectoryName>/ Security/SecurityService.svc" />
</SecurityServiceCollection>
Set Up Web Clients
-
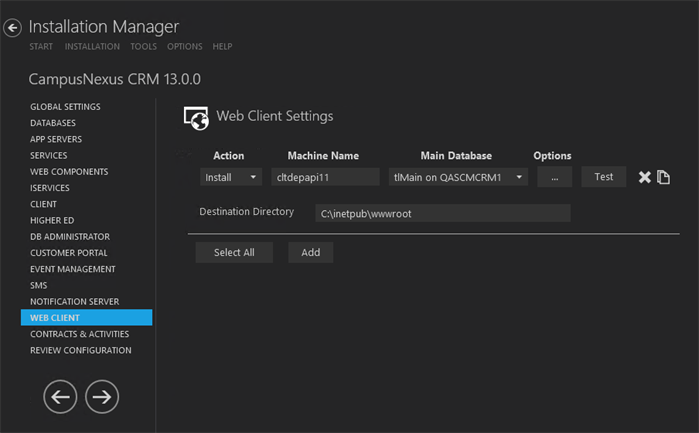
In the Installation menu, click Web Client. The Web Client Settings screen is displayed.

-
Click Add to add a line to the Settings screen.
-
Select an appropriate Action. The following Action values are available:
-
None – Performs no action.
-
Install – Performs a fresh installation or upgrade of a component. You can install or upgrade multiple components at same time.
-
Uninstall – Removes all subcomponents on that machine and uninstalls the component from Programs and Features.
Optional: Click Select All to set the Action field to Install for all components listed on this screen. Click Unselect All to set the Action field to None.
-
-
Enter the Machine Name for the component to be installed.
-
Select a Database from the Database list.
-
Click
 to copy a line. Edit the copied line as needed.
 -
Click
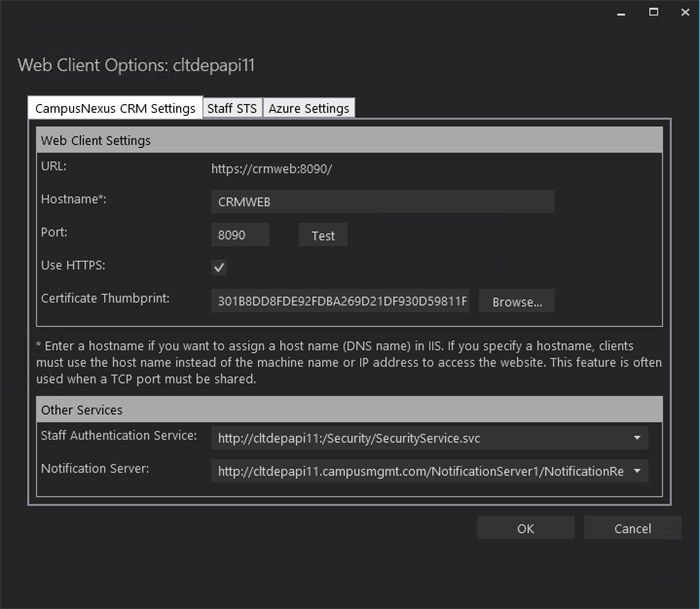
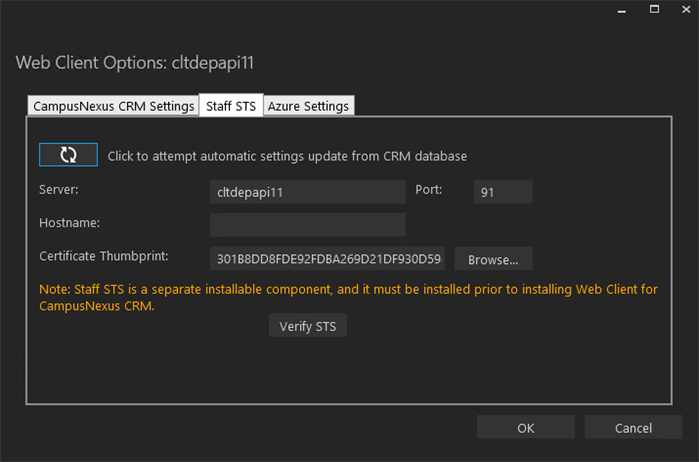
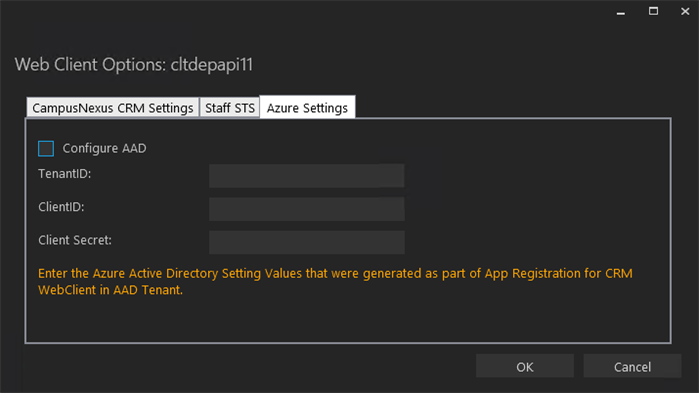
 to view and edit the Options form.
 CampusNexus CRM Settings Tab
Used this tab to specify settings for the CRM Web Client, Staff Authentication Service, and Notification Server.

If multiple instances of Web Client are installed, they must all be associated with a common instance of Notification Server.
Staff STS Tab
Use this tab to specify the Staff STS server, port, hostname (if applicable), and certificate. Staff STS must be installed prior to installing the Web Client for CampusNexus CRM.

-
Click OK to save changes on the Options form. The form is closed.
-
Click
 to delete a selected line.
 -
Accept the default Destination Directory or select a directory where the information for this component is stored. Changing this directory will apply across all machines in the Machine Name column.
-
Click Test to ensure the setup for the corresponding line is correct. If a test on a particular line fails, check all associated fields and click Test again.
-
If all tests pass, click
 .
.
Postinstallation Tasks
Perform the following postinstallation steps for Web Client:
- In the right pane of IIS Manager, double-click ISAPI and CGI Restrictions and ensure that the Allowed option is enabled for all the Web Service Extensions.
When the Web Client is installed on a Windows 64-bit computer, set the value of the Enable 32-Bit Applications option to False in the Internet Information Service Manager (IIS). To do so:
-
On the computer where Web Client is installed, open Internet Information Service Manager.
-
Click Application Pools.
-
Right-click the Application Pool on which Web Client is running, and select Advanced Settings.
-
Set the value of the Enable 32-Bit Applications option to False.
-
Click OK.
If the regional settings of the Web Client computer are not set to a 24-hour format, perform the following steps:
-
Launch IIS Manager on the Web Client computer.
-
Navigate to Sites\Default Web Site\cmc.crm.workspaces.
-
In the right pane, double-click .NET Globalization.
-
In the Culture list, select a language that supports a 24-hour format (E.g.: English (United Kingdom) (en-GB) or English (United States) (en-US)).
-
Reset IIS.
Configuration Settings
You can set the value of the maxAttachmentSize and RestrictedFileFormat tags in the web.config file. To do so, perform the following steps:
-
Navigate to
<CampusNexus CRM installation folder>\cmc.crm.workspaces. -
Open the web.config file.
-
Add the maxAttachmentSize and RestrictedFileFormat tags and values.
"maxAttachmentSize" and "RestrictedFileFormat" Tags and Values Tag Description maxAttachmentSize Enables you to set the maximum limit of the files that can be attached in Web Client. For example, if the value of this parameter is set to 2048 kilobytes, a Web Client User can attach single or multiple files totaling to a size of 2 MB.
By default, the value of this tag is 25 MB.
Important:
By default, the maximum allowed IIS (Internet Information Services) limit for file upload on any Website is 28.6 MB.
If you want to increase the maximum upload limit to a value that is greater than 25 MB, you must first configure your IIS file upload limit to the required value.
To do this, ensure you specify the appropriate value (in bytes) in the maxAllowedContentLength attribute. A sample code extract is shown here:

After configuring the file upload limit value in IIS, you must configure the maxAttachmentSize
RestrictedFileFormat Enables you to specify the file formats that cannot be attached in Web Client. To add a list of file formats that are not supported, add the extension of the file format in this tag. To add multiple file formats, separate the file extensions by the comma delimiter. For example:
.txt,.jpeg,.gifThe default value is
.exe, .bat, which indicates that files with the .exe and .bat format cannot be attached in Web Client. -
Save the web.config file.
-
You can configure the execution time-out period for the Web Client server in the web.config file of Web Client. The execution time-out period is the elapsed time after which an execution request from the Web Client server is timed out. By default, the execution time-out period is set to 120 seconds.
To specify a custom value for the execution time-out period, add the following line of code in the web.config file:
<httpRuntime executionTimeout="<<Time-Out Period>>"/>, where<<Time-Out Period>>is the elapsed time after which an execution request from the Web Client server must be timed out.For example, specify:
<httpRuntime executionTimeout="360"/> -
Save and close the web.config file.
