Credit Card Payment Form
This topic shows how a form sequence for credit card payments could be designed. It also details the associated workflow and shows the rendered sequence.
|
|
The screen captures in this topic show an earlier Forms Builder version. While the UI has been updated, the basic functionality is unchanged. |
Prerequisites
See Credit Card Payment component.
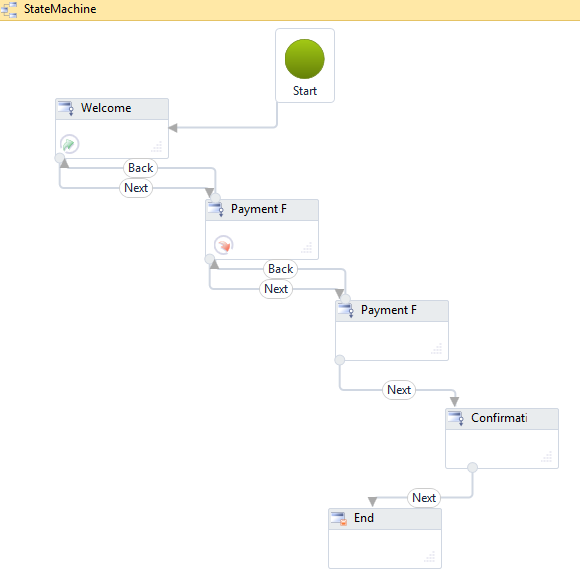
Create the Form Sequence
For a credit card payment sequence, we recommend creating one form to gather the payment data (e.g., name, address, state, country, etc.), another form for the Credit Card Payment component, and a confirmation form that is displayed when the user returns from the PayPal site.
-
In Form Designer, create the layout of the form to gather the payment data (form 1).
-
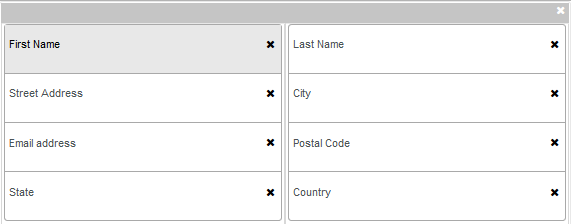
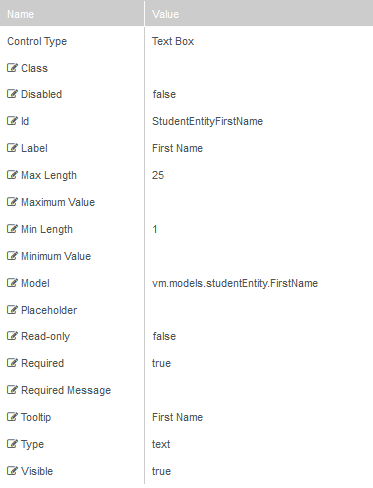
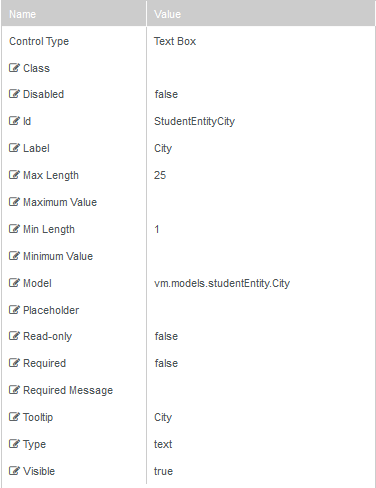
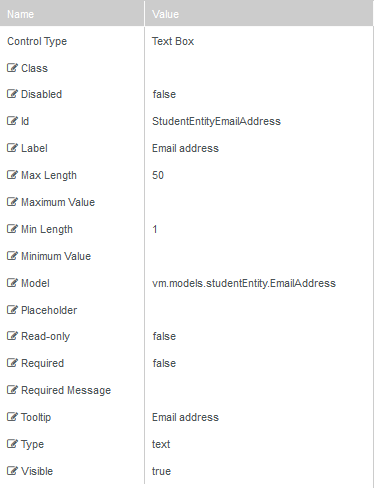
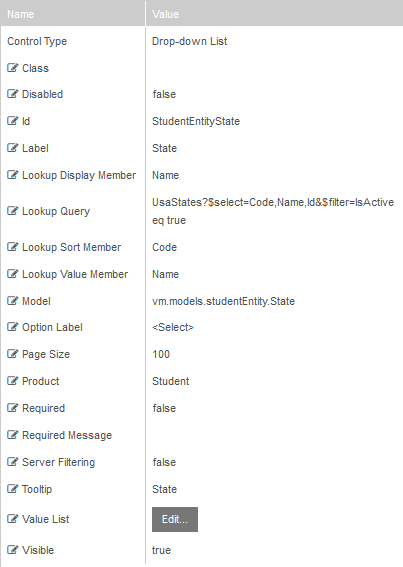
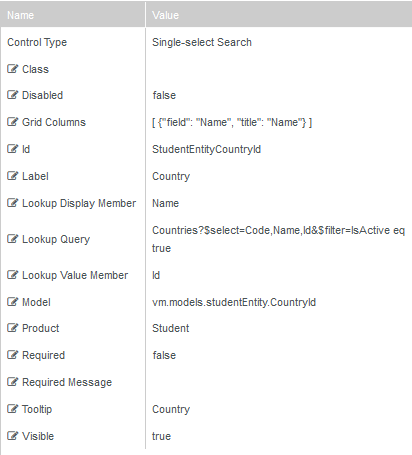
Define the properties for the form fields. In this example, the form fields are bound to the vm.models.studentEntity.
 First Name Last Name Street Address City Email address Postal Code State Country
 -
Save the form.
-
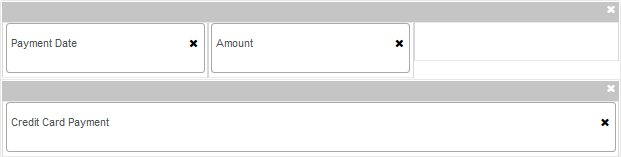
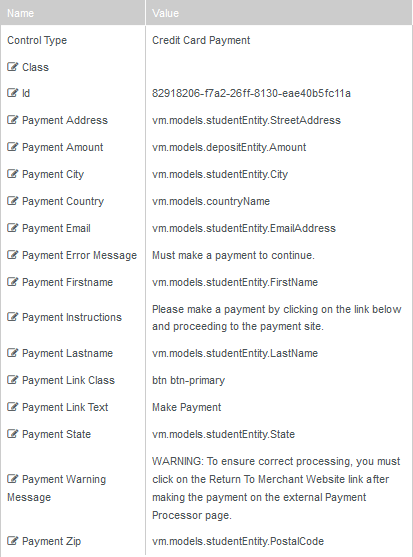
Create the layout of the form with the Credit Card Payment component (form 2). This form contains the "Make Payment" button that links to the payment form on the PayPal site.
-
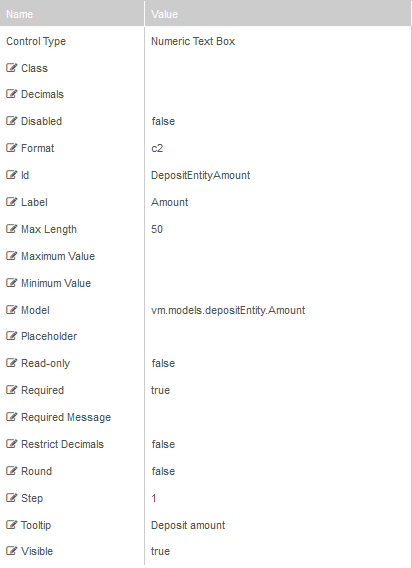
Define the properties and bindings for the form fields. In this example, the Payment Date and Amount fields are bound to the vm.models.depositEntity. The property settings for Credit Card Payment component contain bindings for the vm.models.studentEntity, the vm.models.depositEntity, and vm.models.countryName.
Payment Date Amount -
Save the form.
-
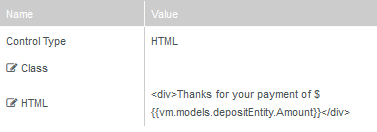
Create a confirmation form that contains an HTML component with property settings similar to the example below (form 3). Note that the syntax {{vm.models.depositEntity.Amount}} allows the form to display the value of the Payment Amount property specified in the Credit Card Payment component above.
-
Save the form.
-
In Sequence Designer, create and save an authenticated sequence that contains a welcome form and the 3 forms built above.
-
Launch Workflow Composer and open the workflow. See Open the Workflow for a Sequence.


Modify the Workflow
-
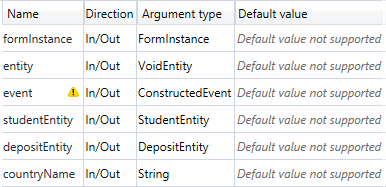
Create arguments to match the vm.models bindings defined in Credit Card Payment component above.
Note: To prepopulate fields in the payment form, create additional arguments as needed and add corresponding Assign activities in the entry state of the first form in the workflow.
-
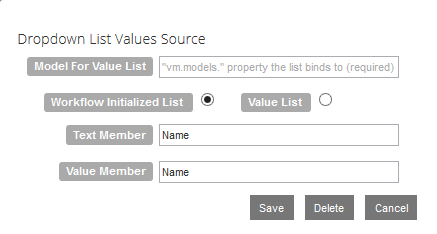
Create variables as needed. Our example creates a variable named "CountryLookup" that will be used to populate the Single-select Search component used for the Country field.

-
In the Entry section of the Welcome form/state, add the activities needed to prepopulate the payment form.
Our example creates the DepositEntity and uses Assign activities for the following values:
depositEntity.DepositReceivedDate = datetime.Now depositEntity.Amount = 50.00d 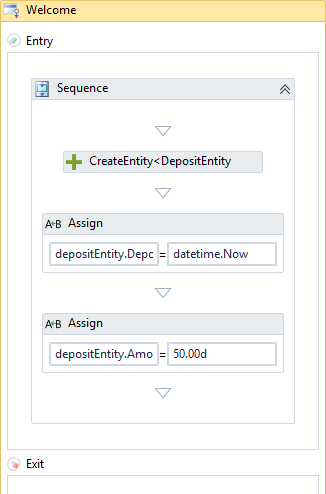
Note: To prepopulate fields in the payment form based on existing database records, place a LookupUser activity in the entry section of the Welcome form.
-
Optionally, add a LogLine activity below the Assign activities to capture the Transaction Id in the log. Specify the following properties:
Text: "FormInstance.paymentInfo.transactionId: "&formInstance.PaymentInfo.TransactionId
Level: Information
-
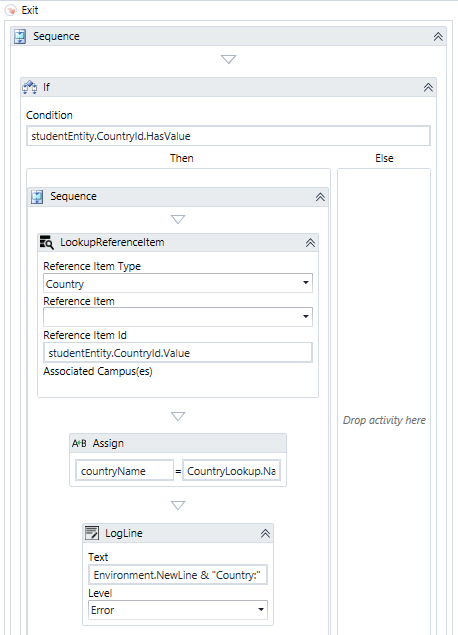
Add a Sequence activity to the Exit section of the form that contains the Country field (form 1). The Sequence will hold the workflow activities needed to populate the Single-select Search component for the Country field.
-
Drag and If activity into the Sequence and specify the following Condition: studentEntity.CountryId.HasValue
-
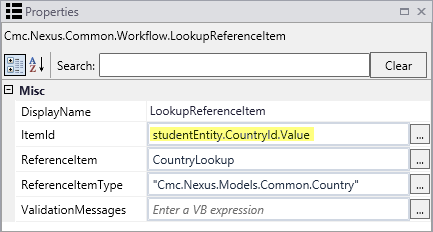
Drag a LookupReferenceItem activity into the Then branch. Specify the following properties:
Reference Item Type = Country
Reference Item Id = studentEntity.CountryId.Value
Note: The CountryId integer value from the Anthology Student database needs to be converted to a string (text) to pass it to the PayPal site. The highlighted value is populated from the Reference Item Type drop-down list in the LookupReferenceItem activity (or from the Anthology Student database if a getEntity > StudentEntity activity is used to populate the bindings). The conversion from integer to string is accomplished with the Assign activity that follows.
CountryName in assignment statement is the in/out argument bound to Country property in CreditCard component
-
Drag an Assign activity into the Then branch. Specify the following properties:
countryName = CountryLookup.Name.Trim
-
Drag a Logline activity into the Then branch. Specify the following properties:
Text: Environment.NewLine & "Country:" & countryName & " State:" & studentEntity.State
Level: Information
-
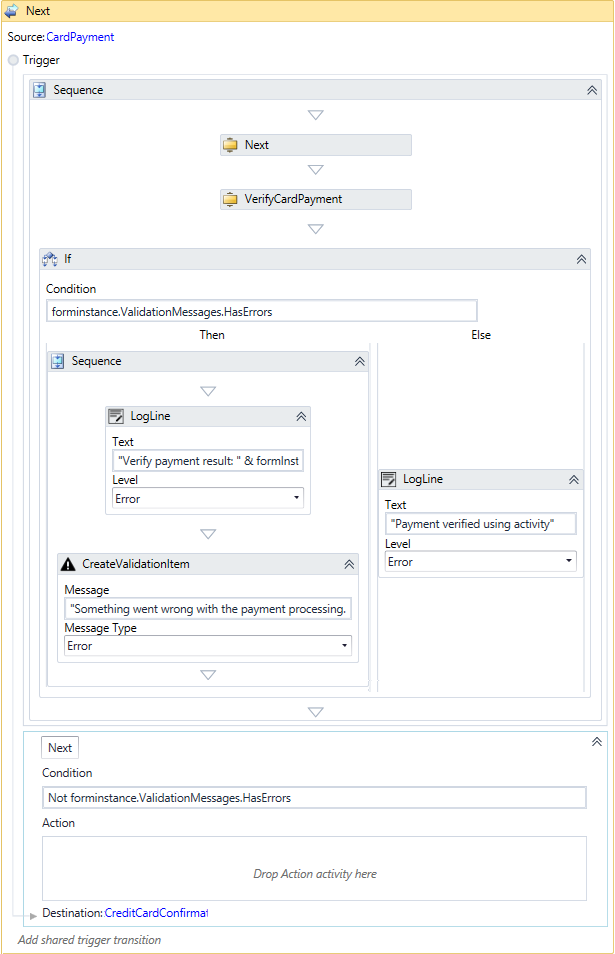
Double-click the Next transition below the form that contains the Credit Card Payment Component (form 2).
-
In the trigger section of the Next transition, add a Sequence activity and insert a WaitForFormBookmark activity.
-
Add a VerifyCardPayment activity with the following properties:
PaymentAmount: Amount PaymentTransactionId: formInstance.PaymentInfo.TransactionId ValidationMessages: formInstance.ValidationMessages -
Drag an If activity below the WaitForFormBookmark activity.
-
In the Condition field, specify: formInstance.ValidationMessages.HasErrors
-
In the Then branch, add a LogLine activity. Specify the following properties:
Text: "Verify payment result: " & formInstance.ValidationMessages(0).Message
Level: Information
-
Below the LogLine, add CreateValidationItem activity with the following properties:
Message: "Something went wrong with the payment processing. Please contact customer service to confirm that your payment was processed correctly." Message Type: Error -
In the Else branch, add a LogLine activity. Specify the following properties:
Text: "Payment verified using activity"
Level: Information
-
In the Condition field of the Next transition, specify: Not formInstance.ValidationMessages.HasErrors
-
Use the following activities to post payments.
-
In the Action section of the previous activity, insert a sequence with a GetServiceInstance<> activity using the <IStudentAccountTransactionService>. Create a variable for the Result OutArgument.
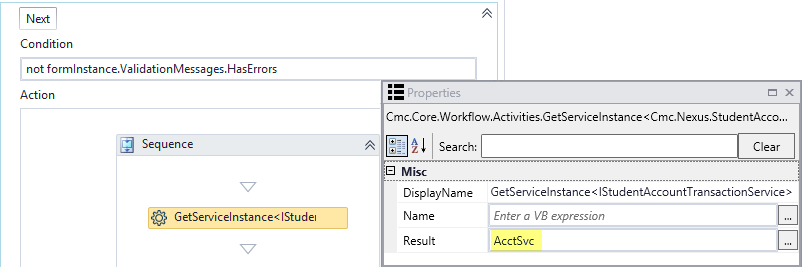
The variable must be of type IStudentAccountTransactionService as shown below:

-
Create variables named postRequest and postResponse as shown below.

-
Below the GetServiceInstance activity, drop an Assign activity for each row in the following table and specify the indicated values:
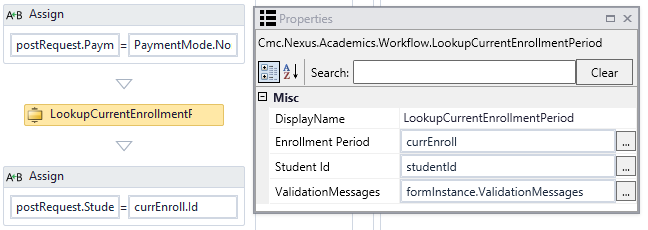
"To" Field Value postRequest.StudentId studentId postRequest.TransactionAmount depositEntity.Amount postRequest.TransactionDate depositEntity.DepositReceivedDate postRequest.PaymentMode PaymentMode.Normal -
Insert a LookupCurrentEnrollmentPeriod activity below the Assign activities. Use the "studentId" variable as InArgument and the "currEnroll" variable as OutArgument for the LookupEnrollmentPeriod activity.
Define the "currEnroll" variable as shown below:

-
Insert Assign activities below the LookupEnrollmentPeriod activity using the following attributes:
"To" Field Value postRequest.StudentEnrollmentPeriodId currEnroll.Id postResponse AcctSvc.PostAccountTransactionPayment(PostRequest) Note: If cashiering is enabled, additional assignment statements will be needed.
-
(Optional ) Insert a LogLine activity. Specify the following properties:
Text: Newtonsoft.Json.JsonConvert.SerializeObject(postResponse,Newtonsoft.Json.Formatting.Indented)
Level: Information
Publish and enable the workflow.
Test the Rendered Sequence
-
Access the sequence in the Sequence List.
-
Log in to Portal.
-
Complete the form that gathers the payment information (form 1) and click Next.

-
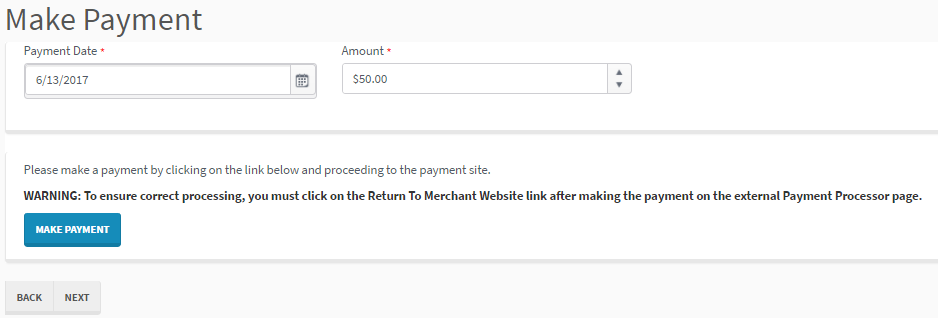
On the next form, note that the Payment Date and Amount fields are prepopulated based on the workflow definition. Click the Make Payment button.
-
Complete the payment form on the PayPal site and click Pay Now.
Refer to the following website to obtain credit card numbers for testing:
https://developer.paypal.com/docs/classic/payflow/integration-guide/?mark=test%20card%20numbers#credit-card-numbers-for-testing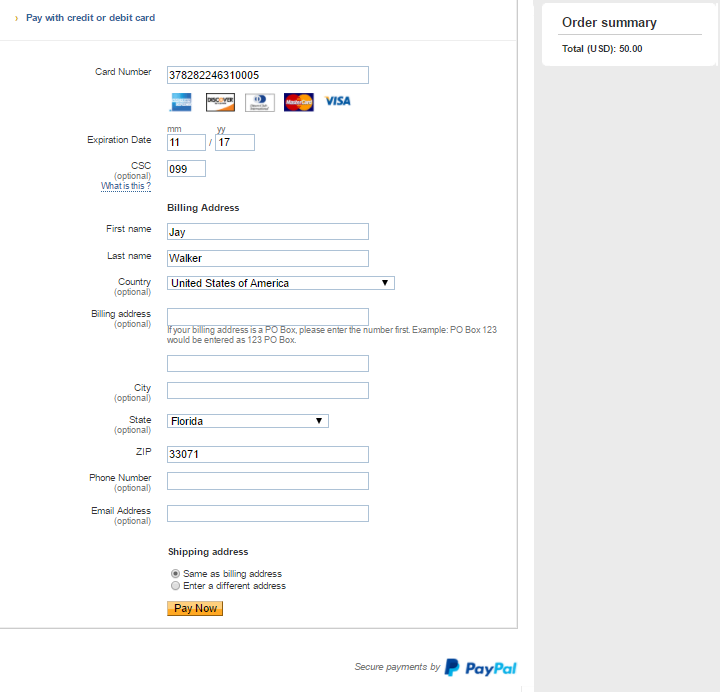
-
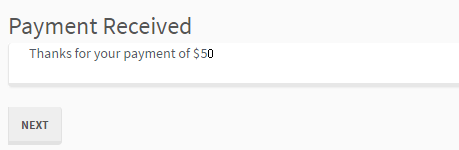
A confirmation page from PayPal is displayed. Click the Return to Anthology Inc. link (this is the customized return link configured in PayPal).
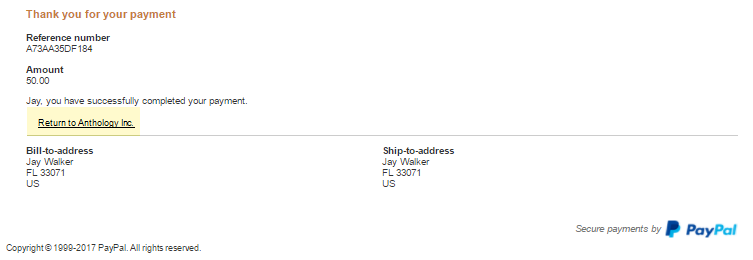
Note: If a user loses the Internet connection while on the PayPal receipt page and logs back in, the user will be returned to the Make Payment form. The user will be charged again if the Make Payment button is clicked again.
-
The confirmation form from your Forms Builder sequence is displayed.