The topic "Adobe Sign Settings" is not available in Version 3.5.
The topic "Adobe Sign Settings" is not available in Version 3.6.
Adobe Sign Settings
The first step in integrating with Adobe Sign is to create an account at this URL - https://secure.echosign.com/public/login.
Anthology is a certified integration partner with Adobe Sign, which means that the Anthology application that’s created is certified by Adobe Sign.
Institutions can integrate with Adobe Sign through a login process by using your Adobe Sign login credentials. Back-end details of Anthology’s certified application will then be used in combination with your login credentials to enable end-users to work with Adobe Sign.
To Integrate With Adobe Sign
-
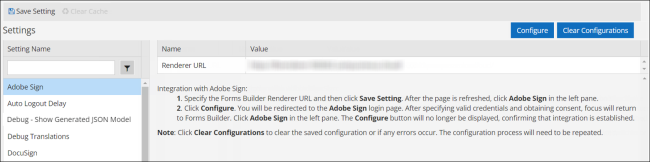
On the Forms Builder home page, click the Settings tile and select Adobe Sign in the Settings pane. The Properties pane will be displayed.
-
In the Renderer URL field, specify the Forms Builder Renderer URL and then click Save Setting.
-
After the page is refreshed, click Adobe Sign in the left pane and then click
 .
. You will be redirected to the Adobe Sign login page.
Specify valid login credentials and also obtain consent. In the background, values specific to the integration process will be fetched from Adobe Sign and stored in Forms Builder.
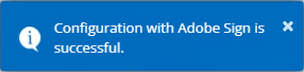
When consent is obtained, focus will return to Forms Builder. The following message will also be displayed:
-
Click Adobe Sign in the left pane. The
button will no longer be displayed, confirming that integration is established. -
Reset IIS or wait an hour for the changes to take effect.
Note:
-
Click
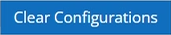 to clear saved integration settings. For example, administrators can clear configurations in a scenario where errors occur. After configurations are cleared, the integration process must be repeated.
 -
If Adobe Sign is not used in the previous 60 days, the configuration process will need to be repeated, which will auto-generate a new refresh token that will then be used in the background when Adobe Sign is used.
The first step to enable Adobe Sign signatures on Forms Builder forms is to open an account with Adobe Sign (see https://helpx.adobe.com/sign/using/get-started-guide.html). Once you have created an account, you need to set up Forms Builder to collect the account credentials that will be sent to and authorized by Adobe Sign.
Adobe Sign treats Forms Builder as a Partner application. This application type has access to any authorized Adobe Sign account group. Partner applications are certified by Adobe Sign before they are given full access to other accounts. The certification process checks partner applications for any potential security vulnerabilities.
Set Up Forms Builder for Adobe Sign
-
Log in to your Adobe Sign account.
-
In the left menu, navigate to Account > Adobe Sign API > API Applications.
-
Click the + icon to create an application.
-
Specify a Name and Display Name for your application.
-
Under Domain, select CUSTOMER and click Save.
-
Select your application and click Configure OAuth for Application.
-
Copy and paste <your Forms Renderer site URL> into the Redirect URI field and click Save.

-
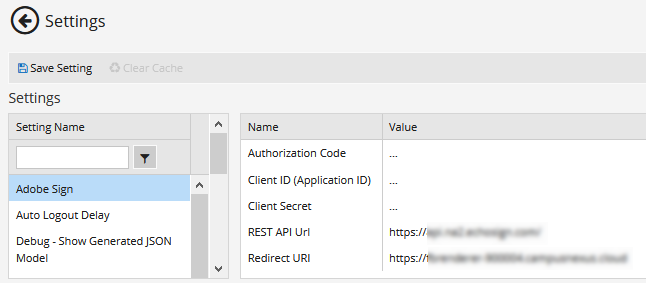
On the Forms Builder home page, click the Settings tile and select Adobe Sign. The Properties pane will be populated with the Adobe Sign properties.
-
Perform the following steps to get an authorization code:
-
Use your Adobe Sign credentials and log in to:
https://secure.na2.echosign.com/public/oauth?redirect_uri=https://<your Forms Renderer site URL>&response_type=code&client_id=CBJCHBCAABAAM2AiiuegTZ6oeZSiU5btZFWx-KOuXln4&scope=user_login:self+agreement_read:group+agreement_write:group+webhook_read:group+webhook_write:group
The site returns a URL with query string similar to this:
https://<your Forms Renderer site URL>?code=CBJCHBCAABAAM2AiiuegTZ6oeZSiU5btZFWx-KOuXln4&api_access_point=https%3A%2F%2Fapi.na2.echosign.com%2F&web_access_point=https%3A%2F%2Fsecure.na2.echosign.com%2F#/
The returned authorization code and security tokens will be valid for 5 minutes.
-
Access a free URL Parser / Query String Splitter on the web (e.g., https://www.freeformatter.com/url-parser-query-string-splitter.html).
-
Paste the URL returned by the Adobe Sign site into the provided field on the formatter site and click Parse.
-
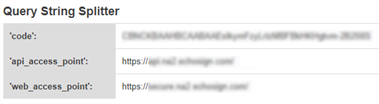
Scroll down to the Query String Splitter section.
-
Copy and paste the 'code' value from the Query String Splitter into the Authorization Code field.
-
Copy and paste the 'api_access_point' value from the Query String Splitter into the REST API Url field.
Important:
The authentication code is solely used to gain access to the authorization and refresh tokens. The expiration times for code and tokens are follows:
- The code lasts 5 minutes.
- The authentication token lasts 1 hour.
- The refresh token lasts 60 days.
The timer restarts every time you use the authToken and/or refreshToken. This implementation follows the ‘authorization code’ grant type of OAuth2.0 flow as described here: https://oauth.net/2/grant-types/authorization-code/
A client can continue to use a refresh token indefinitely, as long as it is being used at least once every 60 days - otherwise it expires automatically. If the timer expires (i.e., Adobe Sign sequences are not executed in 60 days), you need to obtain a new authorization code using the steps above.
For more details about the OAuth process for the Adobe Sign APIs, see https://secure.na2.echosign.com/public/static/oauthDoc.jsp.
-
-
Copy and paste <your Forms Renderer site URL> into the Redirect URI field. This is the page on your website to which Adobe Sign will return users after the OAuth token exchange.
-
Copy and paste <your Client secret> from the Configure OAuth page of your Adobe Sign account into the Client Secret field. The Client Secret is encrypted in the Forms Builder database.
-
Copy and paste <your Client ID> from the Configure OAuth page of your Adobe Sign account into the Client ID (Application ID) field.

|
|
Whenever you edit a field in a Settings panel with hidden fields (i.e., sensitive data that are removed from the client-side view like passwords, keys, and secrets), you must re-enter the hidden values, otherwise they will get cleared upon update and resave of all the Settings. |
-
Save the Settings.
-
Once the Adobe Sign configuration is complete, reset IIS or wait an hour for the changes to take effect.