Automatic Lifecycle Stage Progression and Status Updates
Automatic Lifecycle Progression is a framework that provides capability to automatically move the lifecycle stages and update the Lifecycle statuses based on an update in the status of related entities.
This capability helps by auto progressing Lifecycle based on internal events which are related to Lifecycle, such as (but not limited to):
-
the Review Status or Application Status of the related Application record,
-
the Decision Status of the related Application record
-
the Enrollment Status or School Status of the related Enrollment record which is associated to the Lifecycle record, etc.
As part of the framework, system also provides a capability for the implementation team to configure and add a custom entity by defining and adding its relationship path to the Lifecycle entity (where Lifecycle is always on the one side of the relationship) and using that entity and its status to auto move the stages and status of the corresponding Lifecycle record.
The status of the related entities can be configured to auto move the stages and the state of the corresponding Lifecycle record thereby allowing the system to track each stage and reason at each point of progression and providing institutions a holistic view of student's path from Inquiry to Enrollment.
Configurations to Enable Automatic Lifecycle Stage Progression and Status Updates
The following configurations are required to enable automatic progression of Lifecycle stages and status updates:
For information on the permissions required to work with the Automatic Lifecycle Stage Progression and Status Updates feature, see Permissions for Automatic Lifecycle Stage Progression and Status Updates.
Configure Entity Relationship Paths
An entity relationship path defines the relationship between the Lifecycle entity and the related entity. This information is later used for configuring Lifecycle Progression Mapping records
The related entity should have a relationship with the Lifecycle entity where the Lifecycle entity is on the One side of the relationship.
By default, the entity relationship paths are shipped for the following entities that are related to the Lifecycle entity:
-
Application
-
Decision
-
Enrollment
-
Lifecycle
-
Recommendation
Steps to Configure an Entity Relationship Path
-
Navigate to the Entity Relationship Paths page (under Reference Data > Global).
-
Click New.
-
In the New Entity Relationship Path page, configure the following fields:
-
Source Entity - Select the entity name that is related to the Lifecycle entity where the Lifecycle entity has a One to One or One to Many relationship with the entity.
-
Destination Entity - Select the Lifecycle entity.
-
Relationship Path - Specify the lookup field of the Lifecycle entity field configured in the related entity (Source entity).
 Example
-
For an entity that is directly related to the Lifecycle entity (such as Enrollment - Lifecycle)
When the Source Entity is Enrollment, the value in the Relationship Path field should be specified as cmc_opportunityid, where cmc_opportunityid is the Lookup field of the Lifecycle entity in the Enrollment entity page.
-
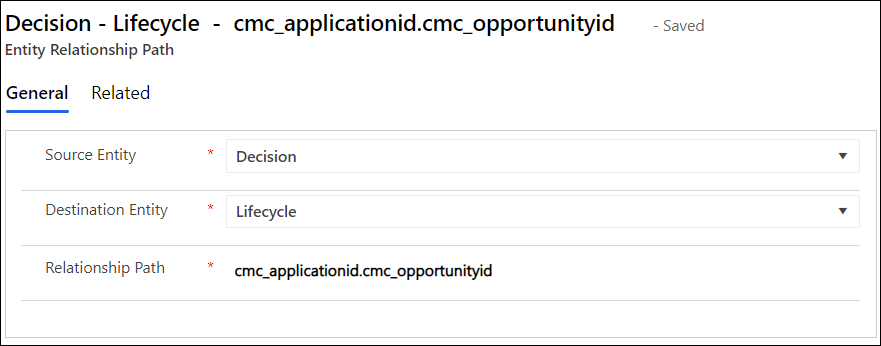
For an entity that is indirectly related to the Lifecycle entity (such as Decision - Application - Lifecycle)
When the Source Entity is Decision, which is related to the Lifecycle entity indirectly through the Application entity, the value in the Relationship Path field should be specified as cmc_applicationid.cmc_opportunityid .
Where, cmc_applicationid is the Lookup field of the Application entity in the Decision entity page and cmc_opportunityid is the Lookup field of the Lifecycle entity in the Application entity page.
For information on how to identify the lookup field of a related entity, see Steps to Locate the Lookup Field of a Related Entity.
-
-
-
Save the record.
Steps to Locate the Lookup Field of a Related Entity
The following steps provide information on how to identify the Relationship path between the Decision entity and the Lifecycle entity, where Decision is the source entity and Lifecycle is the target entity.
-
In Reach, navigate to the Customization page (under Settings > Advanced Settings > Customizations > Customizations).
-
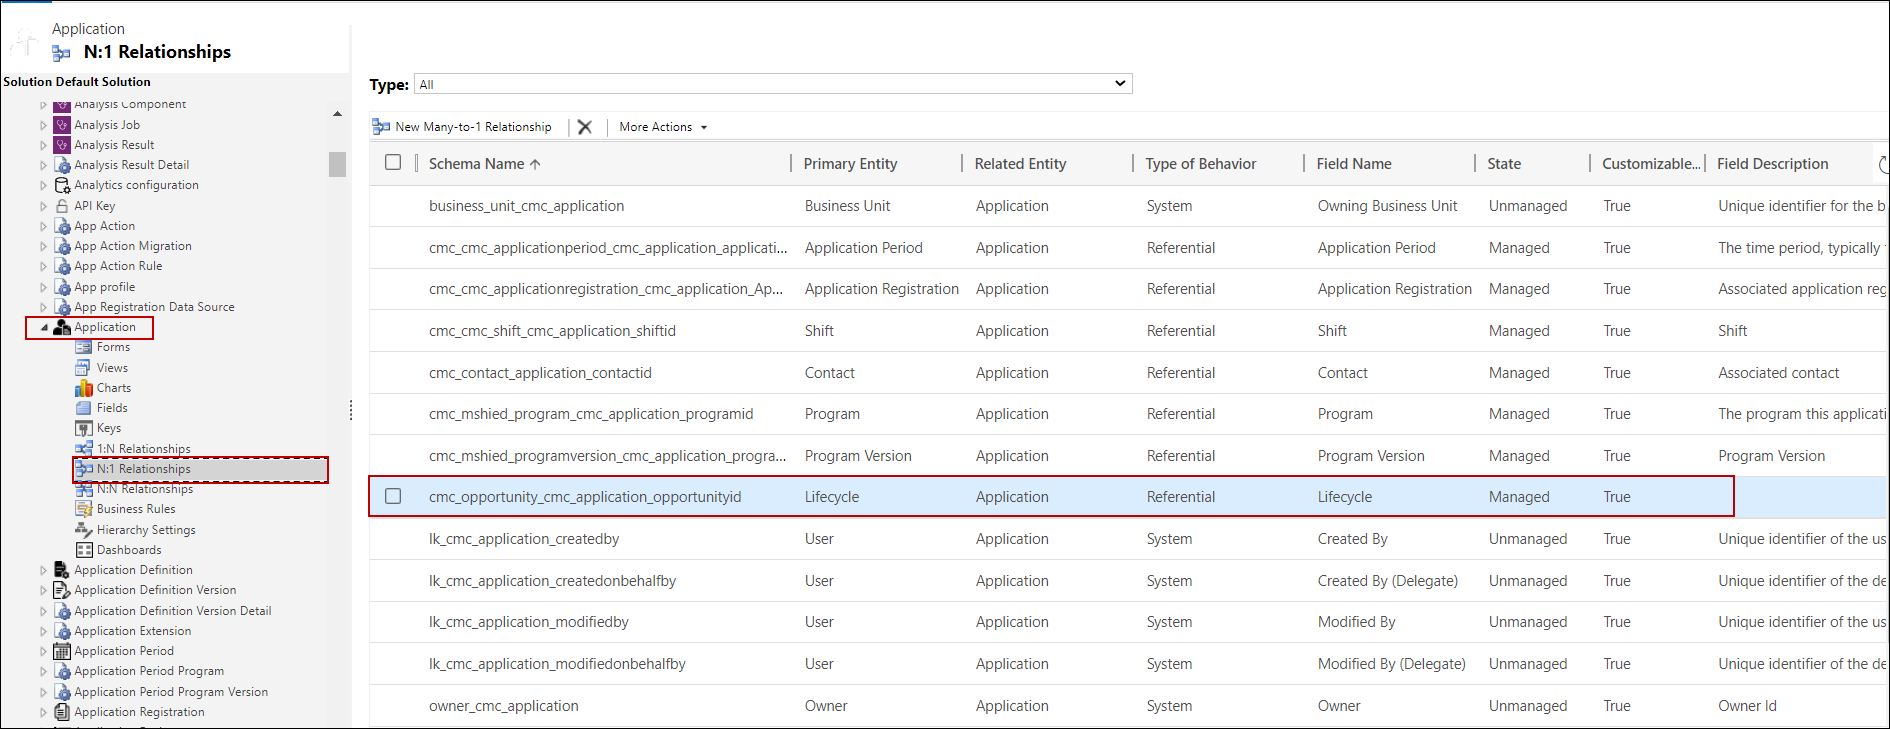
Click Customize the System, and navigate to the Application entity.
-
Click N:1 Relationship.
All the entities that have only one side relationship with the Application entity are listed on the right hand side.
-
Locate the relationship between the Application and the Lifecycle entity and double-click the record.
-
In the Lifecycle to Application relationship page, note the Name of the Lookup field of the Lifecycle entity, cmc_opportunityid.

-
Close the page.
-
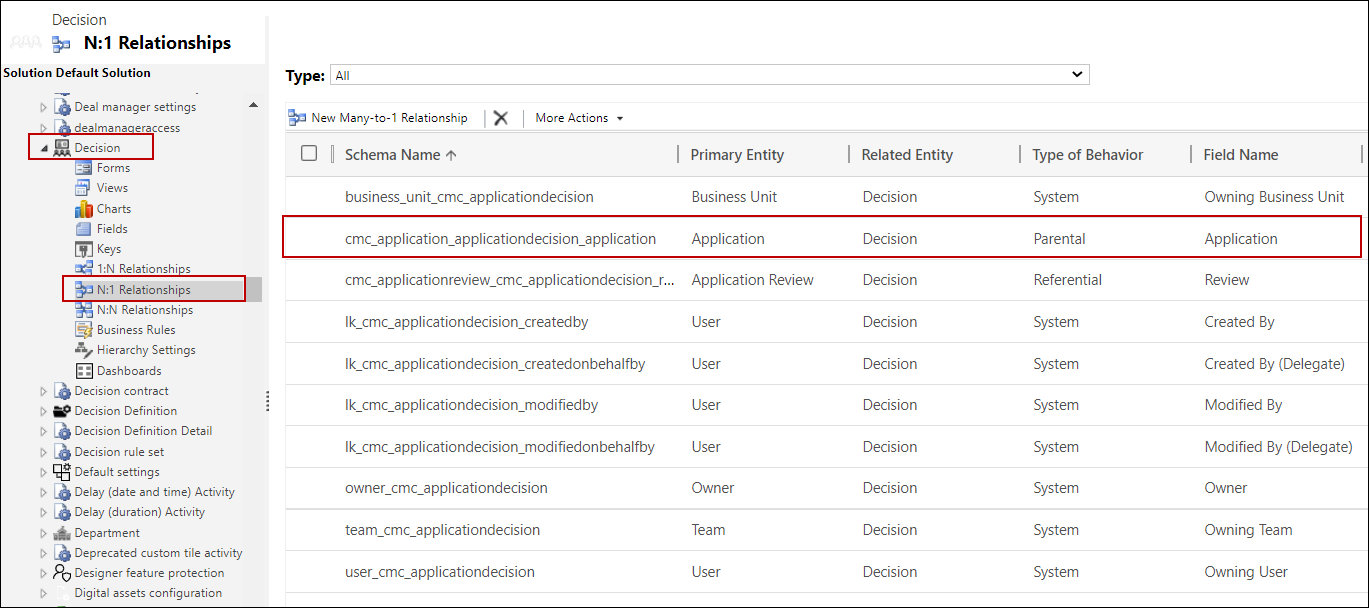
Navigate to the Decision entity and click the N:1 relationship.
-
Locate the relationship between the Application and the Decision entity and double-click the record.
-
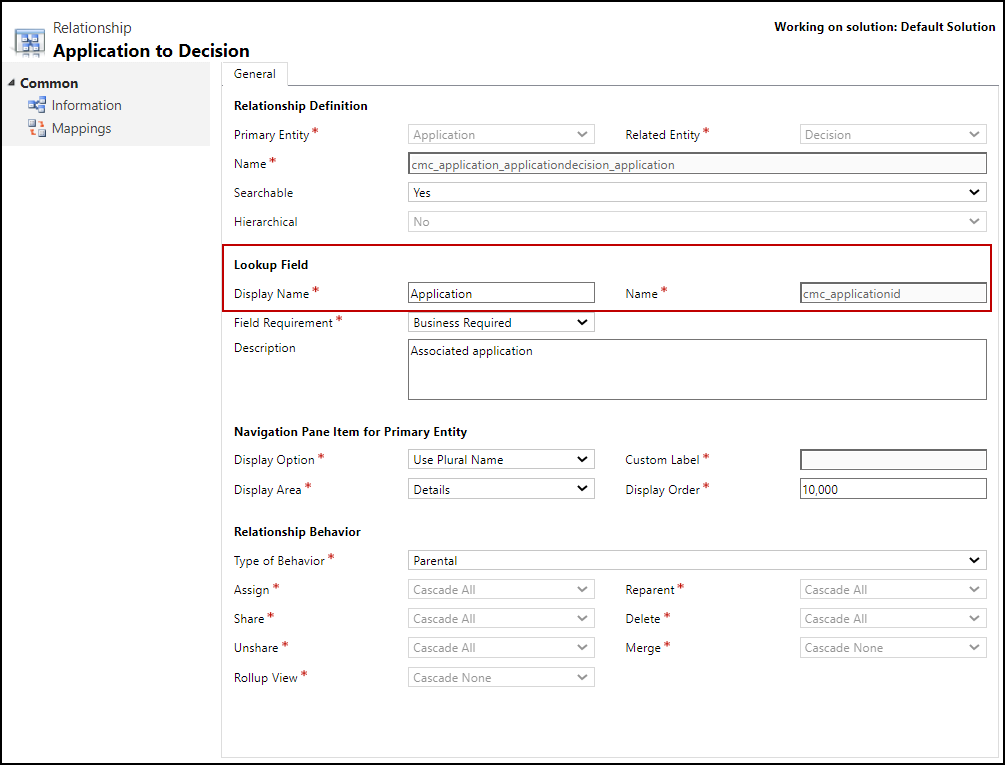
In the Application to Decision relationship page, note the Name of the Lookup field of the Application entity, cmc_applicationid.
-
Close all the pages.
Configure Lifecycle Progression Mappings
The configuration in a Lifecycle Progression Mapping record is used to determine the auto progression of lifecycle stages and update the lifecycle status.
-
Configure Entity Relationship Paths.
-
Configure the Lifecycle Statuses for BPF Stages in the Default Configurations page.
Steps to Configure Lifecycle Progression Mappings
-
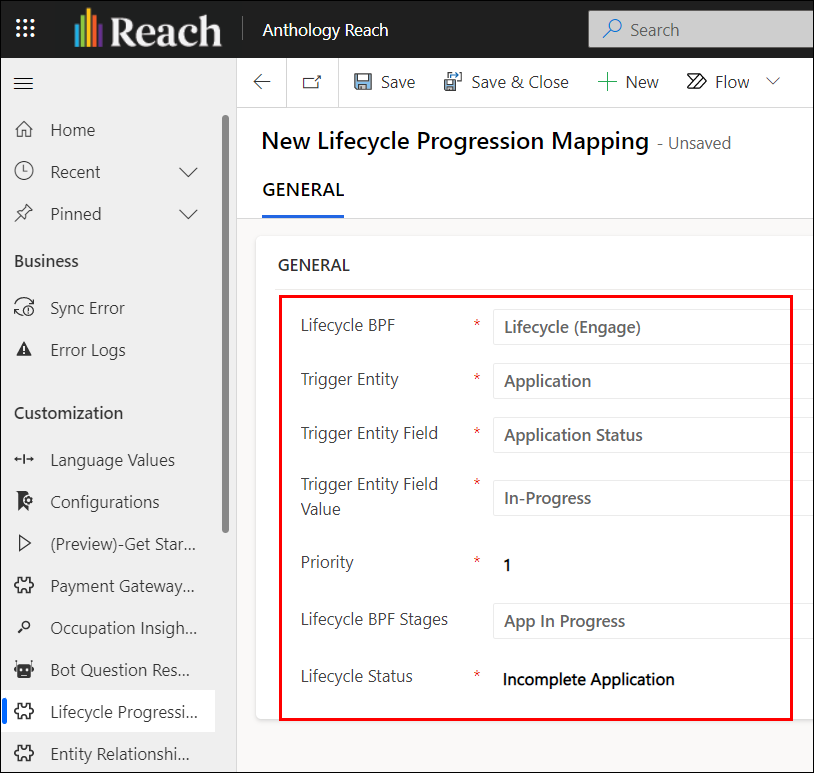
In Reach, navigate to the Lifecycle Progression Mappings page (under Settings > Customization > Lifecycle Progression Mappings).
-
Click New.
-
In the New Lifecycle Progression Mapping page configure the following fields
-
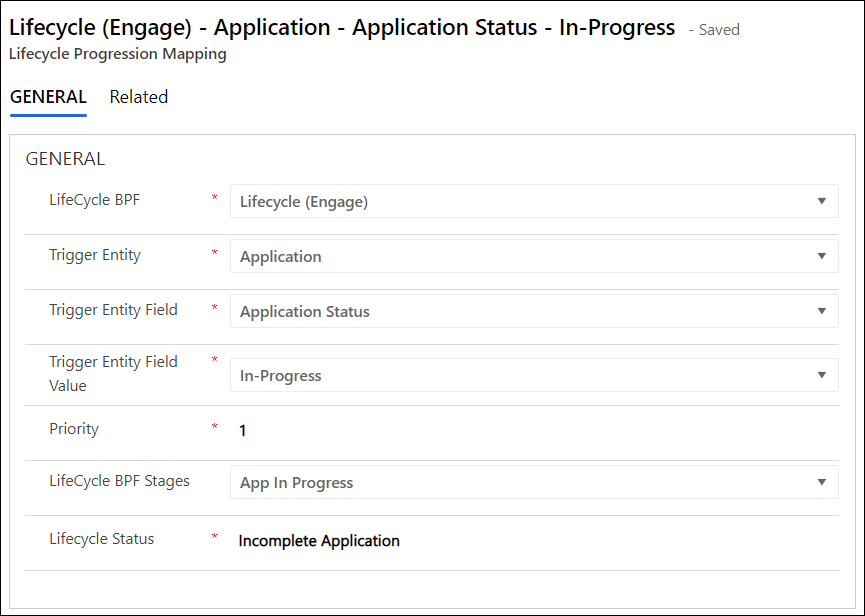
Lifecycle BPF - Select a value from the drop-down.
-
Trigger Entity - Select an entity name.
-
Trigger Entity Field - Select an entity field. Its value will be used for the auto update.
-
Trigger Entity Field Value - Select a value of the entity field which will be used for updating the Lifecycle Stage.
-
Priority - By default, it is 1. If there are more than one field mapping for the same Trigger entity, configure this field based on the priority on which the Lifecycle stage and status need to be updated.
Example
For the Application entity record, two Lifecycle Progression Mapping records are created for the fields Application Status and Review Status. The Priority field for the Application Status field is set to 1 and for the Review Status is set to 2.
When both the fields are updated simultaneously in an application record, the field with the least priority will take precedence. In this example, the mapping configuration of the Application Status field will be used to auto progress the Lifecycle stage and update the Lifecycle status.
If the Priority field for both the Application Status and Review Status fields is set to 1, then the Lifecycle record will progress based on any one of the trigger mappings.
-
Lifecycle BPF Stages - Select a BPF stage that needs to be set in the Lifecycle when the related entity's record is updated with the value selected in the Trigger Entity Field Value field.
-
Lifecycle Status - Select a status for the BPF stage that needs to be set based on the related entity's trigger field value.
The following image displays example values configured for a Lifecycle Progression Mapping record.
-
-
Save the record.
Best Practices
Recommendation for Auto-Progression of Lifecycle Stage When an Application record is Created
-
Use the out-of-the-box workflow, Application - Create Lifecycle, for managing the association of an Application to a Lifecycle which runs in the Synchronous mode.
-
If instead of the out-of-the-box workflow, Application - Create Lifecycle, institutions need to create a custom workflow, it is recommended that:
-
to maintain a separate workflow for associating the Application to a Lifecycle record, and
-
configure to run the custom workflow in Synchronous mode.
If the custom workflow for associating the Application to a Lifecycle record is configured to run in the Asynchronous mode, then ensure that in addition to the step for associating the Application to a Lifecycle record you also create a step in the workflow for updating the Lifecycle Status or Application Status to a value (e.g. Incomplete Application) so that the associated Lifecycle’s stage can be moved automatically based on the configured Lifecycle Progression mapping.
-
Recommendation for Configuring the BPF Stages in the Default Configurations Page
For configuring the Lifecycle Progression Mappings, when a Lifecycle Status is selected without selecting a value in the Lifecycle BPF Stage field, ensure that the selected Lifecycle Status value is configured for the required BPF Stages in the Default Configurations page.
For example, a Lifecycle Progression Mappings record is created without selecting a value in the Lifecycle BPF Stage and the Lifecycle Status is Cancelled. You must ensure that the Cancelled Lifecycle Status is mapped for all the required BPF stages in the Default Configurations page.
Recommendation for the Lifecycle Progression Mappings Migrations
With the creation of Lifecycle Progression Mappings for a Trigger entity, system registers and creates a plugin step for the base Trigger entity, which enables the progression mappings.
When migrating Lifecycle Progression Mappings from one Reach environment (e.g. Sandbox) to a new Reach environment (e.g. Production), the plugin step created for the Trigger entity must also be registered in the new environment. To ensure this:
-
Disable the Disable plugins option in the import tool before performing the import.
-
If there is a need to disable plugins in the import tool, then after migrating the Lifecycle Progression Mappings perform one of the following steps:
-
Deactivate one of the Lifecycle Progression Mappings for each Trigger entity and then activate the Lifecycle Progression Mapping, or
-
Create a new Lifecycle Progression Mapping.
-
Similarly, if there is a need to recreate a plugin step for a Trigger Entity, the Reach system administrator can perform one of the following steps:
-
Deactivate one of the Lifecycle Progression Mappings for each Trigger entity and then activate the Lifecycle Progression Mapping, or
-
Create a new Lifecycle Progression Mapping.