Merging Accounts
Permissions Required
Edit Account - To Edit Accounts.
You can merge two Accounts when:
• An organization with which you transact business has been taken over by another organization.
• Two organizations with which you transact business, enter into a joint venture.
• You no longer want to differentiate between parent and subsidiary (child) Accounts.
|
Note • You can merge two Accounts only if the value of the Integration flag Property of the first Account is Not integrated. This condition is applicable only in a scenario where Talisma Higher Education Foundation is installed and the Talisma system is integrated with an external Student Information System (SIS) using an SIS Connector component. • When two Accounts are merged, you can choose to retain Properties from both the Accounts. By default, Read-only Properties of the second Account are retained. However, you can choose to retain the Read-only Property values of the first Account. Also, the ID of the second Account is retained for the merged Account. All other details of the two Accounts displayed in the tabs of the Account window are retained in the merged Account. • You cannot edit the Retained Value of a merged read-only Property. For example, when you merge Account A, and Account B, you choose to retain the value of the Date Created Read-only Property associated with Account A. You cannot edit the value of this Property in the Retained Value column. |
To Merge Accounts
1. Using the Left pane, locate and select the two Accounts you want to merge.
2. From the Account menu, select Merge.
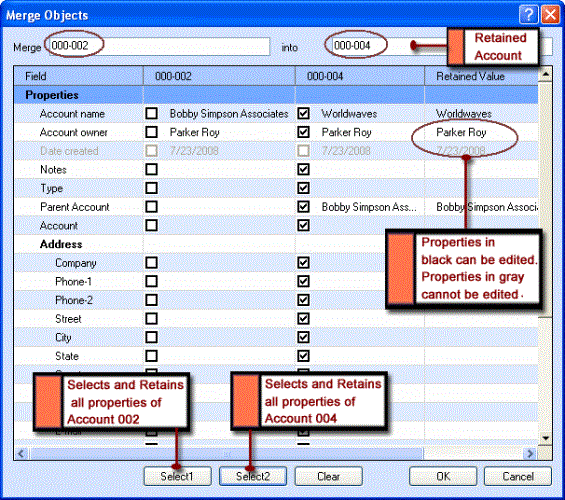
The Merge Objects dialog box is displayed. The Properties of the Account Object are displayed in the Field column. The values of the Accounts are displayed in the relevant columns.

The Merge Objects Dialog Box
3. To retain a Property value of the first Account, select the appropriate value in the second column. Similarly, to retain a Property value of the second Account, select the appropriate value in the third column.
4. To retain all Property values of the first Account, click Select 1.
- OR -
To retain all Property values of the second Account, click Select 2.
The selected Property values are displayed in the Retained Value column.
5. Specify values for Properties in the Retained Value column, if it is required.
6. Click OK to merge the Accounts.
The two Accounts are merged.
|
Note • You can merge two Accounts by selecting both Accounts in the Table View and clicking Merge from the shortcut menu. • You can also merge two Account items from the Account window, by selecting Merge from the Account menu. In such a case, you must specify the ID of the second Account in the into field in the Merge Objects dialog box. • If you have selected only one Account from the Account Table View, and opened the Merge Objects dialog box, you must specify the ID of the second Account in the into field. • You can manually change the values for Properties from the Retained Value column. • You cannot merge Accounts if one of the Accounts has been deleted. • Click Clear in the Merge Objects dialog box to clear all the selected Properties. |