Permissions Required
Send SMS - To send SMS messages to Contacts.
You can send SMS messages to Contacts in response to requests made to a Talisma User or to promote your organization’s products and services. You can also use this feature to send messages in an emergency.
Sending information through an SMS message enables your organization to reach out to the Contact at any time of the day, and enables you to dispatch information at the click of a button.
To work with the SMS feature, your organization must purchase the Talisma SMS license.
You can send SMS messages to those Contacts whose Send SMS Property is set to Yes, and who have a valid mobile phone number in the Mobile field. When you send an SMS message, it is logged as an Interaction in Talisma.
Contacts may inform your organization that they do not want to receive SMS messages. In such a scenario, when you create the Contacts in Talisma, set the value of the Send SMS Contact Property to No. You cannot send SMS messages to such Contacts even if you select the Contacts to be recipients of a message.
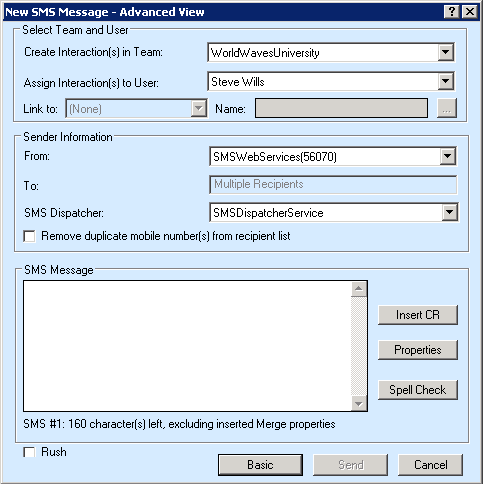
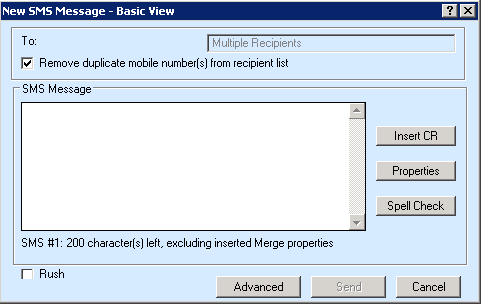
You can use the Advanced or Basic view of the New SMS Message to send an SMS Message.
• New SMS Message - Advanced View: The New SMS Message - Advanced View window enables you to type all options that you want to specify while sending an SMS message to a Contact. When all values are defined, the settings are saved as default values. Subsequently, you can use the New SMS Message - Basic View window in which you can skip specifying information that is repetitive. The New SMS Message - Advanced View window contains the Basic toggle button. Clicking on the Basic button displays the Basic view of the New SMS Message window.

When you first send an SMS message , the New SMS Message - Advanced View window is displayed if:
◦ The Primary Team of the logged on User is associated with multiple SMS Web Services and SMS Dispatchers.
◦ The Primary Team of the logged on User is not associated with any SMS Web Service and SMS Dispatcher.
When a Talisma Client User opens the New SMS window subsequently, the view used by the User during the previous send New SMS operation is displayed and continues to be displayed until the User manually changes the view in the New SMS window.
• New SMS Window - Basic View: The New SMS Message - Basic View enables you to send SMS messages with minimal data. This window has the following fields: To, Remove duplicate mobile number(s) from recipient list, SMS Message, Insert CR, Properties, Spell Check, Rush, Send, and Cancel. In addition to these fields, this window has the Advanced toggle button. Clicking Advanced displays the Advanced view of the New SMS Message window.

When an SMS message is sent to recipients using the Basic View, an Interaction is created in the Team to which the logged on User belongs and is assigned to the logged on User. Values in the Create Interaction(s) in Team, Assign Interaction(s) to User, Link to, Name, From, and SMS Dispatcher fields are automatically set based on values you would have specified using the Advanced view.
When a Talisma Client User performs the send New SMS operation for the first time in Talisma, the New SMS Message - Basic View window is displayed if:
◦ The Primary Team of the logged on User is associated with a single SMS Web Service and SMS Dispatcher.
To Send an SMS Message from the Contact Table View
This procedure describes steps to send an SMS message using the New SMS Message - Advanced View window.
1. Navigate to the Contacts Table View in Talisma Client.
2. Run the appropriate Filter to view Contacts to whom you want to send SMS messages.
3. Right-click the selected Contacts and select New SMS from the shortcut menu.

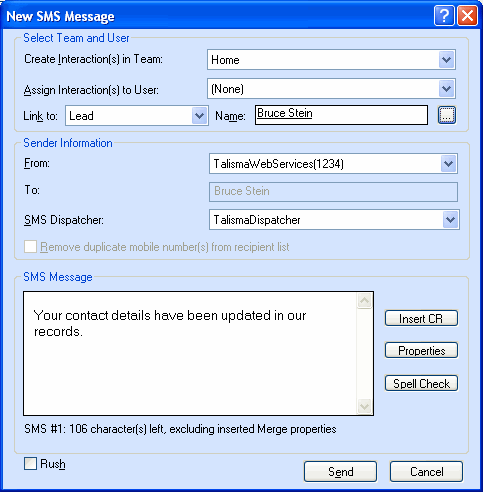
If you selected multiple Contacts, the text Multiple Recipients is displayed in gray in the To field. Alternatively, if you are sending the SMS message to a single Contact, the Contact’s name is displayed in the To field, and is displayed in gray.
|
Note You can send an SMS message to a maximum of ten Contacts in a single Send SMS operation. |
4. In the Create Interaction(s) in Team list, the Teams to which you are granted access are listed. Select the Team in which you want the outbound SMS message(s) to be created as Interaction(s).
5. In the Assign Interaction(s) to User list, Users who belong to the Team selected in step 4 are listed. Select the User to whom the Interaction(s) must be assigned. By default, the name of the logged on User is displayed in this field.
6. From the Link to list, select the Object with which you want to link the Interaction. The following Objects are available for selection: Lead, Enrollment, Campaign, Opportunity and Order.
|
Note If Talisma Higher Education Foundation is not installed, the Link to list displays only the Campaign, Opportunity, and Order Objects. |
7. In the Name field, click  .
.
The Set Object dialog box is displayed.
|
Note The Link to and Name fields are disabled when you select multiple Contacts and select the New SMS Message option. Later, you can manually link the Interactions with Object items. |
In the Set Object dialog box, search for the Object item you want to set. Select the Object item in the Results pane and click Set.
The selected Object item is displayed as a link in the Name field. You can click the link to view the Object item in the Object window.
8. In the From list, SMS Web Services specific to the Team you selected in step 4 are listed in the <SMS Web Service name><SMS Code> format. Select an SMS Web Service. When the SMS message is sent, the SMS Code of the selected SMS Web Service will be displayed to the Contact when the Contact receives the SMS message.
9. In the SMS Dispatcher list, SMS Dispatchers associated with the Team you selected in step 4 are listed. Select the SMS Dispatcher using which the SMS message will be dispatched to the service provider with which your organization is associated.
10. Select the Remove duplicate mobile number(s) from recipient list option. If more than one Contact has the same value for the Mobile Property, the SMS message is sent only to the Contact whose ID occurs first based on its chronological occurrence in Talisma Main Database.
|
Note • If the value of the Mobile Property of two Contacts is +919845098450, and 9845098450, these are considered as unique values, and the SMS message will be sent to both Contacts. • The Remove duplicate mobile number(s) from recipient list option is disabled if you select a single Contact to whom you want to send and SMS message. |
Details of the Contact(s) to whom the SMS message is not sent are displayed in the Failed to Send SMS dialog box.
|
Example Michael Roy and his son Parker Roy have the same value in the Mobile Property, and their Contact IDs are 002-103, and 000-324 respectively. When the Remove duplicate mobile number(s) from recipient list option is selected, a single SMS message is sent to their mobile phone. The SMS message is recorded as an Interaction in Talisma Main Database and is associated with Parker Roy as his ID (000-324) occurs prior to Michael Roy’s (002-103) ID in Talisma Main Database. The Interaction created as a result of this operation is displayed in the Interactions tab of the Contact Parker Roy. Michael Roy’s details are displayed in the Failed to Send SMS dialog box. |
If this option is not selected, for the count of selected Contacts with the same value in the Mobile Property, an equivalent count of SMS messages is dispatched from Talisma. Further, an Interaction is created for each Contact to whom the message is sent.
|
Example The Remove duplicate mobile number(s) from recipient list option is not selected. Michael and Parker Roy have the same value in the Mobile Property. In this scenario, two messages are dispatched from Talisma to the same mobile phone. Two Interactions are created in Talisma Main Database, with Michael Roy, and Parker Roy each being associated with a different Interaction. |
11. Specify the content of the SMS message in the text area of the New SMS dialog box.
|
Note By default, you can type a maximum of 160 characters in the SMS message. As you type the SMS message, the display of the available count of characters decreases dynamically from the maximum value of 160. While you are typing the SMS message, if the count of characters exceeds 160, the count of SMS messages that will be sent is increased by 1, and a fresh set of 160 characters is made available to you for the second SMS message. Thus, the text of the SMS message is segregated into sections with each section containing 160 characters. Each section is then dispatched to the Contact as an individual SMS message. Information about the count of SMS Messages, and the count of characters is displayed in the following format in the New SMS Message dialog box:
When you view an Interaction that included multiple sections of text with 160 characters in each section, the complete text is displayed as a single message in the Conversation pane of the Interaction. By modifying values in the relevant option in the tblGlobalinfo table, the administrator can change the maximum count of characters that can be sent in a single SMS message. For more information, the administrator can refer Talisma Business Administrator Help. |
12. Click Insert CR. The Canned Response Manager is displayed. Talisma enables you to insert Text type of Canned Response(s) that are shared with Teams to which you have been granted access. Search for the required Canned Response and click Insert. The Canned Response is inserted. You can format the content of the Canned Response in the SMS message before sending it.
13. Click Properties. The Insert Properties dialog box is displayed. Select the Contact Properties whose values you want to insert in the SMS message and then click Insert. The selected Properties are inserted as merge fields. When the SMS message is sent, the value of the Contact Property is substituted in the location where the merge field was inserted.
|
Note The count of characters that you type in the SMS message excludes the count of characters in Properties that are inserted as merge fields in the message, and in the selected Canned Response. |
|
Example Consider that a maximum of 160 characters can be typed in an SMS message. You send the following SMS message to two recipients whose names are Parker and Michel: <<Name>>, we will call you at 2 PM. The count of characters typed is 26. As a result, Talisma displays that you can type 134 more characters in the message. When the Property is merged, and the values Parker and Michel are substituted in the <<Name>> Property, the count of characters in the message rises to 29. This occurs as Talisma considers six characters for the merged Name Property value, and one character for the space after the text. |
|
Note In a scenario where you send the SMS message to a single Contact, Property values inserted as merge fields are displayed in the SMS Message area when the Property is inserted. |
14. Click Spell Check. The text of the SMS message is checked for inconsistencies in spelling. Click the appropriate button based on whether you want to accept or reject options in the Suggestions area of the Spell Check dialog box.
15. Select the Rush option to enable the urgent dispatch of SMS messages from your service provider to the selected Contact(s).
When this option is selected, SMS messages are dispatched based on the interval configured in the Dispatch Urgent SMS Messages Every spin control in Talisma Business Administrator. For more information about this option, see Talisma Business Administrator Help.
16. Click Send.
A prompt to link the Interaction with a Lead or Enrollment is displayed.

|
Note The prompt is displayed only if all the following conditions are satisfied: • The Prompt User(s) to associate an Interaction with Lead or Enrollment option in the Global Options page in the Talisma Business Administrator is set to Yes. • While logging Message, you do not specify values in the Link to and Name fields. |
a. Click Set Lead. The Set Lead dialog box is displayed. Search for a Lead and select the Lead in the Results pane.
b. Click Set or double-click a Lead. The New Interaction window is displayed and the selected Lead is linked to the Interaction.
- OR -
a. Click Set Enrollment. The Set Enrollment window is displayed.
Search for an Enrollment and select the Enrollment in the Results pane.
b. Click Set or double-click an Enrollment. The New Interaction window is displayed and the selected Enrollment is linked to the Interaction.
- OR -
Click Continue to log the Interaction without linking it to any Object item.
The New SMS Message window is displayed.
The SMS message is sent to the selected Talisma Contact(s).
The Failed to Send SMS dialog box is displayed if a value is not specified in the Mobile field for Contacts or if the value of the Send SMS Contact Property is set to No.
If you selected the Remove duplicate mobile number(s) from recipient list option, details of Contacts to whom the SMS message is not sent because their Mobile Property value is a duplicate are displayed.
To Send an SMS Message from the Contact Window
You can also send an SMS message to a Contact from the Contact window. To do so, open the required Contact and select New SMS from the Contact menu. The New SMS Message dialog box is displayed. Carry out steps 3 - 17 of the above procedure.
|
Note To view details of the Interaction that is created from the sent SMS message, click the Interactions tab of the Contact. When you send an SMS message to an individual Contact, the text of the SMS message is displayed in the Subject field of the Interaction. |
