Creating a Duplicate Check Configuration for Contacts
The duplicate check for the Contact object is performed based on the value specified for the global option - Enable creation of multiple Contacts with the same e-mail address, in Talisma Business Administrator. For more information about this global option, see Talisma Business Administrator Help. This global option can have one of the following values:
• Yes: Multiple contacts with the same email address can be created, and the duplicate check for contacts is not based on the predefined Default Contact Configuration settings in Data management Utility.
However, you can create multiple custom Duplicate Check Configurations for the Contact object, and set any one of these configurations as the active configuration.
To enable creation of multiple Contacts with the same email address through an import operation, set the value of the AllowDuplicateEmail option to 1 in the Talisma Global Config Utility. For more information about this option, see Configuring Settings for the Import Configuration.
|
Note The Default Contact Configuration settings in Data Management Utility cannot be edited or deleted. |
• No: Multiple contacts with the same email address cannot be created,
To Create a Duplicate Check Configuration
1. Open the Duplicate Criteria Manager.
2. Select Contact in the Select Base Object list.
The Create Contact Duplicate Configuration Page is displayed.
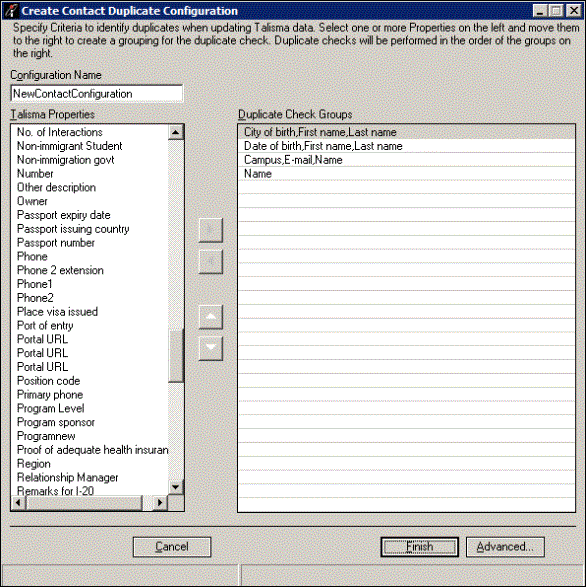
4. In the Configuration Name field, type a name for the Configuration.
5. Select a Property from the Talisma Properties list and click  . The selected Property is listed in the Duplicate Check Groups list.
|
Note You can select multiple Properties in the Talisma Properties list and click |
- OR-
To select random Properties, select a Property, hold down the CTRL key and select other Properties. Click . The selected Properties are displayed in the Duplicate Check Groups list.
To set the order of the duplicate check criteria, click  , or
, or  .
.
Contact Properties displayed in the Duplicate Check Groups area are the Properties based on which the duplicate check will be performed when you create a Contact manually, through a Web Form, or as a result of an iService request.
|
Note • If individual properties are listed on separate rows in the Duplicate Check Groups area, while performing the duplicate check, Talisma identifies the newly created Contact as duplicate by checking if the value in the corresponding Properties of the new Contact match with one of the property values of the Contact that already exists in Talisma. For example, the Name, City, and Phone Contact properties are individually specified on rows 1, 2, and 3 respectively, in the Duplicate Check Groups area. While performing a duplicate check for Contacts, Talisma is first checked for duplicate Contacts based on the Name property value. If the Name property value of an existing Contact matches with the name of the Contact being imported, Talisma recognizes the imported Contact as a duplicate and does not create the Contact in Talisma. If a match is not found on the first property (Name, in this example), the duplicate check is performed based on the City property, and then on the Phone property. This procedure is repeated for individual properties listed on subsequent rows. A Contact is not created in Talisma if any of the values in the Name, or City, or Phone properties are found matching in the Duplicate Check Groups area. Also, if there are multiple rows that are specified (three, as in the above example), and there is a matching entry found in one of the rows (for example, the City property, which is the second row in the configuration), then the duplicate check is not performed on subsequent rows. • When you simultaneously select multiple properties in the Talisma Properties list and move them to the Duplicate Check Groups area, the Properties are grouped and displayed in a single row. In this scenario, Talisma identifies a new Contact as a duplicate if all values in the corresponding Properties of the Contact match with every value of the Properties specified in the row in the Duplicate Check Groups area. For example, you simultaneously select the Name, City and Phone Contact Properties and move them to the Duplicate Check Groups area. Talisma identifies a new Contact as a duplicate if the Name, City and Phone Property values of the Contact being imported match with the Name, City, and Phone Property values of a Contact available in the Talisma system. • A duplicate check is performed on the E-mail Property of the Contact after the duplicate check based on the custom duplicate criteria configuration is performed. |
6. Click Advanced to configure Advanced Duplicate Check Criteria.
|
Note The Advanced button is available when the following conditions are satisfied: • The Use Advanced Duplicate Check Criteria global option is set to Yes in Talisma Business Administrator. • In the Create <Object name> Duplicate Configuration and the Edit <Object name> Duplicate Configuration pages, a Property is listed in the Duplicate Check Groups area. For information about the Use Advanced Duplicate Check Criteria global option, see Talisma Business Administrator Help. |
For more information on configuring the Advanced Duplicate Check Criteria, see To Configure Advanced Duplicate Check Criteria.
The newly created Configuration is displayed in the Duplicate Criteria Manager.
To Configure Advanced Duplicate Check Criteria
|
If Advanced Duplicate Check Criteria are configured, Contacts and a Leads are resolved after a long time. This can impact performance while working with Talisma. |
1. Perform steps 1 - 6 of the above procedure.
The Advanced Duplicate Check Criteria Configuration dialog box will be displayed.
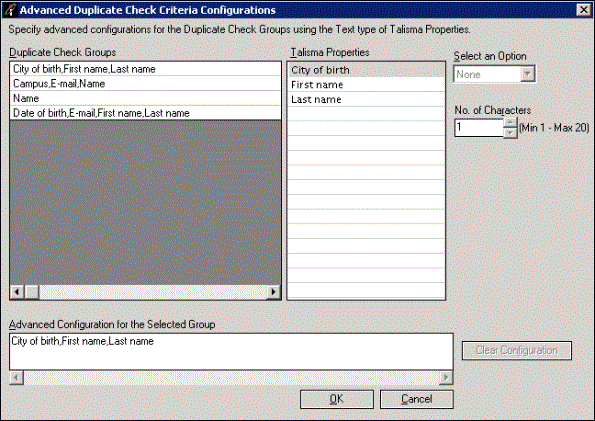
The Advanced Duplicate Check Criteria Configuration Dialog Box
2. Select a Duplicate Check Group in the Duplicate Check Groups area.
3. Select a Property in the Talisma Properties area.
|
Note • Only Text type of Properties are listed in the Talisma Properties area. • By default, the first Property is selected. |
4. Select First from the Select an Option list.
By default, None is selected in the Select an Option list and is disabled. The Select an Option list is enabled when a Property is selected in the Talisma Properties area.
5. Select a number in the No. of Characters field.
You can specify a value ranging from 1 to 20 in this field. Additionally, the selected value is applicable only to Desktop Client. It does not apply to Web Client.
When None is selected in the Select an Option list, the No. of Characters field cannot be edited.
The value you select here applies only to Desktop Client.
6. Repeat steps 3 - 5 to configure the Advanced Configuration for additional Properties.
The Advanced Configuration for the Selected Group field displays the Advanced Duplicate Check Criteria configured for the selected Duplicate Check Group.
|
Note By default, the Advanced Configuration for the Selected Group field displays comma separated Text type of Talisma Properties that are configured in the selected Duplicate Check Group. For example, if the First name, Last name, and E-mail Properties are listed in the Talisma Properties area, the Advanced Configuration for the Selected Group field will display: E-mail,First name,Last name |
|
Example You have configured a Duplicate Check Group with the following Test type of Contact Properties: • First name • Last name In the Advanced Duplicate Check Criteria Configurations dialog box, you have configured the following settings for the three Properties: Configurations for the First name Property: • In the Select an Option list, First is selected. • In the No. of Characters field 3 is selected. Configurations for the Last name Property: • In the Select an Option list, First is selected. • In the No. of Characters field 2 is selected. Configurations for the E-mail Property: • In the Select an Option list, None is selected. • The No. of Characters field is disabled. The Advanced Duplicate Check Criteria configured for the three Properties belonging to the Duplicate Check Group will be displayed in the Advanced Configuration for the Selected Group field as follows:
|

7. Click OK to save the Advanced Duplicate Check Criteria.
- OR -
Click the Cancel button to ignore the changes done in the Advanced Duplicate Check Criteria Configuration dialog box.
- OR -
Click the Clear Configuration button to remove the Advanced Duplicate Check Criteria configured for Talisma Properties. The Advanced Configuration for the Selected Group field will display the default value.
By default, the Clear Configuration button is disabled. It becomes available for selection when First is selected in the Select an Option list.
The Duplicate Check Group(s) for which the Advanced Configuration is set is displayed in blue as depicted in the following graphic:
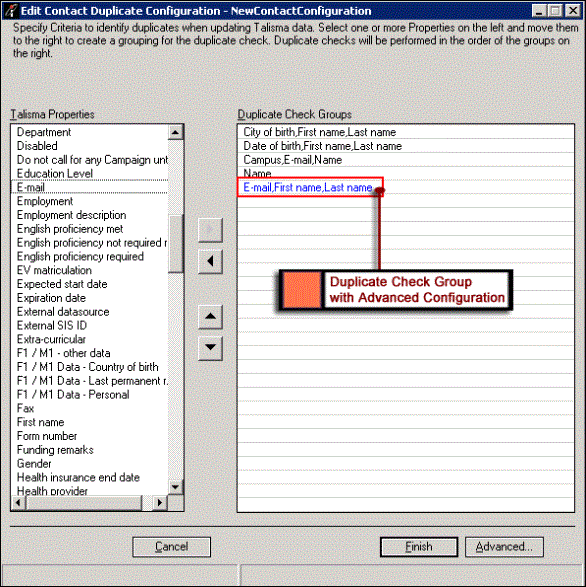
Talisma Properties that are Configured with Advanced Configuration
|
Note When Advanced Duplicate Check Criteria are configured for Talisma Properties and later the Use Advanced Duplicate Check Criteria global option is set to No in Talisma Business Administrator, the Properties will be displayed in black to indicate that Advanced Duplicate Check Criteria are no longer applicable. |
8. Click the Finish button.
The Advanced Duplicate Check Configuration is saved and the Duplicate Configuration Manager page is displayed.
If you click Cancel in the Edit <Object> Duplicate Configuration - <Configuration name> page, the Advanced Configuration for the Duplicate Check Groups specified in the Advanced Duplicate Check Criteria Configurations dialog box is not saved.