Defining Rules for Chat
A Rule is a set of instructions that automatically triggers an Action when an Event specified in the Rule occurs, and the condition specified in the Rule is satisfied. A Rule can route incoming messages to Teams and Users, reserve Interactions for Users, and perform specified Actions on the CRM Object for which the Rule is configured.
Business Rules standardize and automate much of an institution's business and decision-making processes, removing to some extent the human element that is prone to inconsistency and error. Rules determine what action should be taken based on a company's internal guidelines, business practices and/or regulatory compliance. For example, Rules can determine a loan applicant's credit eligibility.
Components of a Rule
The following describes the components of a Rule.
| Component | Description |
|---|---|
|
Event |
An Event is an occurrence that determines when a Rule must be triggered. When the Rule is triggered the Action specified in the Rule is performed. Examples of Events are creation of a new Interaction, creation of an Opportunity, transfer of an Interaction, or categorization of a Contact. |
|
Action |
An Action defines the operation to be performed on a selected Object. An Action is performed on an Object when the specified Event occurs. |
|
Condition |
A Condition evaluates the Event that has occurred for the Object to which the Rule applies, and controls the Action that must be performed. This evaluation is performed based on the field or value specified in the Condition. Example When a new Booking Object item is created, if the value of Activity Type Property is Flight Ticket Booking, then transfer the Booking Object item to the Ticketing Team. |
Defining Rule Names in Multiple Languages
You can define Rule names in multiple languages. Depending upon the localized CampusNexus CRM version that is installed, these Rule names are displayed in the appropriate language in the Rules Manager. The Rule description is created in the Default Server language. Therefore, if the name of the Rule is not defined for a specific language, the name is displayed in the Default Server Language.
After creating a Rule, you must ensure that:
• The Team for which the Rule is created, is in service (applicable only to Team-based Rules)
• The Log for the new Rule is enabled
• The Rule has been validated
Types of Rules
Creation of the following rule types is supported: Global Object Rules, Team Object Rules, Shared custom Object Rules, and Routing Rules.
Global Object Rules
A Global Object Rule enables you to take action on a Global Object. A Global Object Rule does not belong to any Team. Examples of Global Objects are Account, Contact, Event, and any Global custom Object.
Example
On event: When the value of <Type> is changed
IF: Account.Type=CRM And Account.Verticals = Manufacturing And
Account.Profit Earning >20
Then:
Set <Profitability> to <High>
In this example, the Profitability Property value is set to High when a CRM Account from the Manufacturing industry records a P/E (profit earning) ratio greater than 20.
Team Object Rules
A Team Object Rule enables you to take action on Team Objects. A Team Object Rule can belong to one or more Teams. Examples of Team Objects are Interaction, Opportunity, Order, Campaign, and any Team custom Object.
Example
On event: When a new Opportunity is created
IF: Opportunity.Expected value > 1000.000000
Then:
Set <Opportunity Type> to <Golden>
Increment/Decrement numeric <Expected Close Date> by <-3>
In this Rule, if a new Opportunity is worth US$1000 or more, the Opportunity type is set to Golden, and the number of days taken to close the Order is reduced by three days. Thus, a high value customer gets speedy and efficient service.
Rules for Shared Custom Objects
A Shared custom Object Rule enables you to perform actions on Shared custom Objects. You can create Rules for any Shared custom Object you create. You can also create Rules for the Link, and Print Template Objects.
Routing Rules
A Routing Rule routes new incoming messages to the appropriate Teams or Users based on the Actions specified in the Rule. If a Condition has been defined, the Condition evaluates the Event that has occurred and then fires the Rule. These new messages may be received through any Medium configured in CampusNexus CRM.
Routing Rules always belong to one or more Teams. There are two types of Routing Rules: Team Routing Rules and User Assignment Rules.
Team Routing Rules
Team Routing Rules enable you to map incoming messages to the appropriate Teams. Messages are routed to the appropriate Team, based on the Actions specified in the Rule. If a Condition has been defined, the Condition evaluates the Event that has occurred and then fires the Rule.
Example

In this example, all phone messages are routed to the Sales Team.
Note
You cannot share a Team Routing Rule with the same Team for which you have configured the Rule.
User Assignment Rules
A User Assignment Rule routes new incoming messages to the appropriate User in a Team based on the Action(s) specified in the Rule. If a Condition has been defined, the Condition evaluates the Event that has occurred and then fires the Rule.
Example

In this example, all e-mail messages with the text "coding" in the Subject line, are assigned to John Milton whose Skill Set includes 'VB' and 'VC'.
Time-based Rules
Time-based Rules are Global Object Rules or Team Object Rules that have been configured to fire at a specific time after the Event defined in the Rule occurs. Time-based Rules are fired every quarter of the hour.
Example
If a Rule is configured to trigger 15 minutes after the Event has occurred, and if the Event occurs at 3:00 P.M., the Rule will be triggered at 3:15 P.M. However, if the Event occurs at 3:05 P.M., the Rule will trigger at 3:30P.M., and not at 3:20 P.M.
In addition, holidays are excluded when Time-based Rules are triggered.
Example
Assume that you have configured Saturday and Sunday as holidays. For an Interaction created on Friday, the following Rule will be triggered on Monday, ignoring Saturday and Sunday:
“On new Interaction after 1 day if Interaction state = open send mail to owner’s manager <Text>”.
Viewing All Rules
You can view all Rules that are available in the system.
To View All Rules from the System Node
1. From the <System> node, click View All Rules.
A new browser window is displayed, and the message Use Browser Save or Print menus to save or print the Rules is displayed.
2. Click OK.
All Rules in the system with information about Rule Name, Rule Type, Object, Team, and Description are displayed in a separate browser window.
To View All Rules from the Rules Manager
1. Select the Rules node from the Navigation pane to view the Rules Manager in the Results pane.
2. Select All Objects from the Object list.
Rules created for all Objects are listed in the Rules Manager with the following details: Rule Name, Teams with which the Rule is shared, Object and Event for which the Rule is created, whether the Rule is enabled, and whether the Log for the Rule is enabled. The content of any selected Rule is displayed in the Description area.
To Locate a Rule
1. Select the Rules node from the Navigation pane.
The Rules Manager is displayed in the Results pane.
2. In the Object list, select an appropriate Object.
3. In the Team list, select an appropriate Team.
4. In the Event list, select an appropriate Event.
5. If you have selected an Event that requires a parameter, you can select a parameter in the Parameter list.
All Rules that match the selection you have made in the above lists are displayed in the Rules Manager.
Setting the Order in which Chat Rules are Triggered
Global Level
Manage Account Rules - To create, edit, and delete Rules for Accounts.
- OR -
Manage Contact Rules - To create, edit, and delete Rules for Contacts.
- OR -
Manage <Global Custom Object> Rules - To create, edit, and delete Rules based on Global custom Objects.
Team Level
Manage Rule - To create, edit, copy, and delete Team-based Rules.
- OR -
Manage <Team Custom Object> Rules - To create, edit, and delete Rules based on Team custom Objects.
By default, Routing Rules are triggered first, followed by User Assignment Rules and Team Object Rules.
In the Rules Manager, you can set the order in which Rules must be triggered, using the Move Up and Move Down buttons. These buttons are enabled only if a specific Event has been selected in the Event list, and if multiple Rules have been created for the selected Event. If you select All Events from the list, the Move Up and Move Down buttons are disabled.
If multiple Rules are created for an Event, these Rules are triggered based on their order of creation. You may change the sequence in which these Rules are triggered in order to prioritize Rules for certain conditions over others.
To Modify the Sequence in which Rules are Fired
1. Select the Rules node from the Navigation pane to view the Rules Manager in the Results pane.
2. Locate rules created for a specific Event.
Click  or
or  next to a Rule to set the order of preference in which the Rules must be triggered.
About Chat Request Routing Rules
A chat request Routing Rule routes new chat requests to the appropriate Team based on Conditions specified in the Rule. These new requests are received through the Chat Medium configured in CampusNexus CRM.
There are two types of Chat Routing Rules: Team Routing Rules and User Assignment Rules.
Team Routing Rules
You can create Team Routing Rules in all Teams in which you have the Manage Rule Permission.
A Team Routing Rule routes new incoming messages to the appropriate Teams based on Conditions specified in the Rule. These new messages may be received through the Medium specified in the Rule.
Example
You can set a Rule to route all messages containing the phrase “Offer” in the Subject Line, to the Marketing Team.
User Assignment Rules
User Assignment Rules route messages to appropriate Users based on the Condition specified in the Rule. User Assignment Rules are fired when a new message received through the specified Medium is routed to a Team and assigned to User ‘None’.
User Assignment Rules can perform the following Actions:
Assign to User
This Action indicates that new messages satisfying a specific Condition must be assigned to a specific User.
Example
You can set a Rule to assign all messages containing the word “Repair” in the Subject Line to User John.
Assign to User matching a Condition <Filter>
This Action indicates that a User with specific Properties must be assigned the new message.
Example
All new messages received through the Chat Medium, and containing the words “Products” or “Services” in the Subject, can be assigned to Users in the Southern Team, who have the necessary skill set for handling queries related to products or services. The assignment is done based on the current load of the Users.
Load Balance in <Current Team>
When the Load Balance in <Current Team> option is selected, messages are balanced only among Users of the selected Team. The Users must have the Can get Auto Assigned Interactions Permission in the selected Team to receive messages through the Medium.
Example
If there are 3 Users in Team A where the maximum load is set to 5, Interactions are assigned to the User with the least load. If all Users in the Team have the same number of active chat sessions, new chat requests are assigned to Users in the order that the Users were created.
Load Balance in <Current Team> and its sub Teams
This option is available only when a User Assignment Rule is configured for the Phone, VoIP, or Chat Medium.
When the Load Balance in <Current Team> and its sub Teams option is selected, messages are balanced among Users of the selected Team and its sub Teams. The Users must have the Can get Auto Assigned Interactions Permission in the selected Team, to receive messages through the specified Medium.
Round Robin in <Current Team>
When the Round Robin in <Current Team> option is selected, messages are automatically assigned in a cyclic order to Users of the selected Team. Users must have the Can get Auto Assigned Interactions Permission in the selected Team to receive messages through the specified Fax, Letter, In Person, or Email Medium.
Example
If 5 Users are logged in, and their IDs are 230, 232, 234, 235, and 236, User ID 230 is routed the first chat request, User ID 232 is routed the next chat request, and so on.
Based on the Action selected in the User Assignment Rules, messages are assigned to Users. Messages that are not assigned to a User based on User Assignment Rules remain in the common pool.
Actions supported for the Chat Medium are:
• Assign to User
• Assign to User matching a condition <Filter>
• Load balance in <Current Team>
• Load balance in <Current Team> and its sub Teams
Parameters in a User Assignment Rule
When a visitor initiates a chat request, Team Routing Rules route the request to a Team, and User Assignment Rules route the request to a User. The routing is performed on the basis of one of the following parameters defined in the Rule:
History
If a User has interacted with this visitor before, and is currently available for chat, the request is routed to that User.
Context
The context of the request is used to determine the relevant User to whom the request must be routed. For example, you could define a Rule where all requests categorized as “Northern” are routed to Users in the North Zone Team, and all requests categorized as “Southern” are routed to Users in the South Zone Team.
Load Balancing
Load balancing is performed and chat requests are routed to a User who is available for chat and has the least load of chat requests to service, if one or more of the following conditions is true:
• There is no Contact owner.
• The context is not adequate to decide the User to whom to route the request.
• There is more than one User to whom the request can be routed.
The User Assignment Rule ensures the even distribution of chat requests amongst Users within a Team. The Rule automatically checks the number of requests assigned to each User in a Team, and routes new incoming requests to Users whose load is below the maximum limit. This Rule is set when creating a Team, but can be modified at any time.
To Define a Search Condition
1. In the Object column, you can select the Object with which you are currently working, a Relationship created for the selected Object, an Event, or a Property Change. Click More to select an Object that is related to a related Object.
2. In the Field column, select the required Property. The list displayed here is based on the Object selected in the Object column.
3. In the Operator column, select an appropriate operator.
4. In the Value column, type or select a value.
5. In the And/Or column, select AND to specify that the search needs to satisfy the search condition on the current row and the search conditions on the subsequent rows. Select OR to specify that the search can satisfy one or more conditions.
Repeat Steps 1 through 5, to define additional search conditions.
6. To group or ungroup expressions, select adjacent or random Conditions by selecting the check boxes in the first column of the respective expressions. Click Group or Ungroup.
Note
• You can insert a blank row above a selected row by selecting the check box in the first column of the row, and clicking Insert.
• You can delete a row by selecting the check box in the first column of the row, and clicking Delete.
• The Object column displays Events and PropertyChanges for the Object with which you are currently working.
Sharing Team-based Rules
You can share Team-based Rules with other Teams in which you have the Manage Rule Permission.
When creating a Team-based Rule, you must share the Rule with at least one Team. The Rule is created in the selected Team.
You can share an existing Team-based Rule with other Teams by selecting the Rule in the Rules Manager and clicking Share. In the Share Rule page, you can also add or remove Teams with which you want to share this Rule.
By default, if a Rule is shared with several Teams, the Rule is enabled in the new Teams. This can be changed by clearing the selection of the Enable the Rule in the Teams with which this Rule will be shared option in the Share Rule page. The Rule Log is disabled by default for all new Teams with which this Rule is shared.
If you enable or disable a shared Rule in a specific Team, the shared Rule is enabled or disabled only in that Team and not in the other Teams with which the Rule is shared.
If you enable or disable a Log for a shared Rule in a specific Team, the Log of the shared Rule is enabled or disabled only in that Team.
To Share a Team-based Rule
1. Select the Rules node from the Navigation pane to view the Rules Manager in the Results pane.
2. Locate the Team-based Rule you want to share.
3. Select the required Rule.
4. Click Share.
The Share Rule page is displayed.
5. In the Select Teams area, select the Teams with which you want to share the selected Rule.
6. Select the Enable the Rule in the Teams with which this Rule will be shared option, if it is required.
7. Click OK. The Rule is shared with the selected Team(s).
Note
• A shared Team Rule can be modified from any Team with which it is shared. Modifying a shared Team Rule will modify the shared Rule in all Teams with which it is shared.
• If a shared Team Rule is enabled in some Teams while it is disabled in other Team, the  icon is disabled, in the Enabled column of the Rules Manager.
• If the Log for a shared Team-based Rule is enabled in some Teams while it is disabled in other Teams, the  icon is displayed in Gray, in the Log column of the Rules Manager.
• Deleting a shared Rule in a Team will delete the Rule in all Teams with which it is shared. You can select multiple Rules and delete them.
• You can clear the selection of a Team if you no longer want to share a Rule with that Team.
Creating a User Assignment Rule for Chat
You can create User Assignment Rules in all Teams in which you have the Manage Rule Permission.
User Assignment Rules route messages to appropriate Users based on the Condition specified in the Rule. User Assignment Rules are fired when a new message received through the specified Medium, is routed to a Team and assigned to User ‘None’.
User Assignment Rules can perform the following Actions:
Assign to User
This Action indicates that new messages satisfying a specific Condition must be assigned to a specific User.
Example
You can set a Rule to assign all messages containing the word “Repair” in the Subject Line to User John.
Assign to User matching a Condition <Filter>
This Action indicates that a User with specific Properties must be assigned the new message.
Example
All new messages received through the Chat Medium, and containing the words “Products” or “Services” in the Subject, can be assigned to Users in the Southern Team, who have the necessary skill set for handling queries related to products or services. The assignment is done based on the current load of the Users.
Load Balance in <Current Team>
When the Load Balance in <Current Team> option is selected, messages are balanced only among Users of the selected Team. The Users must have the Can get Auto Assigned Interactions Permission in the selected Team to receive messages through the specified Medium.
Example
If there are 3 Users in Team A where the maximum load is set to 5, Interactions are assigned to the User with the least load. If all Users in the Team have the same number of active chat sessions, new chat requests are assigned to Users in the order that the Users were created.
Load Balance in <Current Team> and its sub Teams
This option is available only when a User Assignment Rule is configured for the Phone, VoIP, or Chat Medium.
When the Load Balance in <Current Team> and its sub Teams option is selected, messages are balanced among Users of the selected Team and its sub Teams. The Users must have the Can get Auto Assigned Interactions Permission in the selected Team, to receive messages through the E-mail Medium.
Round Robin in <Current Team>
When the Round Robin in <Current Team> option is selected, messages are automatically assigned in a cyclic order to Users of the selected Team. Users must have the Can get Auto Assigned Interactions Permission in the selected Team to receive messages through the specified Fax, Letter, In Person, or Email Medium.
Example
If 5 Users are logged in, and their IDs are 230, 232, 234, 235, and 236, User ID 230 is routed the first chat request, User ID 232 is routed the next chat request, and so on.
Based on the Action selected in the User Assignment Rules, messages are assigned to Users. Messages that are not assigned to a User based on User Assignment Rules remain in the common pool.
Below are the Medium names and the Actions supported:
• Any Media
◦ Assign to User
◦ Assign to User matching a condition <Filter>
◦ Load balance in <Current Team>
• Phone
◦ Assign to User
◦ Assign to User matching a condition <Filter>
◦ Load balance in <Current Team>
◦ Load balance in <Current Team> and its sub Teams
• Fax
◦ Assign to User
◦ Assign to User matching a condition <Filter>
◦ Load balance in <Current Team>
◦ Round Robin in <Current Team>
• Letter
◦ Assign to User
◦ Assign to User matching a condition <Filter>
◦ Load balance in <Current Team>
◦ Round Robin in <Current Team>
• In Person
◦ Assign to User
◦ Assign to User matching a condition <Filter>
◦ Load balance in <Current Team>
◦ Round Robin in <Current Team>
◦ Assign to User
◦ Assign to User matching a condition <Filter>
◦ Load balance in <Current Team>
◦ Round Robin in <Current Team>
• Chat
◦ Assign to User
◦ Assign to User matching a condition <Filter>
◦ Load balance in <Current Team>
◦ Load balance in <Current Team> and its sub Teams
• VoIP
◦ Assign to User
◦ Assign to User matching a condition <Filter>
◦ Load balance in <Current Team>
◦ Load balance in <Current Team> and its sub Teams
Note
You can also create User Assignment Rules for Interactions created through Web Forms. To implement this behavior, when creating User Assignment Rules for Web Forms, you must ensure that the Rules include Message.Media = Webform as one of the conditions.
To Create a User Assignment Rule
1. Select the Rules node from the Navigation pane to view the Rules Manager in the Results pane.
2. Click New.
The first page of the New Rule wizard is displayed.
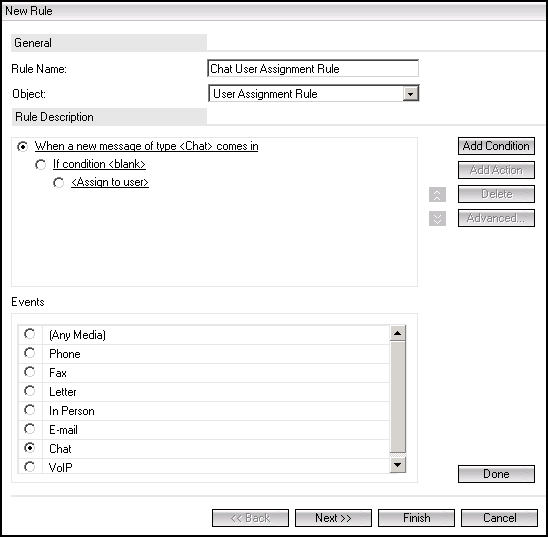
3. In the Rule Name field, a default name is displayed as “Rule<number>”. The number is automatically incremented every time a new Rule is created. The numbering is based on the total number of Rules configured.
Type a name for the Rule if you want to change the Rule name that is displayed.
4. From the Object list, select User Assignment Rule. By default, the Object selected in the Object list in the Rules Manager will be displayed.
5. From the Events list, select a Medium. You can also select the Any Media option to apply the Rule to messages received through the specified Medium.
6. Click Done. The selected Medium is inserted in the When a new message of type <media> comes in Event displayed in the Rule Description area.
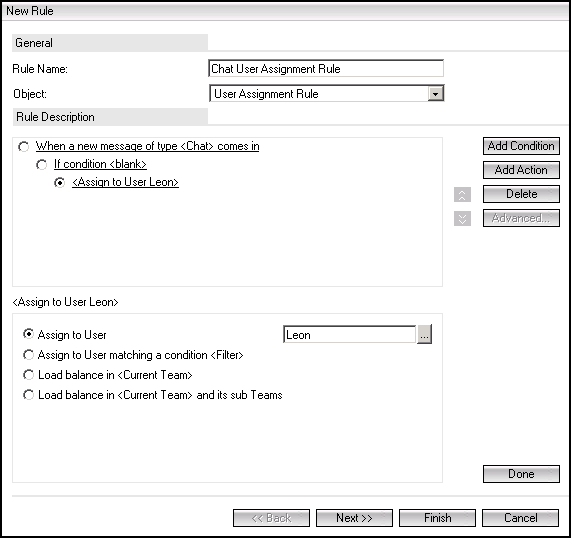
7. If you want to specify a Condition for the Action that must be performed, click the If condition <blank> link. This step is optional.
Specify the Condition in the Condition box that is displayed.
The Condition is a query on the Object. Elements of the Condition include Object, Property, Operator, and Value. A compound Condition may be defined by specifying multiple expressions. Click Done. The Condition is displayed in the Rule Description area. This step is optional.
8. Click the Assign to <user> link in the Rule Description area. A list of supported Actions is displayed in the <Assign to user> list. Select the required Action and click Done.
9. Click Add Condition or Add Action to specify additional Conditions or Actions for the Rule.
10. To change the sequence of Conditions or Action, select the required Condition or Action, click or .
11. Click Next. The second page of the New Rule wizard is displayed.

12. In the Select Teams area, select at least one Team with which you want to share the Rule.
13. Click Finish to save the Rule. The Rule is configured in the Teams with which you shared the Rule. The Rule details are displayed in the Rules Manager and the Object column indicates that the Rule is a User Assignment Rule. The Rule is enabled by default.
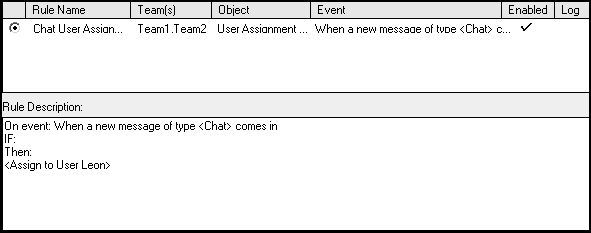
After creating the Rule, you can perform the following operations on the Rule:
• Enable Logs for the Rule in the selected Teams.
• Set the order in which Rules must be triggered.
• Disable the Rule in the selected Teams.
Note
Real Time Media requests are assigned to a User only if the User is available for the relevant Medium. If the User is unavailable, the Rule fails and the request is assigned to another User.
Creating a Team Routing Rule for Chat
You can create Team Routing Rules in all Teams in which you have the Manage Rule Permission.
A Team Routing Rule routes new incoming messages to the appropriate Teams based on Conditions specified in the Rule. These new messages may be received through the Medium specified in the Rule.
Team Routing Rules can perform the following Actions:
Route to Team
This Action indicates that incoming messages satisfying a specific Condition must be routed to a specific Team.
Example
You can set a Rule to route all messages containing the phrase “Offer” in the Subject Line, to the Marketing Team.
Route to <Team> based on percentage
This Action indicates that new messages must be routed to a Team based on a predefined percentage of total messages received in the Teams.
Example
Long Life Insurance offers three solutions: Investment Plans, Retirement Plans, and Child Care Plans. Accordingly, 3 Teams have been created to handle the relevant tasks. With the introduction of a new solution “Life Care”, you have trained selected members of each Team to handle tasks pertaining to the new solution, besides handling existing tasks. Since the Team size is varied, you have configured a Team Routing Rule that will route 20% of the total messages to the Investment Plan Team, 40% to the Retirement Plan Team, and another 40% of the total messages to the Child Care Plan Team
Note
You can also create Team Routing Rules for Interactions created through Web Forms. To implement this behavior, when creating Team Routing for Web Forms, you must ensure that the Rules include Message.Media = Webform as one of the conditions.
To Create a Team Routing Rule
1. Select the Rules node from the Navigation pane to view the Rules Manager in the Results pane.
2. Click New.
The first page of the New Team Routing Rule wizard is displayed.
3. In the Rule Name field, a default name is displayed as “Rule<number>”. The number is automatically incremented every time a new Rule is created. The numbering is based on the total number of Rules configured.
Type a name for the Rule if you want to change the Rule name that is displayed.
4. From the Object list, select Team Routing Rule. By default the Object selected in the Object list in the Rules Manager, is displayed.
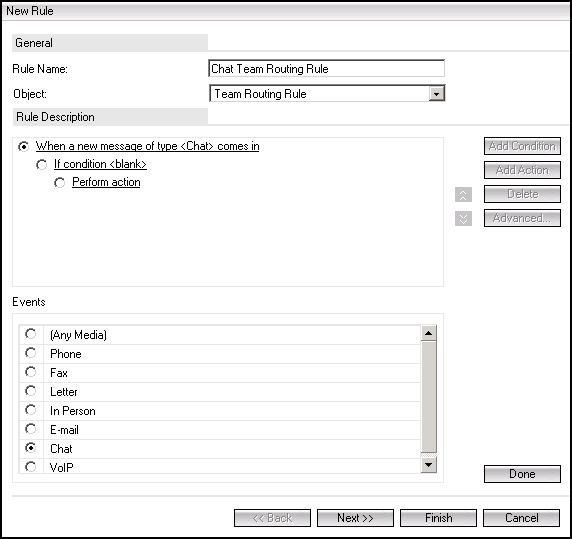
5. From the Events list, select a Medium. You can also select the Any Media option to apply the Rule to messages received through the specified Medium.
6. Click Done. The selected Medium is inserted in the When a new message of type <media> comes in Event displayed in the Rule Description area.
7. If you want to specify a Condition for the Action that must be performed, click the If condition <blank> link. This step is optional.
Specify the Condition in the Condition box that is displayed.
The Condition is a query on the Object. Elements of the Condition include Object, Property, Operator, and Value. A compound Condition may be defined by specifying multiple expressions. Click Done. The Condition is displayed in the Rule Description area. This step is optional.
8. Click the Perform action link in the Rule Description area. The Actions or Route to <Team> area displays the Action(s) relevant to the selected Medium.
9. Select the required Action.
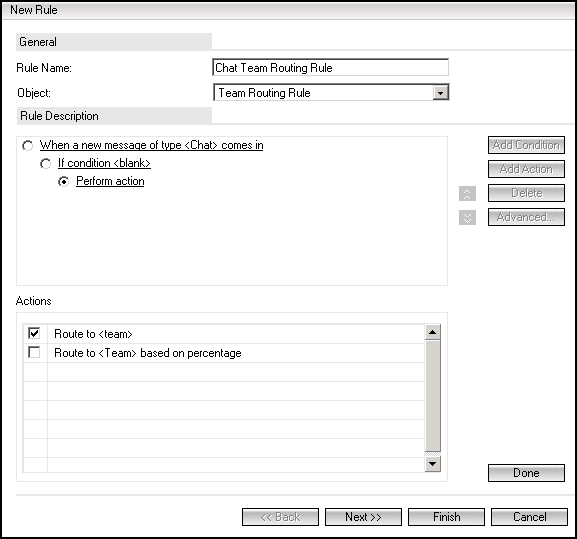
10. Click Done. If you have selected an Action for which parameters must be defined, configure the Action and click Done.
The selected Action is displayed in the Rule Description area.
If you have selected multiple Actions, you must configure every Action separately.
11. Click Add Condition or Add Action to specify additional Conditions or Actions for the Rule.
12. To change the sequence of Conditions or Action, select the required Condition or Action, and click or .
13. Click Next. The second page of the New Rule wizard is displayed.
14. In the Select Teams area, select at least one Team with which you want to share the Rule. You cannot select a Team that has been selected in any Action specified for this Rule.

15. Click Finish to save the Rule. The Rule is configured in the Teams with which you shared the Rule. The Rule details are displayed in the Rules Manager and the Object column indicates that the Rule is a Team Routing Rule. By default, the Rule is enabled.
After creating the Rule, you can perform the following operations on the Rule:
• Enable Logs for the Rule in the selected Team(s).
• Set the order in which Rules must be triggered.
• Disable the Rule in the selected Team(s).
Enabling or Disabling a Rule
Global Level
Manage Account Rules - To create, edit, and delete Rules for Accounts.
- OR -
Manage Contact Rules - To create, edit, and delete Rules for Contacts.
- OR -
Manage <Global Custom Object> Rules - To create, edit, and delete Rules based on Global custom Objects.
Team Level
Manage Rule - To create, edit, copy, and delete Team-based Rules.
- OR -
Manage <Team Custom Object> Rules - To create, edit, and delete Rules based on Team custom Objects.
You can alter the state of a Rule. A check mark next to the Rule state column indicates that the Rule is enabled. By default, a Rule is enabled when it is created.
To enable or disable a Team-based Rule, you must have Manage Rule Permission in the relevant Team(s).
To Disable a Rule
1. Select the Rules node from the Navigation pane to view the Rules Manager in the Results pane.
2. Locate the Rule you want to enable or disable.
3. Select the required Rule.
4. Click Enable/Disable Rule.
5. If the Rule is shared with more than one Team, the Enable/Disable Rule page is displayed.
Select the Teams in which you want to disable the Rule.
Click OK.
The Rules Manager is displayed.
- OR -
The Rule is disabled and  is not displayed in the Enabled column.
Click Save. The settings are saved and the page is refreshed.
Note
If a Rule is disabled, click Enable/Disable Rule in the Rules Manager to enable it. The Rule is enabled and is displayed in the Enabled column.
Enabling or Disabling a Rule Log
Manage Rule - To create, edit, copy, and delete Team level Rules.
In order to log events triggered by a Global or Team level Rule defined in Business Administrator, you need to enable its Rule Log.
The Rule Log can record information only if the Rule is activated, and the Log for the Rule is enabled. A Rule can be activated or deactivated by clicking the Enable/Disable Rule button in the Rules Manager.
The Enable/Disable Log button is used to enable or disable the Rule Log for a selected Rule. By default, the Log for a new Rule is disabled when the Rule is created.
To enable or disable logs for a Team-based Rule, you must have the Manage Rule Permission in the relevant Teams.
To Enable or Disable Logging of a Rule
1. Select the Rules node from the Navigation pane to view the Rules Manager in the Results pane.
2. Locate the Rule for which you want to enable or disable the Log.
3. Select the required Rule.
4. Click Enable/Disable Log.
5. If the selected Rule is shared with more than one Team, the Enable/Disable Rule Log page is displayed.
Select the Teams in which you want to enable the Rule Log.
Click OK.
The Rules Manager is displayed.
- OR -
The Rule Log is enabled and is displayed in the Log column.
Click Save. The settings are saved and the page is refreshed.
Note
• If the Rule Log is enabled, click Enable/Disable Log to disable it. The Rule Log is disabled and is not displayed in the Log column.
• The Rule Log entries are purged when you disable and subsequently enable the Rule Log.
Editing a Rule
Global Level
Manage Account Rules - To create, edit, and delete Rules for Accounts.
Manage Contact Rules - To create, edit, and delete Rules for Contacts.
Team Level
Manage Rule - To create, edit, copy, and delete Rules.
You can modify a Rule from the Rules Manager.
You can edit Team-based Rules in all Teams in which you have the Manage Rule Permission.
To Edit a Rule
1. Select the Rules node from the Navigation pane to view the Rules Manager in the Results pane.
2. Locate the Rule you want to edit.
3. Select the required Rule.
4. Click Edit. The first page of the Edit Rule for Object wizard is displayed.
5. Modify the required details in the page. If you are modifying a Global Object Rule, go to Step 8.
6. Click Next if you are modifying a Team-based Rule. The second page of the Edit Rule wizard is displayed.
7. Modify the required details in the page.
8. Click Finish to save the modifications.
Note
• When you edit a Rule, all logs previously generated by the Rule are deleted from the Rules Log.
• If the Rules Manager does not display the content of a condition defined in a Touchpoint Mapping upgraded as a Routing Rule, click Edit to open the Rule in the edit mode, and save it.
• You cannot change the Object for which a Rule is created.
• If you change a selected Event while editing a Rule, all Actions that are not relevant to the new Event are cleared for the Rule.
Scenarios