Creating a Text or Number Type of Property
To Create Text or Number Type Properties
1. Click the plus sign (+) next to the Objects node in the Navigation pane.
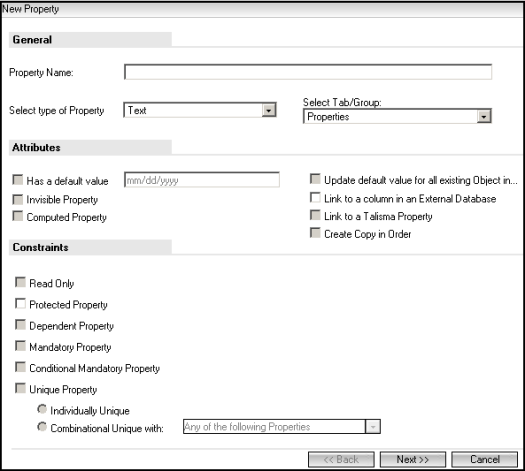
2. Select the required object node in the Navigation pane.
3. Click the New Property link in the Results pane. The first page of the New Property wizard is displayed.

4. In the Property Name field, type the name of the property. The text in the field must not exceed 40 characters, and must not include the commas (,).
5. In the Select type of Property list, select Text or Number, as required.
If Text is Selected:
The Valid Values Page is Displayed.
1. Select the Restrict values this Property can take option to limit the values that the property can accept.
2. In the Enter a Value field, type a value, and click Insert. Repeat this step to add more values to the list.
3. Use the Move Up and Move Down buttons to define the order of values in the list.
4. Select the This Property has a default value of option and select the default value to be displayed in the list.
5. Select Update default value for all existing Object instances to update all items of the selected object in Desktop Client, with the changes you have made to the list.
Important
◦ You can also choose to restrict the values of this property to be specific only to the values of a reference object. To do this, select the Restrict values this Property can take option. This enables the Reference Object field. Now, select the required reference object from the drop-down list. This ensures that the new property values only take values that are configured for the selected reference object.
◦ In Desktop Client, only those Reference Object items for which the value of the Active Property is set to Yes are displayed as restricted values for the property.
◦ You cannot associate restricted values of a property with teams if the reference object items are set as restricted values.
6. Click Finish.
If Number is Selected:
The Range page is Displayed
1. Select Support Decimal Values for the property to accept decimal values.
2. Specify the number of decimal values that the property must support. By default, the property supports two decimal values. You can specify numbers from 1 through 6.
3. Select the Restrict values this Property can take option to limit the range of values the property can accept.
4. Specify the minimum and maximum values that the property can accept.
For example, to specify that the property cannot accept values less than 5 and greater than 15, type 5 in the Minimum Value field and 15 in the Maximum Value field, respectively.
5. Select the Default Value option to specify a default value that must be displayed in the list.
6. From the Format (from locale setting) list, select Yes if you want the Number type of property to be displayed in the number format specified in the Regional and Language Options settings of the computer where the property is viewed.
Example
You set this option to Yes. On Jack's computer, if the format in the Regional and Language Options settings dialog box is set to English (United States), the number 1234356789 is displayed as 123,456,789.
Select No if you do not want the Number type of property to be formatted according to the Regional and Language Options settings of that computer.
7. Select Update default value for all existing Object instances to update all items of the selected object in Desktop Client, with the changes you have made to the list.
8. Click Finish.
Things to Remember When Creating Properties with Restricted Values
• You must change the name of the property if a pluralized version of the property is already available
Example
You are creating a property called Course, and the Courses property is already available.
• When you create a property with restricted values (enumerated property), these values are available for use in Rules, only after you sign off and sign on to Business Administrator.
• Restricted values of a custom property can be activated or deactivated through iServices. When a restricted value of a custom property is activated or deactivated, the changes are reflected in CampusNexus CRM only after you sign off and sign on again.
• A restricted value that is deactivated, appears as read-only in the Edit Property page. The deactivated value is not available for selection in the following areas across CampusNexus CRM:
◦ In Rules
◦ In the Item view of Desktop Client
◦ In the Select Property field when creating a Campaign in Desktop Client
• Restricted values of a deactivated custom property continue to be displayed in the object Table View, Filters, Reports, Advanced Search dialog boxes, and other user interfaces in Desktop Client.
• The maximum value supported for a property with restricted values cannot exceed 14 digits, including decimals. For example, if a property supports a precision value of up to three decimal places, the maximum value it can support is 99999999999.999.