Permissions Required
Mask/Unmask Text in Messages - To mask or unmask text in Messages.
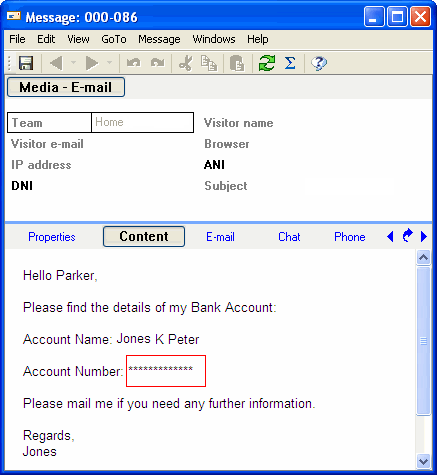
You can mask text to restrict the display of confidential information in a Message. When you mask text, the text is replaced with the character specified in the Masking character in Interaction Messages Global Option in Talisma Business Administrator.
The text in its masked form is also displayed in the following locations:
• In the Conversation pane of the Interaction to which the Message is added in Talisma Client
• In the Message sent from Talisma Client. The text will be displayed in the masked form to the Contact.
To Mask Text in a Message
1. In the Conversation pane or the Preview pane of an Interaction, right-click the Message and select Show Message.
The Message window is displayed.
2. In the Content tab, select the text that you want to mask.
3. Right-click and choose Mask Selected from the available options.
The selected text is masked.
To Mask Text in an Outbound Message
1. In the Reply pane, enter the required content that you want to send to the recipients.
2. Go to the File menu options and click Save. Alternatively, click  to save the changes made to the email content.
3. Now, go to the Conversation pane and select the Response Started node.
4. Right-click on the message and select Show Message.
The outbound message window is displayed.
5. In the Content tab, select the text that you want to mask.
6. Right-click and choose Mask Selected from the available options.
The selected text is masked.
To Unmask Text in a Message
When you unmask text, it is displayed in the original form in the Message and in the Interaction to which the Message was added.
1. In the Conversation pane or the Preview pane of an Interaction, right-click the Message and select Show Message.
The Message window is displayed.
2. In the Content tab, select the masked text.
3. Right-click and select Unmask Selected from the shortcut menu.
The selected masked text is unmasked.
To unmask all masked text in the Message, click in the Content tab, and select the Show Masked Text option from the shortcut menu.
|
Note • Although you can mask or unmask text only from Talisma Client, the text is displayed in its masked form when you view the text using Talisma iServices and Talisma Web Client. • The text masked by a User can be unmasked by another User if the latter User has the Mask/Unmask Text in Messages Permission. • When you mask underlined text, the underline will continue to be displayed. • You cannot mask: ◦ Attachments and multimedia content. ◦ Text displayed in multiple lines. When you select multiple lines of text, the Mask Selected and Unmask Selected options will not be enabled. When you include text that does not contain a new line character, even if the text is displayed in multiple lines, Talisma considers it as a single line of text and enables you to mask the text. ◦ Text in a table. You must select text in individual cells and mask the selected text. ◦ Windows Controls included in Interaction Messages. For example, text boxes, applets, etc. However, you can mask or unmask text inside text boxes. • Character formatting of original text is lost when you select the Unmask Selected option. Therefore, it is recommended that you use the Show Masked Text option to display the text in its original format. • It is recommended that you do not mask hyperlink(s) in an Interaction Message that contains multiple hyperlinks. While the Unmask Selected option will be disabled when you try to unmask a hyperlink, you can use the Show Masked Text option to unmask all hyperlink(s). |
Usage Scenario to Mask Text
Parker Roy, the admissions representative at WorldWaves University, masks the value of the Account Number Property of Jones Mathew, a Lead who seeks admission at WorldWaves. The following image depicts the Account Number Property masked with asterisks (the special character) in the Message window:

Masked Text in a Message