Required Permissions:
• Manage All Users - To create, edit, copy, and delete Users.
• Manage User - To create a user, copy a user, delete a user, add an existing user to a Team, remove an existing User from a Team, and set the Properties of other Users in the Teams in which this Permission is granted.
A user can be created with Trusted Security, Application Security, or Custom Security. CampusNexus CRM uses the Microsoft® Windows® NT domain login name and password to authenticate the Trusted Security User. When logging on to the CRM Client using Trusted Security, select Use Trusted Connection.
A user created with Application Security requires a Login Name and Password. For a user created with Custom security, a third-party server's login name and password are used for authentication. Users can specify these details when logging on to the CRM Client. An SQL login name is not created for this user.
To Create a User with Trusted Security
1. Select the Users node from the Navigation pane. The existing users are listed in the Results pane.
2. Click the New User link, or click New in the Results pane.
The General area of the New User page is displayed.
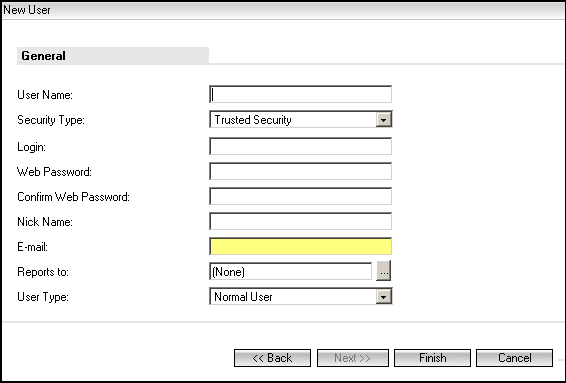
3. In the User Name field, type the User name.
4. From the Security Type list, select Trusted Security.
5. In the Login field, type the user's login name. Text in this field must be in the format <Domain>\<UserName> (Windows NT) or a valid User principal name. When specified, this value is displayed in the Nick Name field as well.
Example
If Tony@email.com or Mycompany\Tony is typed in the Login field, the value Tony is displayed in the Nick Name field.
Note
User details created in the Windows NT format cannot be recreated in the user principal name format and vice versa.
6. In the Web Password field, specify the user's password. This is the password that the User will specify when logging on to Business Administrator. For security reasons, asterisks (*) are displayed as you type.
7. In the Confirm Web Password field, type the password again.
8. In the Nick Name field, type a nick name. By default, the name of the user is displayed. Modify the name displayed in the Nick Name field, if it is required. This field cannot be left blank. The nick name specified here will be used in Chat Transcripts.
9. In the E-mail field, type the email address of the User.
10. From the Reports to list, select the User to whom the selected user reports. This step is optional.
11. From the User Type list, select Normal User or Viewer. A Normal User, when granted Permissions, can perform operations in Desktop Client. A Viewer is a user who can only view information.
Further, log on credentials of Viewer type of users are not supported on Web Client.
12. Click Next to continue.
13. From the list of existing Teams, select the Teams to which the user will have access. Select the Root Team, to give the user access to all teams in CampusNexus® CRM. Select a Parent Team to give the user access to all its Child Teams. If a user is not given access to any Team, you will not be able to define any Roles or grant any Team level Permissions for that user. However, Global Permissions can be granted.
14. Click Next to continue.
15. Select the required Global Roles for the user from the Select Global Roles list. When a CRM Client User is assigned a specific Role, the user is automatically granted the set of permissions associated with the role. CampusNexus CRM automatically selects these permissions in the fourth page of the New User wizard. This step is optional.
16. Select a Team from the Team list and choose the Roles for the user from the Select Roles in Team list. Repeat this step for each Team for which Roles have to be assigned to the user. This step is optional.
17. Click Next to continue.
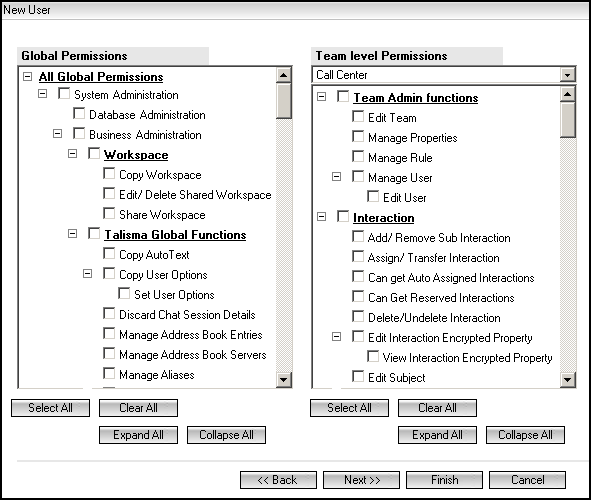
18. From the Global Permissions box, select the Permissions to be granted to the user. You can grant a User any of the Permissions assigned to you. This step is optional. Only Users who customize Desktop Client, or perform administrative tasks must be granted these Permissions. A group of Permissions can be selected or cleared.
◦ Select System Administration to grant the User all Global Permissions.
◦ Select Database Administration only for the User who will maintain the Database Servers, Web Components, Campaign Dispatchers, and External Data Sources.
◦ Select Business Administration to grant the User all Permissions relating to Business Administrator and Desktop Client .
CampusNexus CRM automatically selects Permissions associated with the Roles selected for the User in the previous page.
19. From the list of Teams in the Team level Permissions area, select a Team.
20. From the list of Team level Permissions, select the Permissions to be granted to the User. You can grant a User any of the Permissions assigned to you as well as the subset of Permissions that are part of the main set of Permissions. For example, select Team Admin functions to grant the User the Manage Team, Manage Properties and Manage Rule Permissions. CampusNexus CRM automatically selects Permissions associated with the Roles selected for the User in the previous page.
21. Click Next to continue.

Specifying Media Load Options for the User
You can define Media Load Options for the User, select the Default Team for a Phone User, and set the Primary Team for the User.
22. In the Non Real Time field, type the maximum load for Non Real Time Stored Media that enable communication to proceed independently and from which data can be saved to a memory device. Non Real Time Stored Media are requests that do not demand immediate attention. For example, e-mail. By default, the maximum load for Non Real Time Media is 99999.
23. In the Real Time Stored field, type the maximum load for Chat and other Real Time Stored Media, that enable two persons to communicate in sequence and from which data can be saved to a memory device. Real Time Stored Media requests are requests that demand immediate attention and for which contents of discussion are available for reference. For example, Chat sessions. By default, the maximum load for Real Time Stored Media is 3.
24. In the Real Time Non Stored field, type the maximum load for phone, VoIP, and other Real Time Non Stored Media that enable two persons to communicate in sequence and from which data cannot be saved to a memory device. Real Time Non Stored Media requests are requests that demand immediate attention but the contents of the discussions are not available for reference. For example, Requests received by phone. By default, the maximum load for Real Time Non Stored Media is 1.
Default Team
25. In the All Phone Calls list, select a Team as the default Team for Phone Users. The list displays all Teams in the CRM system for a User with the Business Administration Permission. However, only those Teams are listed for other Users, in which they have the Use Media Phone Team Level Permission.
In Desktop Client, this Team is set for the relevant Message Object when a Phone User receives an incoming call or when a User makes an outgoing call. Setting the default Team facilitates Team-based reporting of Phone calls made and received by the User.
26. In the Proactive Chat list, select a Team in which a Proactive chat request must be created. Setting the default Team facilitates Team-based reporting of Proactive chat sessions initiated by the User.
Primary Team
27. In the Team-based Objects list, select a Team as the Primary Team for the User. The list displays all Teams in the CRM system for which the User has access.
Team-based Object items that are assigned to a User from the SIS are available to the User in the Team that is selected in the Team-based Objects list.
You can set a Team for a User in the Team-based Objects list. Consider that an Activity (or another Team-based Object) is assigned to User A who belongs to the Marketing Team in the CRM system. When the Activity is transferred to User B, for whom the Primary Team is the Sales Team, the Activity is automatically transferred to the Sales Team. User B can work with the Activity in the Sales Team.
28. Click Finish. The User can now log on to Desktop Client using a Trusted connection.
To Create a User with Application Security
1. Select the Users node from the Navigation pane. The existing Users are listed in the Results pane.
2. Click the New User link, or click New in the Results pane.
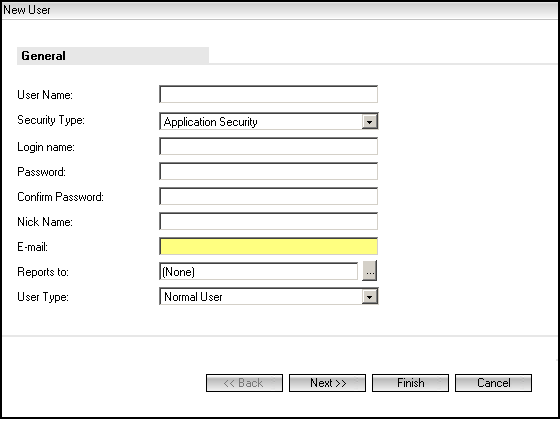
3. In the User Name field, type the User name.
4. From the Security Type list, select Application Security.
5. In the Login name field, type the User's login name. This is the User name that the User specifies when logging on to Business Administrator and Desktop Client. When specified, this value is displayed in the Nick Name field as well.
6. In the Password field, specify the User's password. This is the password that the User will specify when logging on to Business Administrator, Desktop Client and Database Administrator. For security reasons, asterisks (*) are displayed as you type.
7. In the Confirm Password field, type the password again.
8. In the Nick Name field, type a nick name. By default, the name of the user is displayed. Modify the name displayed in the Nick Name field, if it is required. This field cannot be left blank. The nick name specified here will be used in Chat Transcripts.
9. In the E-mail field, type the email address of the User.
10. From the Reports to list, select the User to whom the selected user reports. This step is optional.
11. From the User Type list, select either Normal User or Viewer. A Normal User, when granted Permissions, can perform operations in Desktop Client. A Viewer is a user who can only view information.
12. Click Next. The Matching Users dialog box is displayed if login credentials of active and inactive users in associated products match with values typed in at least one of the following fields: User Name, Login name or Email. To inherit values in these fields from the Matching Users dialog box, select a user and click OK. The values are inherited and the Teams page is displayed.
OR
Click Cancel and proceed to the Teams page without inheriting values from the Matching Users dialog box.
Note
• The Matching Users dialog box is also displayed if you click the Finish button on the first page of the user creation wizard.
• The Matching Users dialog box is not displayed when you edit the Talismaadmin user or a system defined user.
• Users in other products are detected as a result of changes in the web.config file that is available in the path <System Drive>:\Program Files\Talisma Web Components\BusinessAdministrator. Perform the following steps to display the Matching Users dialog box.
To configure the display of users of other products in the Matching Users dialog box, make the indicated changes to the following code in the web.config file:
<LookUpService>
<urls>
<!--<add product="<Product Name>" address="<Security WebService Url>" enabled="false" />-->
<!--<add product="<Product Name>" address="<Security WebService Url>" enabled= "false"/>-->
</urls>
</LookUpService>
a. Open the web.config file in a text editor.
b. Replace the text <Product Name> with the name of the product.
c. Replace the text <Security WebService Url> with the URL of the security web service installed for the product.
d. Change the text of the enabled attribute from false to true.
e. Uncomment the changed code and save the web.config file.
Log on afresh to Business Administrator.
13. To continue creating a User with Application Security, follow steps 14 through 29 of Creating a User with Trusted Security.
To Create a User with Custom Security
1. Select the Users node from the Navigation pane. The existing Users are listed in the Results pane.
2. Click the New User link, or click New in the Results pane.
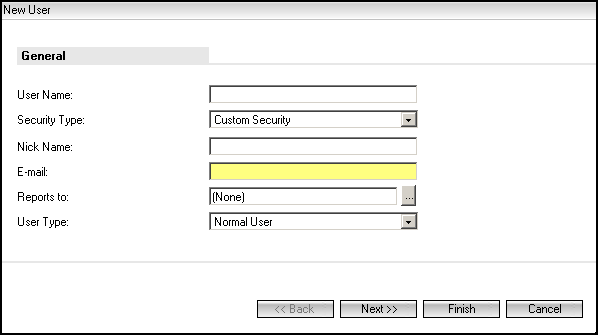
3. In the User Name field, type the User name.
4. From the Security Type box, select Custom Security.
5. In the Nick Name field, type a nick name for the User. This field cannot be left blank.
6. In the E-mail field, type the email address of the User.
7. From the Reports to list, select the User to whom the selected user reports. This step is optional.
8. From the User Type list, select either Normal User or Viewer. A Normal User, when granted Permissions, can perform operations in Desktop Client. A Viewer is a user who can only view information.
9. Click Next. The Matching Users dialog box is displayed if login credentials of active and inactive users in associated products match with values typed in at least one of the following fields: User Name or E-mail. To inherit values in these fields from the Matching Users dialog box, select a user and click OK. The values are inherited and the Teams page is displayed.
OR
Click Cancel and proceed to the Teams page without inheriting values from the Matching Users dialog box.
Note
• The Matching Users dialog box is also displayed if you click the Finish button on the first page of the user creation wizard.
• The Matching Users dialog box is not displayed when you edit the Talismaadmin user or a system defined user.
• Users in other products are detected as a result of changes in the web.config file that is available in the path <System Drive>:\Program Files\Talisma Web Components\BusinessAdministrator. Perform the following steps to display the Matching Users dialog box.
To configure the display of users of other products in the Matching Users dialog box, make the indicated changes to the following code in the web.config file:
<LookUpService>
<urls>
<!--<add product="<Product Name>" address="<Security WebService Url>" enabled="false" />-->
<!--<add product="<Product Name>" address="<Security WebService Url>" enabled= "false"/>-->
</urls>
</LookUpService>
a. Open the web.config file in a text editor.
b. Replace the text <Product Name> with the name of the product.
c. Replace the text <Security WebService Url> with the URL of the security web service installed for the product.
d. Change the text of the enabled attribute from false to true.
e. Uncomment the changed code and save the web.config file.
Log on afresh to Business Administrator.
10. To continue creating a User with Custom Security, follow steps 14 through 29 of Creating a User with Trusted Security.
Note
• The Matching Users dialog box is displayed only when the selected Security Type is Application Security or Custom Security.
Administrators must ensure that a scenario where different users with identical login credentials in CampusNexus applications are prevented from logging on to other CampusNexus applications if they do not have permissions in the latter application.
• Ensure that you do not specify a single or double quotation mark when you specify the password for a Trusted Security User in the Web Password field, and when you specify values in the Login Name and Password fields for an Application Security User.
• Trusted Security Users are prompted to specify the Web password used to log on to Business Administrator. Trusted security Users can use their Windows NT password to log in.
• Application Security Users are prompted to specify the password used to log on to Business Administrator, the Analytics Workspace, Database Administrator, and Desktop Client.
• Ensure that the Microsoft® Distributed Transaction Coordinator (DTC) Service is running on the server where Media Database is installed. If the DTC Service is not running, the User creation operation fails and an "Unspecified error" is displayed.
To Select a User
1. Select the Users node from the Navigation pane. The existing Users are listed in the Results pane.
2. Select the required User.
From any page related to Users, you can view the list of Users by clicking the User List link in the Results pane.
Creating a User from an Existing User
You can create a User by reusing the information of an existing User. You can then modify the User name, Permissions, and other details to suit specific requirements. This option is useful when creating a User with the same or similar Properties, but with a different name.
When you create a user with the same email address as a deleted user, the deleted user's details are recovered and displayed. You can modify these details and then complete the process of creating the user.
If you create a user with the same email address as a deleted user, a message is displayed that prompts you to restore the deleted user's login. You can click OK to confirm your action and create the user with
To Create a User from an Existing User
2. Click Create As. The General page of the Users wizard is displayed.
3. In the User Name field, specify the new name for the User.
4. You can modify the details of the User.
5. Click Finish. A new User with the specified name is created.
Note
• If you type the email address of a deleted user in the Email field, when you navigate to the last page of the user creation wizard, a message is displayed that prompts you to restore the deleted user's login. Click OK to complete the process of creating a user that has the same email address as a deleted user.
• User access and Permissions must be specified manually.
• Ensure that the Microsoft® Distributed Transaction Coordinator (DTC) Service is running on the server where Media Database is installed. If the DTC Service is not running, the User creation operation fails, and an "Unspecified error" is displayed.