Creating an Alias
Required Permission: Manage Aliases - To create, edit, copy, and delete Aliases.
Note
• To create an alias, it is mandatory to have at least one Job Service and its associated Dispatcher and Extractor Jobs.
• To facilitate the association of aliases with teams, create the teams before creating aliases.
To Create an Alias
Alias creation is a three-step process:
1. Specifying General, Opt-out and Teams Details
2. Setting Mail Server Details
3. Selecting Directory Servers
Step 1: Specifying General, Opt-out and Team Details
1. Select the Aliases node from the Navigation pane. The existing aliases are displayed in the Results pane.
2. Click New Alias or New in the Results pane.
The first page of the New Alias wizard is displayed.
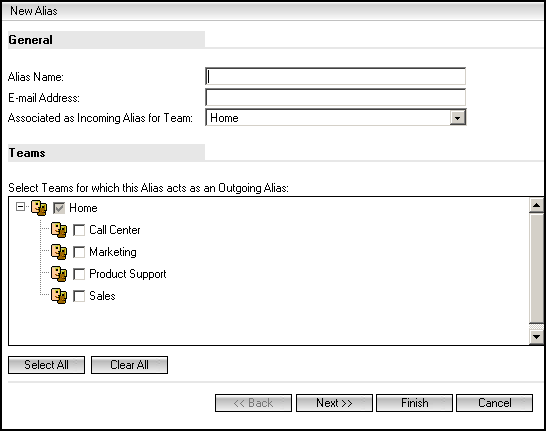
Specifying General Information
1. In the Alias Name field, type a name for the alias. If the alias is configured as an Outgoing Alias for a team, when a user responds to email or sends mailers in campaigns, the contact can see this name in the From field of the message.
2. In the E-mail Address field, type the email address associated with the alias. This is the email address to which contacts will send emails.
3. From the Associated as Incoming Alias for Team list, select the team that must receive emails from this alias. It serves as the incoming alias only for this team.
Opt-out Information
Settings in this section enable you to configure a hyperlink that email recipients can click to stop receiving additional email messages.
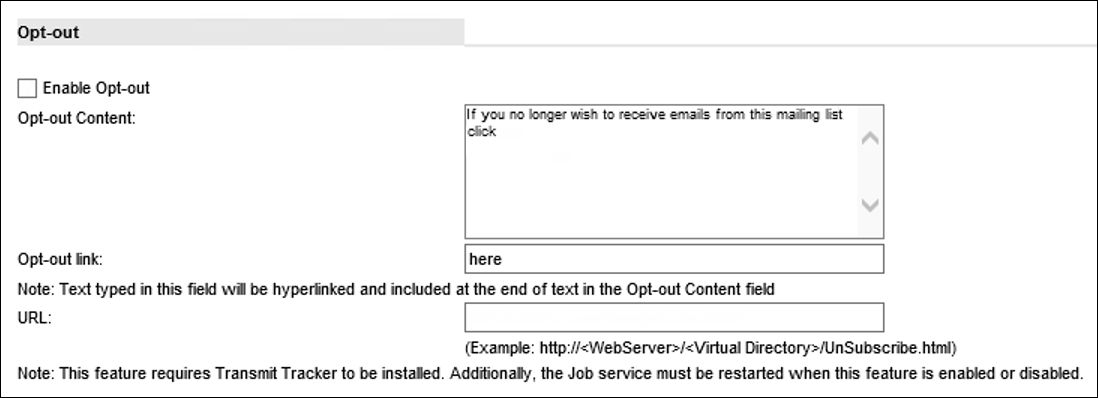
4. Select the Enable Opt-out check box. For the alias, you can configure settings that provide email recipients the choice to opt-out of email that will be sent from teams associated with the alias.
5. In the Opt-out Content field, type the opt-out content that will be displayed to recipients of emails sent from teams associated with the alias.
6. In the Opt-out Link field, type the text that will be hyperlinked and then appended after the text typed in the previous step.
For example, the following text is indicative of the text typed in steps 5 and 6:
If you no longer wish to receive emails from this mailing list, click here.
7. In the URL field, type the fully qualified domain name of the web server that will direct the email recipient to a confirmation page to stop receiving emails in future.
Specifying Team Information
8. From Select Teams for which this Alias acts as an Outgoing Alias, select one or more teams that are going to use this alias to send emails to contacts.
9. Click Next to continue.
Step 2: Setting Mail Server Details
Obtain details required to complete this step from your system administrator.
Incoming Mail Server Details
1. In this section, specify appropriate values in the following fields:
| Field | User Action |
|---|---|
| Mail Server Name (Incoming) | Type the POP3 or IMAP server name or IP address of the incoming mail server. This is the mail server that receives email in your institution. |
| Protocol Type | Select the protocol that you want to use to retrieve email messages from the mail server. The POP3 or IMAP options are available for selection. When you select SSL or TLS in the next step, a connection is established with the mail server along with TLS encryption. |
| Authentication Type |
Select the authentication type that is used to log on to the mail server. The following options are available: CLEAR TEXT, NTLM and OAUTH 2.0. By default, CLEAR TEXT is selected. |
| Service Provider (For OAUTH 2.0 only) |
Select Office 365 or Gmail. |
| Account Name | Type the name of the mailbox, or a user name on the mail server that you want to use to access the mail server. For a mailbox on a Microsoft® Exchange Server, provide the account name in the following format: [NT domain name]\[NT User name]\[mailbox]. If you select IMAP from the Protocol Type list, provide the account name in the following format: [mailbox]. |
| Password (For CLEAR TEXT and NTLM only) | Type the password of the account used to access the mail server. |
| Type of Encrypted Connection | Select one of the following options: • None - Communication between the Extractor job and the mail server is not encrypted. • SSL - For the IMAP or POP3 protocols, communication between the Extractor job and the mail server occurs through TLS or SSL on a dedicated SSL port that is configured on the mail server. The connection is attempted using TLS 1.2 encryption. If the mail server does not support TLS, the connection occurs through SSL 3.0. • TLS - Communication between the Extractor job and the mail server occurs through TLS that uses TLS 1.2. |
|
(For OAUTH 2.0 only) Access Token and Refresh Token |
Click the Generate Tokens button. After typing your login credentials and password in the displayed web page, values will be updated in these read-only fields:
While the web page is displayed, tokens will not be generated if you click a link in the Business Administrator page displayed in the background. To generate the tokens in this scenario, close the web page and click the Generate Tokens button again. Note When generating tokens for a second alias, the browser may consider credentials that were used for generating tokens for the previous alias. To prevent this scenario, before generating tokens for a second alias it's recommended to clear the browser’s cache or close and reopen the browser window. |

Note:
The value in the Port field is changed by default based on the combination of values that you select in the Protocol Type and Type of Encrypted Connection lists.
| Protocol Type | Type of Encrypted Connection | Default Port Value |
|---|---|---|
| POP3 | None | 110 |
| TLS | 110 | |
| POP3 | SSL | 995 |
| IMAP | None | 143 |
| TLS | 143 | |
| IMAP | SSL | 993 |
You can type a different value for the port of the incoming mail server.
Outgoing Mail Server Details
2. In this section, specify appropriate values in the following fields:
| Field | User Action |
|---|---|
| Mail Server Name (Outgoing) |
Type the SMTP server name or the IP address of the outgoing mail server. The outgoing mail server sends emails from your institution to contacts. |
| Port | Type the port address of the outgoing mail server or the SMTP port number. The default port number is 25. |
| Authentication Type |
Select the authentication type that is used to log on to the mail server. The following options are available: CLEAR TEXT, NTLM and OAUTH 2.0. By default, CLEAR TEXT is selected. |
| Service Provider (For OAUTH 2.0 only) | Select Office 365 or Gmail. |
| SMTP E-mail Address |
Type the email address that the mail server recognizes. This option is displayed if SMTP authentication is enabled for the server. |
| SMTP Account Name |
Type the name of the SMTP account. The SMTP account name and password are required if the outgoing mail server supports authentication. If your institution is integrating with SendGrid, type the value apikey. |
| SMTP Password (For CLEAR TEXT and NTLM only) |
Type a password for this account. The SMTP account name and password are required if the outgoing mail server supports authentication. If your institution is integrating with SendGrid, copy the API key generated from the SendGrid website. |
| Message Encode Type | Select UTF-8 and encoded, or Plain Text and unencoded. UTF-8 (Unicode Transformation Format) and encoded format enables the sending of messages in Unicode format. This is the preferred format for sending out messages containing non-ASCII characters. This option is selected by default. Select Plain Text and Unencoded only if e-mail sent out from your organization is in plain text or ASCII format. |
| Type of Encrypted Connection | Select one of the following options: • None - Communication between the Dispatcher job and the mail server is not encrypted. • SSL - Communication between the Dispatcher job and the mail server occurs through implicit TLS or SSL on a dedicated SSL port that is configured for SMTP on the mail server. The connection is attempted using TLS 1.2 encryption. If the mail server does not support TLS 1.2, the connection occurs through SSL 3.0. • TLS - Communication between the Dispatcher job and the mail server occurs through explicit TLS which uses TLS 1.2. |
| (For OAUTH 2.0 only) Access Token |
Click the Generate Tokens button. After typing your login credentials and password in the displayed web page, values will be updated in the following read-only fields:
While the web page is displayed, tokens will not be generated if you click a link in the Business Administrator page that's displayed in the background. To generate the tokens, close the web page and click the Generate Tokens button again. Note When generating tokens for a second alias, the browser may consider credentials that were used for generating tokens for the previous alias. To prevent this scenario, before generating tokens for a second alias it's recommended to clear the browser’s cache or close and reopen the browser window. |
| Refresh Token |
Note
• The following table indicates the default value in the Port field based on the value in the Type of Encrypted Connection list:
| Type of Encrypted Connection | Default Port Value |
|---|---|
| None | 25 |
| TLS | 25 |
| SSL | 465 |
You can type a different value for the Port of the outgoing mail server.
The encryption connection type that you select can also depend on the type of encrypted connections supported by your email server. For example, Exchange server allows configuration of SMTP only through explicit TLS or the configuration is unencrypted.
Threading
3. In this section, specify the following details:
| Field | User Action |
|---|---|
|
Threading Mode |
• Select the Interaction ID in Subject option to insert the Interaction ID in the Subject Line of all messages. Selecting this option ensures that all messages containing the same Interaction ID are threaded into a single Interaction. When this Threading Model is selected, by default, the Subject Line is prefixed with the Interaction ID. By changing the value of the SubjectLineInTheEnd option in the tblGlobalInfo table, you can specify that the Subject Line must be suffixed with the Interaction ID. • Select the Interaction in Reply-To option to insert the Interaction ID in the Reply To header of all messages sent from the Desktop Client. Selecting this option ensures that all messages containing the same Interaction ID are threaded into a single Interaction. • Select the Interaction in Reply-To with Subject Match option to thread messages containing the same Interaction ID in the Reply-To header, or containing the same Subject Line, into a single Interaction. • Select the Subject Match option to route all messages containing the same Subject Line into a single Interaction. The Interaction ID is not inserted in the Subject Line. |
|
Track responses to Campaign Mailer |
Select Yes if you want the new Alias to be used for tracking and threading Mailer responses to the appropriate Campaigns. Select No, if the Alias is not going to be used in any Campaign. This helps in improved performance of the Threader. |
Send and Receive Intervals
4. In the Extract mail every field, indicate the interval after which the email must be extracted from the mail server. For example, choose 10 minutes to specify that the Server must extract email from the mail server every 10 minutes.
5. In the Dispatch mail every field, indicate the interval after which mail should be dispatched to the mail server. For example, choose 30 minutes to specify that the Server must dispatch email to the mail server every half-hour.
6. Click Next to continue.
Step 3: Selecting Directory Servers
In this step, select directory servers from the available list.
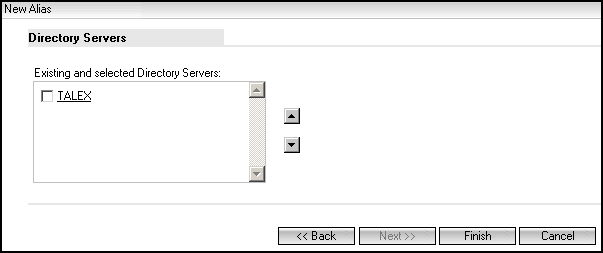
1. From the list of Directory Servers displayed, select the Directory Servers from which you want to automatically retrieve data for Contacts. Directory Servers store Contact information. If no servers are available, add a directory server and then edit the Alias to enable this feature. This specification is optional.
2. Click Finish. The newly created Alias is displayed in the Aliases list. The Test Login option to validate the outgoing mail server is no longer available. You can view the status of the Extractor and Dispatcher jobs of an Alias in Database Administrator.
Notes
• While using the POP3 Protocol type along with the Encryption Connection as SSL or TLS, ensure that the required security certificates are installed on the Main database, Job Services Framework (JSF), and Mail Server computers to enable the JSF Extractor and the corresponding configured Aliases to use the POP3 protocol and successfully establish a connection with the Mail Server.
• If you have integrated the Chat Medium, ensure that all teams have at least one Outgoing Alias defined. This enables a user to send the chat Transcript to a visitor at the end of a chat session.
• The email address defined when configuring an Alias is also referred to as the Reply To address.
• When selecting a Threading criterion, it is recommended that you select the same option selected by your system administrator when the CRM installation was upgraded.
• For SMTP authentication to take place when you create an alias, on servers that support SMTP authentication, you must specify the SMTP User name and password in the SMTP Authentication page.
• The extractor and dispatcher Jobs are automatically created when a new Alias is created.
• If the selected Threading model fails for an email message received in response to a message, then the CRM application attempts to match the Message ID of the incoming message with the Message ID of the message. If a matching Message ID is found, CRM uses the Message ID for threading. However, if a matching Message ID is not found, a new Interaction is created.
• If the Interaction ID in Reply-To Threading model is selected for an Alias and you create a Rule using the "contains" operator with the Message Object Property set to To:
◦ The Rule is executed successfully when the e-mail address or both the display name and the email address are inserted in the Value field.
◦ The Rule fails when instead of the email address, the Alias name is specified in the Value field.
• When you create a Rule using the ‘=’ operator with the Message Object Property set to To, the Rule fails when the text Display Name[Email Address] is inserted in the Value field.
Selecting an Alias
1. Select the Aliases node from the Navigation pane of Business Administrator. All existing Aliases are displayed in the Results pane.
2. Select the Alias to be edited.
From any page related to Alias, you can view the list of Aliases by clicking the Aliases List link in the Results pane.
Authentication Types
CRAM-MD5, NTLM, and APOP are challenge-response authentication mechanisms that help avoid sending out the User's password over the network.
In these mechanisms, the server supplies a piece of data (the Challenge) to the client, which the client encrypts and sends back to the server. The server uses the stored password of the client to confirm that the encrypted data is genuine.
These methods are secure in that:
• Only people who know the password can respond to the challenge correctly.
• The password is not sent over the Internet.
• The server sends a new challenge every time, and therefore, it is difficult to impersonate the client in subsequent sessions.
Creating an Alias from an Existing Alias
You can modify a source alias when you need to create a new alias with the same domain information. You can then modify the alias name and other details as required.
To Create an Alias from an Existing Alias
2. Click Create As.
3. In the Alias wizard, modify the required details.
4. Click Finish. A new alias with the specified name is created.