Sending an Email Message to Leads
Permissions Required: Send Email
You can send an email message to selected lead records from the Table View.
To Send an Email to Leads
1. In the lead Table View, select the check boxes corresponding to the lead records for which you want to send an email.
2. On the top bar, click  . From the available options, select Send Email.
OR
Click the ID of the lead to view the lead record and then click  in an email property.
The New Email window is displayed.
3. Enter valid information in the required fields and send the email.
A new interaction record is created automatically for the corresponding leads after the email is sent.
Note
From a lead-based workspace, when you insert canned responses using shortcut keys in the New Email window, you can insert lead and contact-based canned responses.
To insert a canned response using a shortcut:
a. Position the cursor where you want to insert the canned response.
b. Type its prefix followed by its shortcut key and then press the space bar.
Any inline and non-inline attachments in the canned response are also included when it is inserted.
The various fields and action buttons in the New Email window:
| Field | Description |
|---|---|
| From | Select the appropriate team email alias from this drop-down list. |
| Email Type |
By default, the E-mail property is displayed. You can select a different email type of property from the drop-down list. Note The selected email type of property is displayed by default when you view the New Email window again. Click |
| Subject | Specify an appropriate subject for the email that you are sending. |
| Message | Type the contents of the email in this area, and use the available formatting options, as required. |
| Insert |
Click this drop-down field to insert any of the following: • Canned Response. For more information, see Inserting a Canned Response in a Message. • Signature. For more information, see Inserting a Signature in a Message. • KB Article. For more information, see Inserting a KB Solution in an Interaction |
Note
In the object item view, the functionality of sending emails to addresses available in the following types of properties is not supported:
• Related object properties
• Properties linked to a column in an external database
• Linked properties
• Email properties in a RecordList tab
| Click | To... |
|---|---|

|
Send the email to the selected leads. An interaction record is created automatically after the email is sent. The interactions are in the Open state by default. The Bounced and Opt-Out Addresses dialog is displayed if: • Soft or hard bounced email addresses are included in the To, Cc or Bcc lines. The Send Email property of these addresses can be Yes, No or blank. OR Email addresses on the To line that are not bounced but which have the value No in the Send Email property. Additionally, the opt-out feature is required to be enabled for the associated outgoing alias. Note Email addresses that are not bounced but which are on the Cc or Bcc lines (with the value No in the Send Email property) will not be displayed. Select email addresses that you want to remove and then click Send. The addresses will be removed from the New Email window and the message will be sent to the remaining leads. Note An amber icon indicates the email address is soft bounced ( |

|
Send the email and move the new interaction status to Resolved. Note The Bounced and Opt-Out Addresses dialog is displayed if the same issues that occurred by clicking To resolve these issues, see documentation in the previous row. |

|
Add attachments to the email. |

|
The Bounced and Opt-Out Addresses dialog is displayed if: The lead's email address on the To, Cc or Bcc lines are soft or hard bounced. . The Send Email property of these addresses can be Yes, No or blank. OR Email addresses on the To line that are not bounced have the value No in the Send Email property. Additionally, the opt-out feature is required to be enabled for the associated outgoing alias. |

|
Hide the CC field. This option is selected by default. To include the CC field in the email, clear the check box. |

|
Hide the BCC field. This option is selected by default. To include the Bcc field in the email, clear the check box. |

|
Select this check box to rush the dispatch of the email to the lead. |
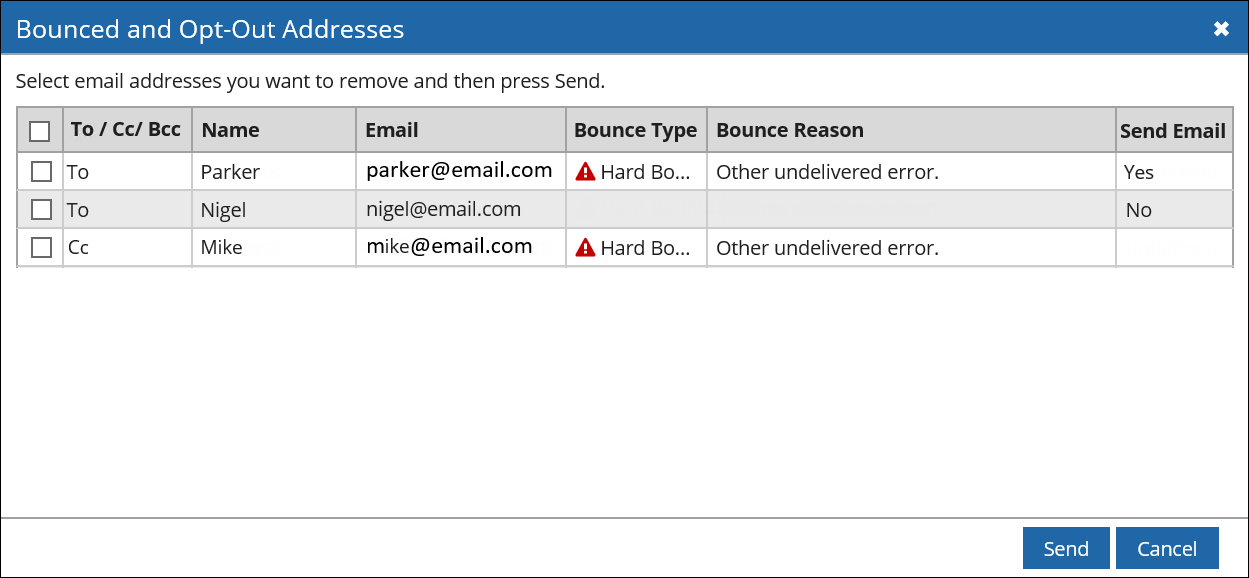
 ) and a red icon indicates a hard bounce (
 ).
).