View Messages
As the system administrator, you use the Connector Queue Manager web application as a central point of management for viewing queues and resolving error messages. You regularly monitor three message queues to primarily verify the correctness of the data being transferred between the two systems.
Messages with an ‘error’ status reach two error message queues. You access messages in the error message queues to edit the error transaction, correct the error, and resubmit it.
Monitor Message Queues
Three queues that you regularly monitor are:
- Talisma CRM outgoing messages queue
- Talisma CRM incoming messages queue
- CampusVue outgoing messages queue
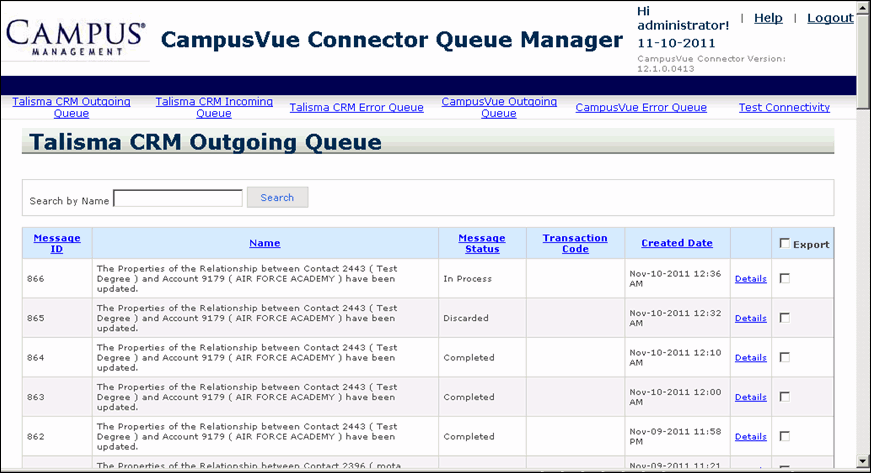
On a regular basis, you view messages in the three messages queues to:
-
verify that successful message transactions have the correct data.
-
verify the number of messages going into each system.
-
verify earlier error transaction messages that are resubmitted have been successfully transferred.
This section describes the various pieces of information displayed in the columns of the queue tables. Understanding what each piece of information depicts will help you better analyze each transaction and make meaningful comparisons as you monitor the three message queues.
Message Queue Information
Six columns in each message queue’s display table display message information pertaining to that queue. The following table describes the information that is displayed in each of the first five columns. The sixth column is described in the View Transaction Details section.
| Column Name | Description |
|---|---|
| Message ID | ID of the message in the source system. |
| Name | A description of the message in the source system. |
| Message Status | Status of the message transaction |
| Transaction Code | Type of transaction between the two systems. |
| Status Date | The date when the message was created. |
Message Status
The status of a message indicates the transaction’s state: whether it is pending, in process or completed. It may also indicate whether the transaction was completed successfully or resulted in an error. The following table lists and describes six possible message statuses.
| Message Status | Description |
|---|---|
| Pending | The message is yet to be picked up for processing by the Connector from the respective Outgoing Queue. |
| Completed | The message has been successfully delivered to the destination system. |
| Discarded | The message has been discarded within the Queue Manager and no further processing will take place with this message. |
| Error | The message has resulted in an error. |
Transaction Code
A transaction code indicates the type of transaction: a create, update or delete type of transaction. The code is depicted with the Object or Property name suffixed by the values, Create, Update, or Delete. The following table lists six possible transaction codes.
| Transaction Code | Description |
|---|---|
| <Object>Create | This message type creates an <object> in the destination system. Example: “StudentCreate” - this type of transaction creates a Student in the destination system. |
| <Object>Update | This message type updates an existing <object> in the destination system. Example: “EnrollmentUpdate” - this type of transaction updates a Student Enrollment in the destination system. |
| <Object>Delete | The message type deletes an existing <object> in the destination system. Example: “AddressDelete” - this type of transaction deletes a Student Address from the destination system. |
| <Property>Create | This message type creates a property in an existing Object in the destination system. Example: “MaritalStatusCreate” - this type of transaction creates a property value for the marital status property on the student record in the destination system. |
| <Property>Update | This message type updates a property in an existing Object in the destination system. Example: “TitleUpdate” - this type of transaction updates an existing property value for an existing property on the student record in the destination system. |
| <Property>Delete | This message type deletes a property in an existing Object in the destination system. Example: “SuffixDelete” - this type of transaction deletes an existing property value for an existing property on the student record in the destination system. |
View Transaction Details
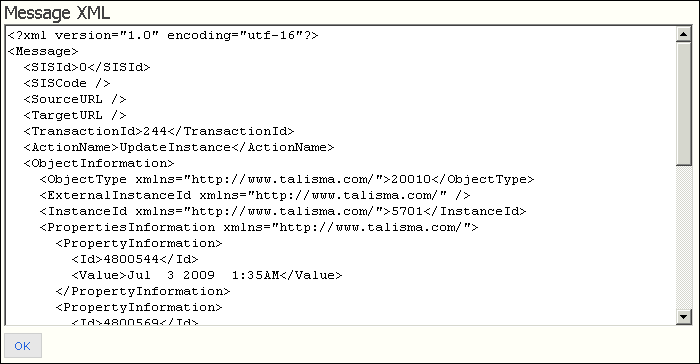
A sixth column contains the Details links that enable you to view the XML format of the transaction in order to obtain a detailed and complete view of the actual transaction. This XML tagged information includes field names and values that are being transferred from one system to the other.
-
Click the Details link under the sixth column in the row of the required message.
The Message XML pop-up is displayed.
-
Click OK, after viewing the transaction details, to exit the pop-up.
