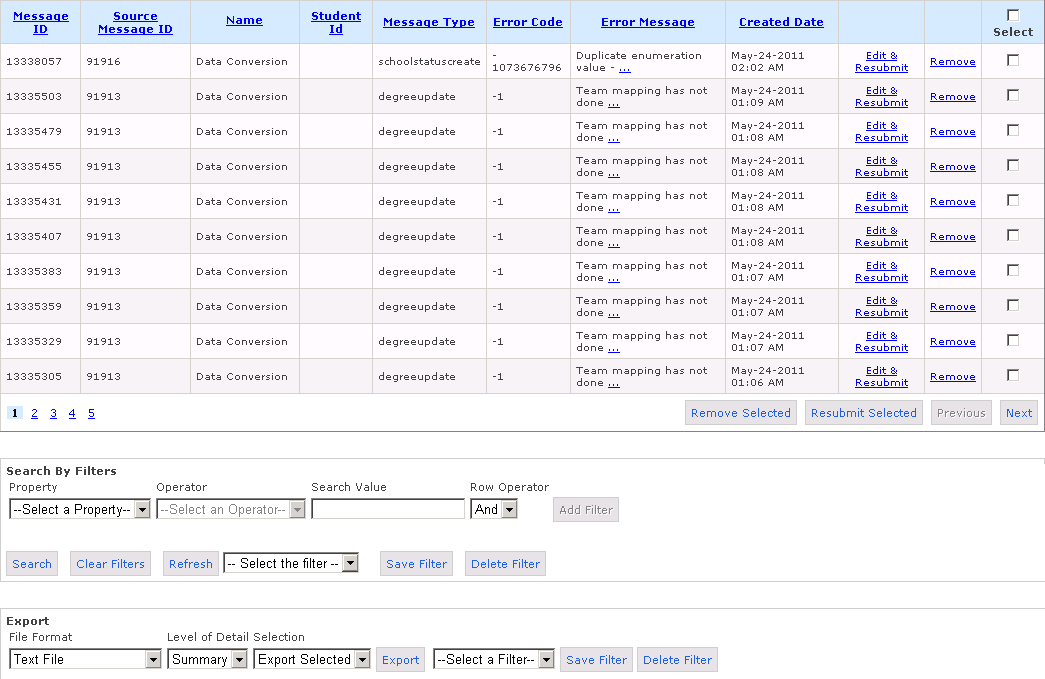
Search and Filter Messages
The Connector Queue Manager web application provides Search and Filter mechanisms to refine your searches as you analyze the messages in the queues. You can also save the filters configured within the Queue Manager application and reuse them as required.
Search by Name
If you know the name or the initial part of the name of the message, you can search for that name or initial part, using the Search by Name edit box displayed over the queue table.
-
Enter the name of the message in the Search by Name edit box.
-
Click Search.
Message(s) with the keyed-in name or initial part are displayed in the queue table.
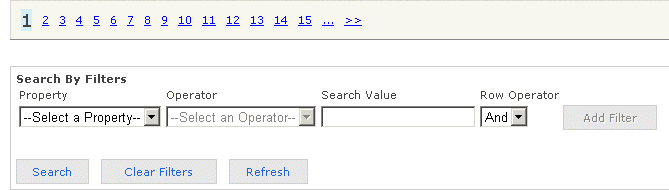
Search by Filter
The Search by Filter mechanism is for advanced and combined searches made possible by adding filters. You can search for values of any property (columns of the table) and specify Boolean and comparison operators.
-
Select the property name from the Property drop-down list box in the Search By Filter area below the queue table.
-
Select an appropriate operator from the Operator drop-down list box.
-
Enter the selected property’s value in the Search Value edit box (or, for properties with finite number of values, select it from a drop-list box).
-
Click Add Filter.
-
Click Search.
Message(s) filtered through the set filter are displayed in the queue table.
Add Multiple Filters
You can also choose to use logical operators to build a complex search query by using multiple filters. Each filter that you add specifies a filter criterion.
-
Select the property name, operator and value for the first filter criterion.
-
Choose the appropriate logical operator, AND or OR from the Row Operator drop-down box.
-
Click Add Filter.
-
Repeat Steps 1 to 3 to set additional filter criteria.
-
Click Search.
Message(s) filtered through the set of filters are displayed in the queue table.
Periodically, you may choose to click the Refresh button to keep the results of a search current.
Search filters for all queues are listed in the Select a Filter list. You can save a Search filter. You can also store multiple Search filters for each user and reload, run and edit a previously saved Search filter.
Save a Filter
-
Click Save Filter.
-
Enter a filter name in the Create Filter window.
If you type the name of an existing filter, the existing filter will be updated with details of the new filter.
-
Click OK.
The newly saved search filter is listed in the Search filter list.
-
To select a previously saved search filter, select the filter from the Search filter list.
The filter criteria are displayed.
-
Click Search.
Delete a Filter
-
Select a filter from the Search filter list.
-
Click Delete Filter.
Remove Filters
After having built and searched the tables, based on a complex query, you can delete the filters one at a time, to remove the filter criteria. A Delete button is provided for this purpose against each filter row added to your search criteria. You can also choose to remove all filters in one action by clicking the Clear Filters button.
Export Messages
The Queue Manager enables the Application Administrator to export error messages from all the Queue pages to file formats such as Comma Delimited File, Text File, Excel File, and XML File. The Application Administrator can export all or specific error messages, which can be distributed for analysis and troubleshooting purposes. The functionality of exporting specific or all messages for any of the Queues can be used along with the existing Search and Filter options.
This functionality enables the Application Administrator to:
- Export the error messages in formats such as Comma Delimited File, Text File, Excel File, XML File.
- Generate a detailed or summarized report of exported error messages.
- Export all or selected records using the Export All or Export Selected option.
-
Open a Queue and navigate to the Export area.
-
Select the file format from the File Format list. For example, Excel File.

-
Select one of the following options in the Level of Detail list.
-
Detail: Includes a detailed report of the exported error messages.
-
Summary: Includes a summarized report of the exported error messages.

-
-
Select one of the following options in the Selection list.
-
Export Selected: Exports the selected error messages.
-
Export All: Exports all error messages. This option enables the Application Administrator to analyze the frequency of errors.

-
-
Click Export.
A dialog box prompts you to open or save the output file.
-
Select the required option.