Customize Workspaces
You can customize the tile region within your workspace. You can move the tiles within your workspace, add permissions to restrict access to your tiles, change the property of the tile region, and remove the tile region from the workspace.
By default, when you add a tile, all staff members have access to the component or tile until you add the security.
After you create the region, you can add a:
- Custom Tile to the region
- Custom Live Tile to the region
- Preset Tile to the region

After you create a tile in the region, you can also customize the tile to:
- Move the tile within the workspace region
- Add security to a specific tile within the workspace region
- Add properties to a specific tile within the workspace region
- Remove a specific tile within the workspace region
Prerequisites
You must have:
-
System - Settings - Workspaces - Delete, Edit, New, Manage, and View authorization
Your institution must have configured a workspace.(Select the Settings tile > expand System > select Workspaces.)
Access Method
Select the Settings tile > expand System > select Workspaces..
Procedure to Customize Workspace Region or Component
After you have created the regions, take the appropriate action to customize the regions.
This customization option is only available for Add Tile Region component. You can add multiple custom tiles, custom live tiles, and preset tiles such as Class Scheduling, Document Tracking, Tasks, Settings and more under this region.
-
Select the menu icon (
 ). Anthology Student displays a drop-down menu.
 -
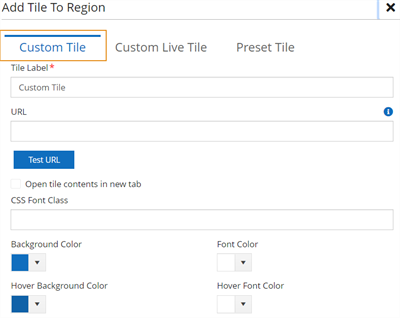
Select the Add Tile option from the drop-down. Anthology Student displays a dialog.
-
Take the appropriate action.
-
To configure a custom tile, select the Custom Tile tab and specify the values.
-
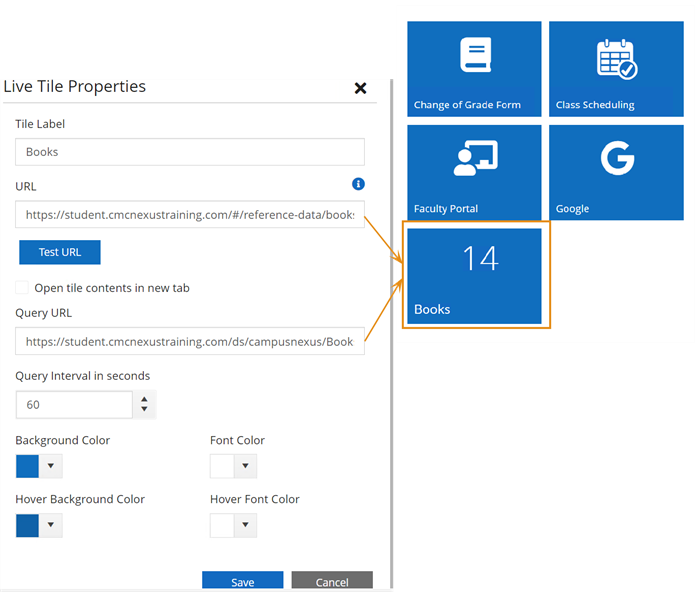
To configure a custom live tile by entering a API URL that returns a count, select the Custom Live Tile tab and specify the values.
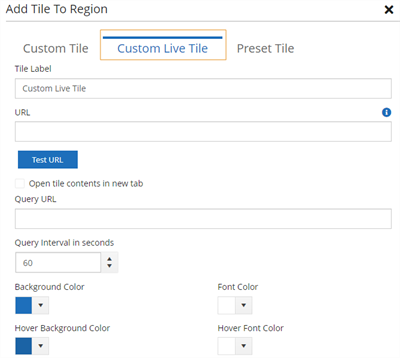
For example, if you want to add a tile that displays the count of books, you would specify the URL for the:
- Location you want to direct the staff member to when they select the tile in the first URL field
- Query that calculates the count of books in the second URL field
-
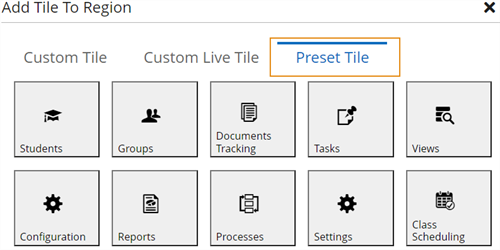
To select a preset tile from the available list of tiles, select the Preset Tile tab. For example, you can add Students, Groups, Document Tracking, Tasks, Views, Configuration, Reports, Processes, Settings and Class Scheduling.
-
-
Select the Save button. Anthology Student displays the changes in the tile region.
If you have already added a custom or custom live tile, you can add a customized icon from the Font Awesome library or Anthology library.
To add a Font Awesome icon:
-
Navigate to https://fontawesome.com/.
-
Select the Icons tab on the top menu.
-
Explore and select the icon you want to add. The HTML code appears on screen.
-
Copy the icon name from the code, for example if the code is <i class="fa-thin fa-globe"></i>, copy fa-globe.
-
Navigate to Workspaces.
-
Select the tile menu tab.
-
Select the Properties option from the drop-down menu. Anthology Student displays a dialog.
-
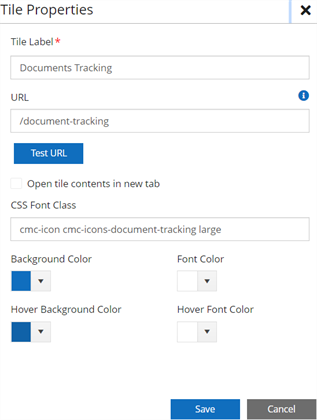
Add the icon library, icon name, and icon size to CSS Font Class field in the following format: [icon library] [icon name] [icon size].
For example: fa fa-globe fa-3x
- fa - refers to icon library (Font Awesome)
- fa-hippo – refers to the name of the icon
- fa-3x – defines the size of the icon (2x,3x,4x).
-
Select Save.
To add an Anthology Student icon:
Add the icon in this format [icon library] [icon name/icon group name] [icon-size]. For example, cmc-icon cmc-icons-student large
You can add security to restrict the access of a specific component or a tile from the staff members.
-
Select the Add Security option from the drop-down menu. Anthology Student displays the Recent Student Properties dialog.
-
In the Permit NSA Operations, specify the authorization. The pre-populated authorization appears on the field.
-
Select the add icon (
 ). You can view the authorizations added above the Permit NSA Operations field. You can add or delete multiple authorizations.
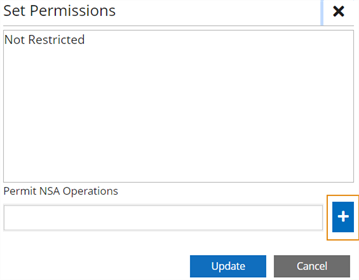
-
Select the Update button.
For more information, refer to System Administration.
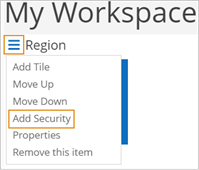
Select the Move Down option from the drop-down menu. Anthology Student moves the tile down.
Select the Move Up option from the drop-down menu. Anthology Student moves the tile up.
-
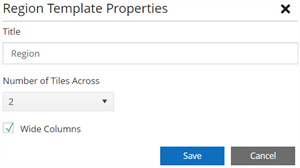
Select the Properties option from the drop-down menu. Anthology Student displays the Region Template Properties dialog.
-
Review, specify, or change the following values.
-
Select the Remove Tile option from the drop-down menu. Anthology Student displays the Remove Component dialog.
-
Select the Yes button. Anthology Student removes the tile region.
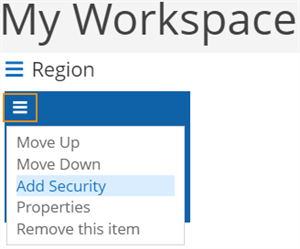
Procedure to Customize a Workspace Tile Located in a Region
After the tiles are added to a region, you can customize each tile as per your requirement. Select the menu icon (![]() ) and select the option you want to use from the drop-down menu.
) and select the option you want to use from the drop-down menu.
Select the Move Up option from the drop-down menu. Anthology Student moves the tile up.
Select the Move Down option from the drop-down menu. Anthology Student moves the tile down.
You can add security to restrict the access of a specific tile from the staff members.
-
Select the Add Security option from the drop-down menu. Anthology Student displays the Recent Student Properties dialog.
-
In the Permit NSA Operations, type in the authorization. The pre-populated authorization appears on the field.
-
Select the add icon (
). You can view the authorizations added above the Permit NSA Operations field. You can add or delete multiple authorizations. -
Select the Update button.
-
Select the Properties option from the drop-down menu. Anthology Student displays the Region Template Properties dialog.
-
Review, specify, or change the following values.
-
Select the Remove Tile option from the drop-down menu. Anthology Student displays the Remove Component dialog.
-
Select the Yes button. Anthology Student removes the tile region.
Once you have customized your workspaces, you must perform the following steps:
-
Associate the workspaces with a staff group (refer to Staff Groups Tab)
- Next, you and your staff members can begin using the workspaces (refer to Use Workspaces )