Merge Student Profiles

The Merge Student Profiles page is not available when Anthology Student is integrated with Anthology Finance & HCM.

You can use the Merge Student Profiles page to create a batch for merging multiple student profiles. In cases where duplicate student profiles exist, usually as a result of clerical error or name changes, the profiles are updated in the institution's records.

Use the History tab to review the status of all batches, review the results of specific batches, and manage the batches.

Take extreme care when using this feature. The process of merging student profiles is not reversible. Once you merge the student profiles into your current student profile, the original student profiles are deleted.

Anthology Student merges the following information.

  • Admissions deposits

  • Audit records

  • Do not call (DNC) status

  • Documents

  • Enrollment records and enrollment-related information (such as attendance). It also recalculates the GPAs.

  • Ethnic information

  • FAFSAs/ISIRs and Pell records. If there are duplicate PELL records, a confirmation message appears.

  • Financial aid estimates. If there is more than one record with the same academic year sequence, a confirmation message appears.

  • Inquiries. If your institution selected the Track Multiple Inquiries check box when it configured Contact Manager and Admissions settings for the campus, all inquiries are merged. If it is not selected, Anthology Student keeps the most current inquiry.

  • Roommate information

  • School statuses. Anthology Student uses the highest school status in the status hierarchy as the current status.

  • Student Accounts records. It also recalculates the accounts receivable balance and increments the transaction number to the next highest number.  Merged transactions will be listed on the Ledger Card Transactions tab when the "All Program Versions" option is selected. You will have to associate these transactions with the appropriate program versions once the merge is completed.

  • Student status history

  • Veteran information

Anthology Student will

  • Remove applications for the student selected to be merged.

  • Update CampusNexus CRM (if integrated) and Portal.

Prerequisites

You must have:

  • Common - Processes - View authorization

  • System Administration - Processes - Merge Student Profiles - Queue authorization

The campus for the students must not be configured to use a servicer to process financial aid (such as Global Financial Services).

The students must not have: 

  • School-defined fields in both student records. If there are school-defined fields in both records, you must delete the school-defined fields from one or both student records and then process the merge again.

  • Incompatible lock statuses on the 1098-T batches. You must verify that the lock status for each batch in the same calendar year is in the same state (locked or unlocked) for both students, and then process the merge again.

  • Financial aid documents for the same award year. You must delete one of the documents and process the merge again.

Access Method

Select the Processes tile > locate System Administration > select Merge Student Profiles.

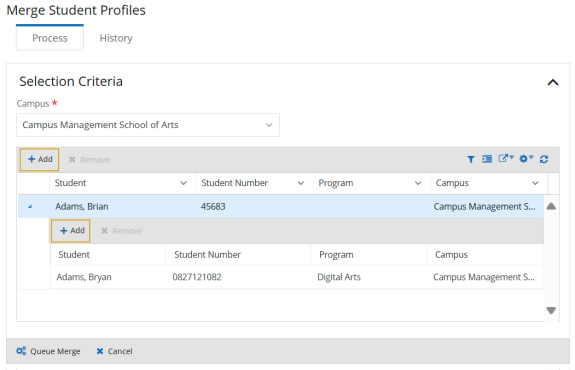
Procedure to Create and Queue the Batch

  1. Select the Process tab.

  2. Select a CampusClosed The campus or campuses to which a person or item is assigned. It is filtered to display the campuses to which you have access. In some cases, it is also used to filter a list to only those items for the campus. In some lists, you can select more than one campus or select All. In lists that display columns, if the column contains more than one campus, you cannot sort or filter on that column..

  3. Select the Add button on the toolbar. Anthology Student displays the Select Student dialog.

  4. Select the student and select the Select button. Anthology Student adds a record for the selected student to the grid. You can expand or collapse the record using the expand icon (Expand icon).

  5. In the record that was added to the grid, select the Add button. Anthology Student displays the Select Student dialog.

  6. Select the one or multiple students with the profile that contains information that you want to merge. and select the Select button.

    Merge Student Profiles

  7. Anthology Student validates duplicate Pell records. If a duplicate Pell record exists, Anthology Student displays the dialog to resolve the conflict. Select the Resolve button.

    Anthology Student displays the Merge Duplicate Pell Records dialog with the following values.

    Attending PellClosed The Attending Pell ID that is used when processing Pell Grants for students who are attending this campus. It is also used on ISIRs.

    Award Year Closed The financial aid award year associated with the record.

    Primary StudentClosed The last and first name of the student. In some lists, the name of the student is highlighted. If it is highlighted, you can select the link. The link will take you to their Student Profile or a page available from their profile (such as their Documents list in Contact Manager). To display the Student Profile, you must have Common - Student - View authorization. If it takes you a page available from their profile, you must have authorization for that page. For example, if it displays their Documents list, you must have Contact Manager - Student Document - View authorization.

    StudentClosed The last and first name of the student. In some lists, the name of the student is highlighted. If it is highlighted, you can select the link, and it will display the Student Profile or a page available from the profile (such as their Documents list in Contact Manager). To display the Student Profile, you must have Common - Student - View authorization. If the link takes you to a page available from the profile, you must have authorization for that page. For example, if it displays the Documents list, you must have Contact Manager - Student Document - View authorization.

    Select the award year link to merge the ISIR detail, and then select the Save button.

    If you want to remove a student, select the required student record and select the Remove button on the toolbar.

  8. Select the Queue Merge button.

  9. In the Queue Merge dialog, review or change the name of the batch and select the Queue button.

Anthology Student processes the batch and merges the student profiles.

When the batch completes, Anthology Student displays the results on the History tab so that you can review the results of merged student profiles.

Procedure to Review Results

  1. Select the History tab.

    Batches on this tab are available for 28 days by default. Anthology Student removes them after 28 days. If you need to keep the information for a batch, use the Export (Export button) button on the toolbar.

  2. Review the status and values for the batches in the list.

    CanceledClosed Indicates whether the batch process was canceled or the date and time when the batch was canceled. Blank if the batch was not canceled.

    Date AddedClosed The date when the item or person was added or the status change was entered.

    DurationClosed The amount of time it took to process the job or batch.

    Last RetryClosed Indicates the details of the last attempt made to retry batch processing. Shows the date and time when the deleted jobs within the batch were last resubmitted for processing. Blank if a retry has never been requested.

    NameClosed The name of the item (e.g., data set, batch, job, process, task, person, organization, entity, file).

    StartedClosed The date and time when the first job within the batch started executing.

    StatusClosed Indicates the status of processing for the student or item in the job. If all awards were successfully processed and approved, it displays Succeeded. If one or more awards were not approved, it displays Completed.

    Submitted ByClosed The name of the staff member who submitted the background job or batch for processing.

  3. Select the name of the batch in the list. Anthology Student displays the details for the job in the Job Results list.

  4. Review the values in the list.

    Job CreatedClosed The date and time when the job was added to the background job queue.

    Job StartedClosed The date and time when the job was pulled from the queue and started executing. The start time for a job will be the same time or later than the start time for the batch.

    Job Status Closed The status of the job. Enqueued indicates the job is in the queue waiting to be executed. Scheduled indicates the job is scheduled to run at a future time. Processing indicates the job is running. Succeeded indicates the job was completed with no errors. Deleted indicates the job was completed with errors.

    Primary Student Closed The last and first name of the student. In some lists, the name of the student is highlighted. If it is highlighted, you can select the link. The link will take you to their Student Profile or a page available from their profile (such as their Documents list in Contact Manager). To display the Student Profile, you must have Common - Student - View authorization. If it takes you a page available from their profile, you must have authorization for that page. For example, if it displays their Documents list, you must have Contact Manager - Student Document - View authorization.

    Primary Student NumberClosed If your institution assigns student numbers, the number your institution uses to identify the student. The number assignment is specified by your institution. For example, Anthology Student can be configured to assign the number, or your institution can use another method for assigning the ID.

    ResultClosed Indicates the result of the processing for the student or item in the job. If they were successfully processed, it displays Matched. Otherwise, it displays the reason why it was not processed.

    StudentClosed The last and first name of the student. In some lists, the name of the student is highlighted. If it is highlighted, you can select the link, and it will display the Student Profile or a page available from the profile (such as their Documents list in Contact Manager). To display the Student Profile, you must have Common - Student - View authorization. If the link takes you to a page available from the profile, you must have authorization for that page. For example, if it displays the Documents list, you must have Contact Manager - Student Document - View authorization.

    Student NumberClosed If your institution assigns student numbers, the number your institution uses to identify the student. How the number is assigned is specified by your institution. For example, Anthology Student can be configured to assign the number, or your institution can use another method to assign it.