Register Students into a Term

You can register students for a class section within the term. This process is recommended when you have groups of students or a list of identified students whom you wish to register into an identified section within a term. This process saves time when there are many students that need to be registered in an identified section.

When you register, unregister, and drop courses for students, Anthology Student performs validations and identifies conflicts. If you have the required specialized permissions, you can override the conflicts.

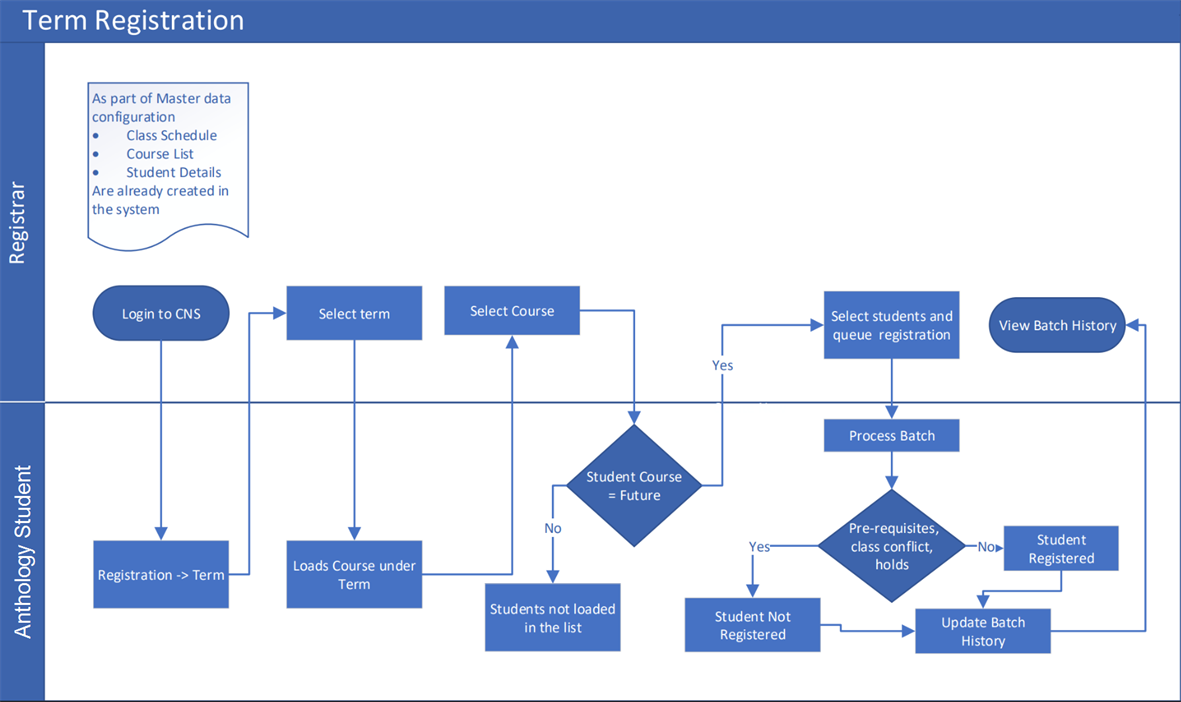
The flowchart describes the steps taken by the registrar and the data validations performed by Anthology Student during the term registration process.

Term Registration Process

Prerequisites

You must have:

  • Common - Processes - View authorization

  • Academics – Processes - Registration authorization

The course must: 

  • Have a value of Future for Course Status

  • Be active or inactive and have active substitutes

For cross-referenced courses, your institution must have:

  • Enabled cross-reference sharing groups (CRSG) for the logged-in staff member

  • Enabled cross-referencing for the Academic Records module

You should also be familiar with the Background for Requisite Validations and Conflicts.

Access Method

Select the Processes tile > locate Academic Records > select Registration.

Procedure to Register Students into a Term

  1. Select the Term tab.

  2. Select the Term into which the students will be registered. The class sections scheduled for the term are displayed.

  3. Select a row of the grid to view the instructor and start date in the fields at the bottom of the form.

  4. Review the list of class sections.

    CourseClosed The code and name of the course associated with the record. Some pages also indicate the course status (Active or Inactive).

    Days Closed The days of the week. For example, days for which the class is scheduled.

    Delivery MethodClosed The delivery method of the course. For example, online, on ground. They are configured by your institution. To automatically add a class section, your institution must have configured the delivery with Auto Add Class Section set to Yes.

    InstructorClosed The instructor or instructors assigned to the course, class section, or class section session.

    SectionClosed The code and name for the class section.

    Start DateClosed The first day the item takes effect or becomes active. Depending on the context of the associated record, the start date can also be the start of a time range, session, or activity (e.g., job, program, course, term, payment period, academic year, enrollment).

    TimesClosed The times the class or class section is scheduled for.

  5. Select the Class Section into which the students will be registered.

  6. If the Term contains cross-referenced or shared courses, review the list of class sections in Cross.

    Campus Closed The campus or campuses to which a person or item is assigned. It is filtered to display the campuses to which you have access. In some cases, it is also used to filter a list to only those items for the campus. In some lists, you can select more than one campus or select All. In lists that display columns, if the column contains more than one campus, you cannot sort or filter on that column.

    CourseClosed The code and name of the course associated with the record. Some pages also indicate the course status (Active or Inactive).

    Days Closed The days of the week. For example, days for which the class is scheduled.

    Delivery MethodClosed The delivery method of the course. For example, online, on ground. They are configured by your institution. To automatically add a class section, your institution must have configured the delivery with Auto Add Class Section set to Yes.

    InstructorClosed The instructor or instructors assigned to the course, class section, or class section session.

    Portal PreviewClosed Indicates whether the class section will be previewed on the student portal.

    SectionClosed The code and name for the class section.

    TimesClosed The times the class or class section is scheduled for.

  7. In the Campus list, select All Campuses or Selected Campuses.

    • All Campuses - Students who are enrolled or active in all the campuses in your institution will be displayed and selected for registration.

    • Selected Campuses - Students who are enrolled or active in the selected campus will be displayed and selected for registration.

  8. Select Next. The students are displayed in the Results section. The section also displays the Max Students and Students Registered, along with the Seats Available.

    You can filter the students using available filter criteria, such as Student Group, Registration Group, or Shift.

  9. Review and select the filter criteria.

    Registration GroupClosed The registration group that the student will be associated with. Staff members can override the registration groups only if they are configured to do so.

    ShiftClosed Select shifts associated with the students. Only students who are associated with the selected shifts will have statements generated.

    Student GroupClosed The name of the student group. If you are selecting a group and your institution has configured Anthology Student to limit groups to campuses, you can only select groups for the campus to which you are assigned. If you are selecting a group, it can also be filtered to display groups where you are the owner, public groups, and private groups to which you have been given access.

  10. If you want to view the details of the student registered, go to the View Registered Students grid.

    Review the following values.

    CampusClosed The campus or campuses to which a person or item is assigned. It is filtered to display the campuses to which you have access. In some cases, it is also used to filter a list to only those items for the campus. In some lists, you can select more than one campus or select All. In lists that display columns, if the column contains more than one campus, you cannot sort or filter on that column.

    Program VersionClosed The program version associated with the student or item.

    ShiftClosed Select shifts associated with the students. Only students who are associated with the selected shifts will have statements generated.

    StudentClosed The last and first name of the student. In some lists, the name of the student is highlighted. If it is highlighted, you can select the link, and it will display the Student Profile or a page available from the profile (such as their Documents list in Contact Manager). To display the Student Profile, you must have Common - Student - View authorization. If the link takes you to a page available from the profile, you must have authorization for that page. For example, if it displays the Documents list, you must have Contact Manager - Student Document - View authorization.

    Student NumberClosed If your institution assigns student numbers, the number your institution uses to identify the student. How the number is assigned is specified by your institution. For example, Anthology Student can be configured to assign the number, or your institution can use another method to assign it.

    The list of students includes only those students in the group who have the selected course on their Student Course list in a Future status.

  11. Select one or more students and select Queue Registration.

  12. On the Submit Batch dialog, review the batch name and select Queue. The batch is submitted to the queue.

    When the batch is processed, review the History tab to view any registration conflicts for students. All registration conflicts will be displayed in the Job Results grid.