Manage Workspaces
You can use the Workspaces page to create, edit, delete, or deactivate a workspace.
You can add components to your workspace such as:
- Add a tile region
- Add recent students
- Add the messages component
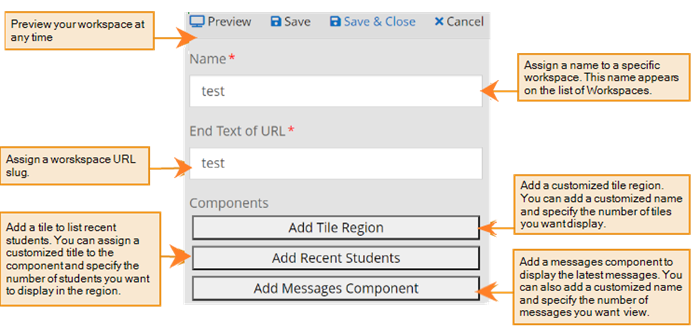
When you add a tile region to your Workspace you have the option of creating a custom tile, custom live tile, or a preset tile. You can also customize a tile within your region for your workspace by rearranging the tile, customizing the labels, color, icons, and URLs as per your institution’s needs.
Follow the steps below:
-
You can customize your workspaces (refer to Customize Workspaces)
-
You must associate the workspaces with a staff group (refer to Manage Staff Groups)
- Next, you and your staff members can begin using the workspaces (refer to Use Workspaces )
Prerequisites
You must have:
-
System - Settings - Workspaces - Delete, Edit, New, and View authorization
Access Method
Select the Settings tile > expand System > select Workspaces..
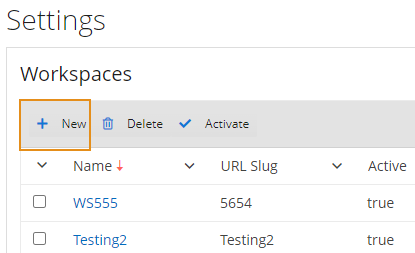
Procedure to Create Workspaces
-
If you want to:
-
Create a new workspace, select the New button on the toolbar
- Edit an existing workspace, select the name of the workspace in the list
-
-
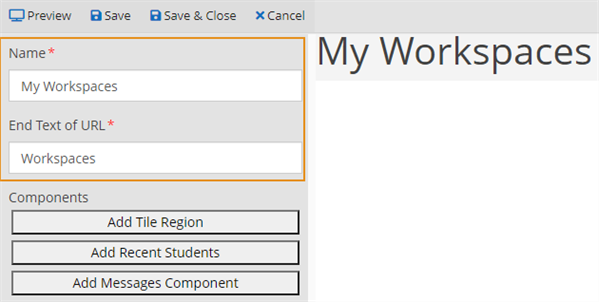
Review, specify, or change the following values.
Workspace Name 
Workspace URL
-
In Components, take the appropriate action.
Task Action to Take Add Tile Region to your workspace
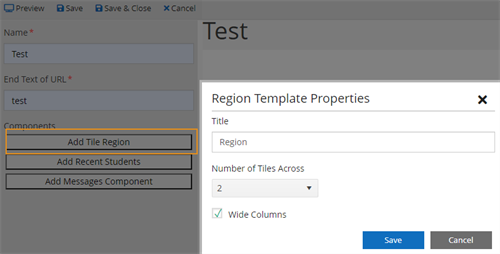
-
Select the Add Tile Region button. Anthology Student displays the Region Template Properties dialog.
-
Review, specify, or change the following values.
-
Select the Save button. Anthology Student displays the tile region.
If you want to customize your Tile Region, navigate to Customize Workspaces
Add Recent Students to your workspace
-
Select the Add Recent Student button. Anthology Student displays the Recent Student Properties dialog.
-
Review, specify, or change the following values.
-
Select the Save button. Anthology Student displays the Recent Students tile region.
Add Messages Component to your workspace
-
Select the Add Messages Component button. Anthology Student displays the Messages Properties dialog.
-
Review, specify, or change the following values.
-
Select the Save button. Anthology Student displays the Messages tile region.
To preview your workspace, select the Preview button on the toolbar. To change any settings after previewing your workspace, you can return to previous screen and select the Back to Designer Palette button.
-
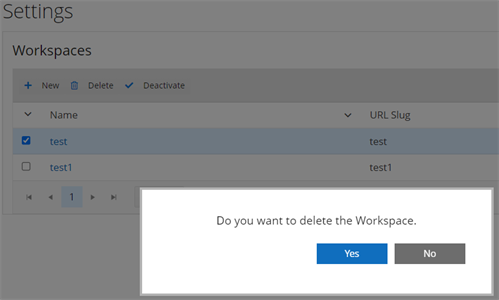
Delete or Deactivate Workspaces
You can use the Workspaces page to delete or deactivate your customized workspaces.
-
Deleting an item permanently removes it. No record of deleted list items is maintained in Anthology Student.
-
Deactivating an item keeps a record of it in Anthology Student (preferred). It can no longer be associated to a staff record, but remains assigned if it was previously assigned.
If an item:
-
Is not associated with a staff record, you can delete or deactivate it
- Is associated with a staff record, you can only deactivate it
Procedure to Delete Items
-
Highlight the item in the list.
-
Select the Delete button on the toolbar.
The item is:
- Removed from the list on the page and the list is redisplayed
- No longer available to select on the forms that contain the list
Procedures for Deactivating Items
There is more than one method for deactivating an item.
| Method | Procedure to Follow | Result |
|---|---|---|
| Using a toolbar button |
|
The item:
|
| Editing the item |
|
Because the item is not removed, you can also make it active again by selecting the Activate button.