Background for Views
You can use views to display your data in the Anthology Student database. Views is a feature unique to Anthology Student. You create views in grid and chart formats containing data from most of the modules in Anthology Student (such as the Contact Manager
For example, you can create views that enable you to:
- Quickly access the data that you refer to frequently
- Track and complete your work faster
- Compile and analyze data more efficiently
You can create a view using all the related data in the database. Once saved, the views are available on demand and can be pinned to the Views page for quick and easy access.
For example, program data from Admissions is related to data from Academic Records because:
- A prospect becomes a student
- A student is associated with a program
You can include the program data from Academic Records in an Admissions view because it is related.
View Types
While a view refers to a collection of data, a view type is the format used to display the data. Once you have created a view, you can easily switch between the view types. The table explains the view types and the icons that you can use to distinguish between them. Reports are no longer supported.
| View Type | Description | Icon |
|---|---|---|
| Chart | Displays the view in a chart. |

|
| Grid | Displays the view in a grid. |

|
When a View is predefined and installed with Anthology Student, the name will be prefixed with Anthology -.
Data Available in Views
In the current release, views can access the most commonly used data and any of its related data in the following modules.
- Academic Records
- Admissions
- Career Services
- Contact Manager
- Financial Aid
- Student Accounts
- Student Services
Anthology Student filters the data in Views and grids so that the data displayed is for the campuses (CampusIds) that are associated with your user ID. For example, if your user ID is associated with three campuses, the Views and grids will contain data for those three campuses.
Modules, Objects, and Properties in a Query
To add data to a view, you select the modules, objects, and then the properties to include in the query. The table lists the items you use to create the query.
| Item in List | Definition | Example | Additional Information |
|---|---|---|---|
| Module | Corresponds to modules in the legacy interface. | The Academics module. | The exception is the Common object. It contains information that appears across modules (such as students, staff, and campuses). |
| Object | Corresponds to a category of information in the legacy interface module. |
The Programs object in the Academics module corresponds to:
|
A predictive search option is available. You can type into the search bar to find the Object for use. You have to select the displayed Object from the drop-down. The predictive search option helps you to search without wading through the available lists, saving time and minimizing missing a field on the list that exists. |
| Property |
Corresponds to a field containing data in the object. When selected, it becomes:
|
The Name property corresponds to the Description field on the Select the Configuration tile > expand Academic Records > select Programs. |
Not all of the fields are always available. For example, although the Program Group is listed in the Program Code Setup dialog, it is not a property of the Program. It is selectable as a property in the Program Group object instead. A predictive search option is available for the Available Properties list. You can type into the search bar to find the Available Property for use. You use the search icon or select the Enter/Return key to search the particular property. Available Properties also enables you to search for three levels of child properties. The Available Properties search bar:
|
Relationship of an Object to a Property
The relationship of an object to a property in the legacy interface of Anthology Student is displayed when you select the Lists menu > Academic Records > Programs tab and use the Edit button on the tab to access the Program Code Setup dialog.
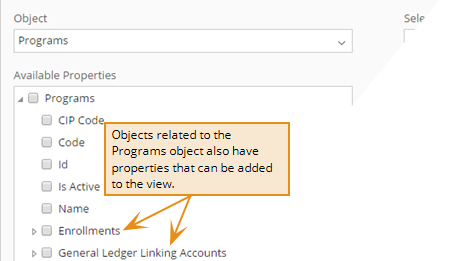
Objects with Related Data
When an object has related data, you can add the properties of the related object to the view. The illustration shows how related objects are displayed in the Student Web App.
When you create or edit a View in Anthology Student, the system generates an OData query using the selected entity properties/columns. The system limits the number of properties in the OData query to 90. Views will not be displayed and OData queries will not succeed when the limit is exceeded. Opening an existing View that exceeds 90 properties will redirect you back to the grid, where you must select Show Query and edit the properties. If necessary, contact Anthology Support for assistance to modify your custom Views or queries.
Standard Views Installed With Anthology Student
Standard views are installed with Anthology Student so that you have examples to review and views that you can use immediately. Standard views cannot be deleted, removed, or renamed like the custom views that you create, except if you have System Administrator access.
Standard views are prefixed with Anthology -.
Expand the following sections to review the standard views, the type of data included, the audience, and whether the view is available as a grid, chart, or both.
| View Name | Data Included | Audience |
Grid |
Chart |
|---|---|---|---|---|
| Anthology – Audit Courses |
Detailed report of all the audit courses Term.Code Term.Description Student.Full Name Class Section.Section Code Course.Code Course Description Student Schedule Letter Grade Course Status Credits Class Section.Instructor.Staff.Full Name Audit Course |
Faculty members and administrators who want to know the details of all audit courses |
X |
X |
| Anthology – CIP Codes – Area of Study |
Area of Study identifiers and the 2010 and 2020 CIP Codes configured To identify when CIP Codes changed between 2010 and 2020, filter/sort the 2020 CIP Note field to those containing “deleted” or “moved to”. Name Code Area Of Study Type.Name Active 2010 CIP Code Concentration Current Year Cip Code.2020 CIP Code Current Year Cip Code.2020 CIP Name Current Year Cip Code.2020 CIP Note |
Departments engaged in managing and/or reporting Area of Study CIP Codes |
X |
|
| Anthology – CIP Codes – Program |
Program identifiers and the 2010 and 2020 CIP Codes configured Description Code Active 2010 CIP Code Current Year Cip Code.2020 CIP Code Current Year Cip Code.2020 CIP Name Current Year Cip Code.2020 CIP Note Program |
Departments engaged in managing and/or reporting Program CIP Codes |
X |
|
| Anthology – CIP Codes – Program Version |
Program Version identifiers and the 2010 and 2020 CIP Codes configured Code Version Description Program Version Active 2010 CIP Code Current Year Cip Code.2020 CIP Code Current Year Cip Code.2020 CIP Name Current Year Cip Code.2020 CIP Note |
Departments engaged in managing and/or reporting Program Version CIP Codes |
X |
|
| Anthology – Class Sections with Departments |
Detailed report of the class sections with departments for specific terms Term Code Class Section.Course.Code Class Section.Course.Description Class Section.Section Code Class Section. Instructor.Description Class Section.Department.Code Class Section.Department.Name Class Section.Reg.Studs Term Start Date |
Faculty members and administrators who want to know the list of the class sections with departments |
X |
X |
| Anthology – Degree Awarded |
Detailed information about the list of the students who were awarded a degree Degree.Description Degree.Code Enrollment.Student.First Name Enrollment.Student.Last Name Enrollment.Program Version.Code Enrollment.Program Version.Version Description Date Awarded Date Cleared Record ID Note |
Faculty members and administrators who want to know the detailed report of the students who were awarded a degree. |
X |
X |
| Anthology - Final Grade Change Reasons |
Detailed report of students who had a final grade change and the change reason associated with that final grade change. Student.Full Name Student.First Name Student.Last Name Student Course Record.Term.Code Student Course Record.Term.Description Student Course Record.Course.Code Student Course Record.Course.Description Student Course Record.Letter Grade Student Course Record.Numeric Grade Old Value New Value Student Course Record.Final Grade Reason.Name Date Modified User Name (who modified the Final Grade) Id |
Faculty members and administrators who want to know the detailed report of the students who have had a final grade change and the final grade change reason. |
X |
|
| Anthology – Grade Report |
Detailed information about student grades Term.Code Term.Description Course.Code Description Student.First Name Student.Last Name Letter Grade Date Grade Posted Credits Hours Hours Attempt Hours Earned Cost Credits Attempt Credits Earned Drop Date End Date Enroll Status Hours Enroll Status Credits Expected End Date Grade Points In Progress Grade Pass/Fail Course Last Date of Attendance Midterm Letter Grade Numeric Midterm Grade Numeric Grade Student Start Course Status Student Schedule |
Faculty members and administrators who want to know a detailed overview of the students' grades to analyze their overall performance |
X |
X |
| Anthology – Master Course List |
Detailed report of all the master courses Code Description Credit Hours Enroll Status Credits Active Notes Course Level.Description Course Type.Description Department.Code Department.Name Course |
Faculty members and administrators who want to know the details of all master courses |
X |
X |
| Anthology - Registration Relationships |
Detailed information for registration relationships for the class section. Course Code Course Name Term Code Term Name Section Code Start Date End Date Rule Name Rule Code Rule Allow/Deny Rule Active Rule Date Added Is Bidirectional Rule Criteria Is RegRel Registered Count Waitlist Count Is Crosslist Course Sharing Campuses Cross Reference Campuses Variable Credits Rule Created By Rule Description Instructor Name You can export the view to Excel and PDF. In the exported files, the rule shows on one line. To make the rule more readable in an Excel file, follow these steps.
|
Registrars who want to know the detailed report of the registration relationships configured for the class section. It includes:
|
X |
|
| Anthology - Secondary Instructors |
Detailed information for the secondary instructors (such as course name, class section name and code, class section start and end dates, instructor for the period and the hours assigned, days and times of those periods, buildings, rooms, and locations) The default term used to filter the view is 2023-SP-CMC. You can change the term or remove it and add additional filters. One or more filters will be required to improve the performance. Class Section.Class Schedule Instructor Name Term.Description Course.Description Class Section.Description Class Section.Section Code Week Day Class Section.Class/Section Start Class Section.Class/Section End Class Section Meeting Schedule.Length Class Section Meeting Schedule.Meeting Pattern.Custom Meeting Pattern.Start Time Class Section Meeting Schedule.Meeting Pattern.Custom Meeting Pattern.End Time Building.Description Location.Name Room.Description Instructor Hours Assigned Class Section.Reg.Studs. Term.Code |
Faculty members and administrators who want to know the details of the instructors assigned to the periods for class sections |
X |
|
| Anthology - Selected Letter Grade |
Detailed information about the list of the students who have received an "X" grade in a particular term Student.Full Name Term.Code Term.Description Class Section.Section Code Course.Code Course.Description Student Schedule Letter Grade Course Status Credits Class Section.Instructor.Staff.Full Name |
Faculty members and administrators who want to know the detailed report of the students who have received an "X" grade in a particular term |
X |
X |
| Anthology – Term Attendance |
Detailed information about the attendance details of a student for a course in a particular term Student Course.Student.Full Name Student Course.Term.Code Student Course.Term.Description Student Course.Class Section.Course.Code Student Course.Class Section.Section Code Attend Date Start Time Time Attended Time Absent Record ID Excused Absence Status Type Unit Type Notes |
Faculty members and administrators who want to get an attendance report of all the students for a particular term |
X |
X |
| View Name | Data Included | Audience |
Grid |
Chart |
|---|---|---|---|---|
| Anthology - Document Tracking |
Detailed data on required documents and their statuses Student.Campus.Description Student.Person.First Name Student.Person.Last Name Student.School Status.Description Document Status.Description Document Type.Description Document Status.Approved Due Date Date Requested Date Sent Date Received Expiration Date Date Approved Notes Student Document |
Admissions departments and processes | ||
| Anthology - Prospect Master Listing |
Detailed data on prospect inquiries Expected Start Date Last Task Date Lead Date Original Expected Start Date Student Id Person.Date of Birth Person.First Name Person.Last Name Prospect Source.Description Prospect Type.Description Campus.Description School Status.Description Previous Education.Description Shift.Description Admissions Representative.Person.First Name Admissions Representative.Person.Last Name |
Admissions departments and processes |
X |
X |
| Anthology - Prospects Not Interviewed |
Data that can be used to track the prospects who have not yet been interviewed Prospect Inquiry.Lead Date Expected Start Date Prospect Inquiry.Current Prospect Inquiry.Student Id Prospect Inquiry.Campus.Description Prospect Inquiry.Person.Full Name Prospect Inquiry.School Status.Description Prospect Inquiry.School Status.System School Status.Status Category Interviewed Interview Scheduled Prospect Inquiry.Admissions Representative.Person.Full Name Prospect Inquiry.Prospect Source.Description Enrolled |
Admissions departments and processes |
X |
X |
| Anthology - Total Active Programs |
A summary count of all active programs in the system Code Active Description |
All departments leveraging or managing active programs |
X |
|
| Anthology - Total Active Students |
A summary count of total active students and data about students that are currently in a system status category of Attending Full Name Student Number School Status.Description Program.Description Campus.Description Unique Student ID |
All departments working with the active student population |
X |
|
| Anthology - Total Prospects |
A summary count of total prospects and data about prospects that are currently in a system status category of Lead Person.Full Name Best Time to Contact Expected Start Date Current Last Task Date Lead Date Original Expected Start Date |
Admissions departments and processes |
X |
|
| View Name | Data Included | Audience |
Grid |
Chart |
|---|---|---|---|---|
| Anthology – Tasks Detail |
Data for tasks associated with a staff member or student Date Added Activity Priority Reassigned Date Subject Due Date To From Assigned to Staff.Person.First Name Assigned to Staff.Person.Last Name Completed By Staff.Person.First Name Completed By Staff.Person.Last Name Prospect Inquiry.Prospect Type.Description Student.Campus.Description Student.Person.First Name Student.Person.Last Name Student.School Status.Description Task Result.Description Task Status.Description Task Type.Description Task Type.Task Category.Description Event Type.Description |
All departments that perform tasks or send out communication to students (Tasks correspond to activities in Anthology Student.) |
X |
X |
| View Name | Data Included | Audience |
Grid |
Chart |
|---|---|---|---|---|
| Anthology – Automated MPN Service |
Direct Loans packaged by Auto Awarding process and source MPN Id AwardBeginDate AwardStatus AwardYear BorrowerIdentifier BorrowerName CampusId CampusName CreatedDateTime DirectLoanIdentifier FundSourceType IsMpnLinkIndicator LastModifiedDateTime LinkDate LinkResult MpnExpirationDate MpnIdentifier MpnStatus Reason StudentName StudentNumber |
Departments engaged in managing the student's MPN associated with loans |
X |
X |
| Anthology - Automated R2T4 Freeze Date Audit |
All types of program deliverables that are using Freeze Date to determine the Total Days scheduled during Automated Refund calculation Student Name Student Number Term Code Module Code (a.k.a Child Term Code) Course Code Course Name Credit Hours Course Registration Date Course Status Campus Name NSLDS Withdrawal Date R2T4 Freeze Date R2T4 Calculation Status R2T4 Calculation Date Program Name Program Version Name Date Added |
Departments engaged in auditing automated refund calculations based on Freeze Date |
X |
X |
| Anthology - Financial Aid |
All types of financial aid for students Financial Award Year Batch Identifier Borrower Birth Date Borrower Name Campus Name Direct Loan ID EMPN Indicator Fund Source Type Id Date Imported Date Last Modified MPN Expiration Date MPN ID MPN Link Indicator MPN Status Reporting Entity ID Student Name Student Number |
Departments engaged in auditing financial aid for students |
X |
X |
| Anthology - Financial Aid MPN Details |
All MPNs for that were imported during the import process Id AwardYear BatchIdentifier BorrowerBirthDate BorrowerName CampusName DirectLoanIdentifier EMpnIndicator FundSourceType ImportDate LastModifiedDateTime MpnExpirationDate MpnIdentifier MpnLinkIndicator MpnStatus RptEntityIdentifier StudentName StudentNumber |
Departments engaged in verifying the MPNs incoming from COD |
X |
X |
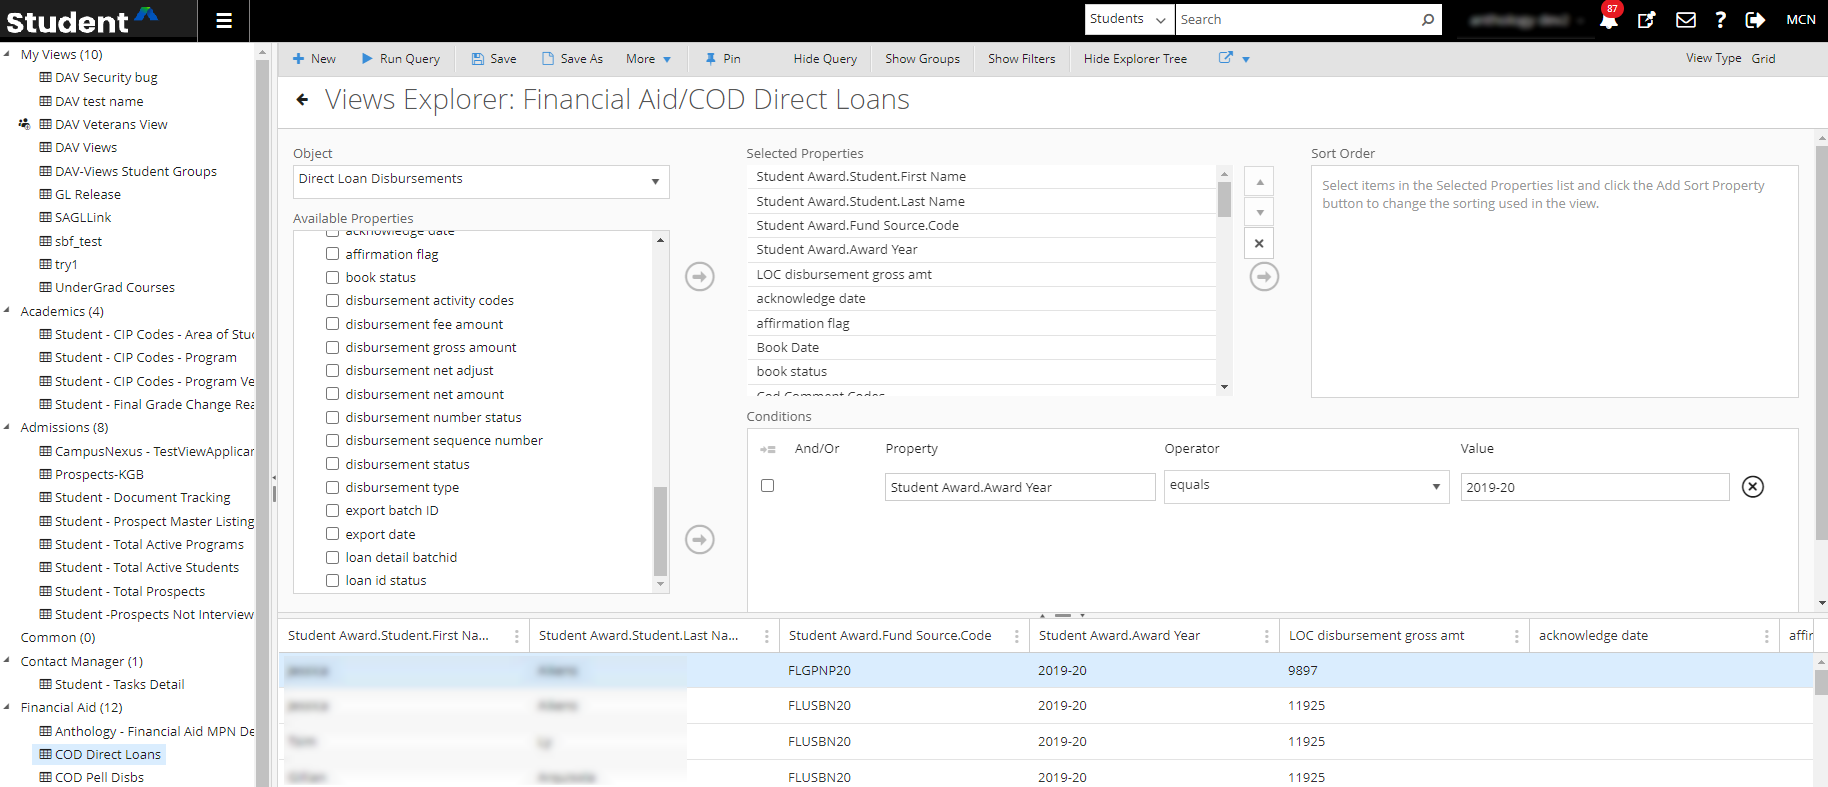
| COD Direct Loans | Direct Loan Disbursements
|
Departments engaged in managing financial aid loan disbursements |
X |
X |
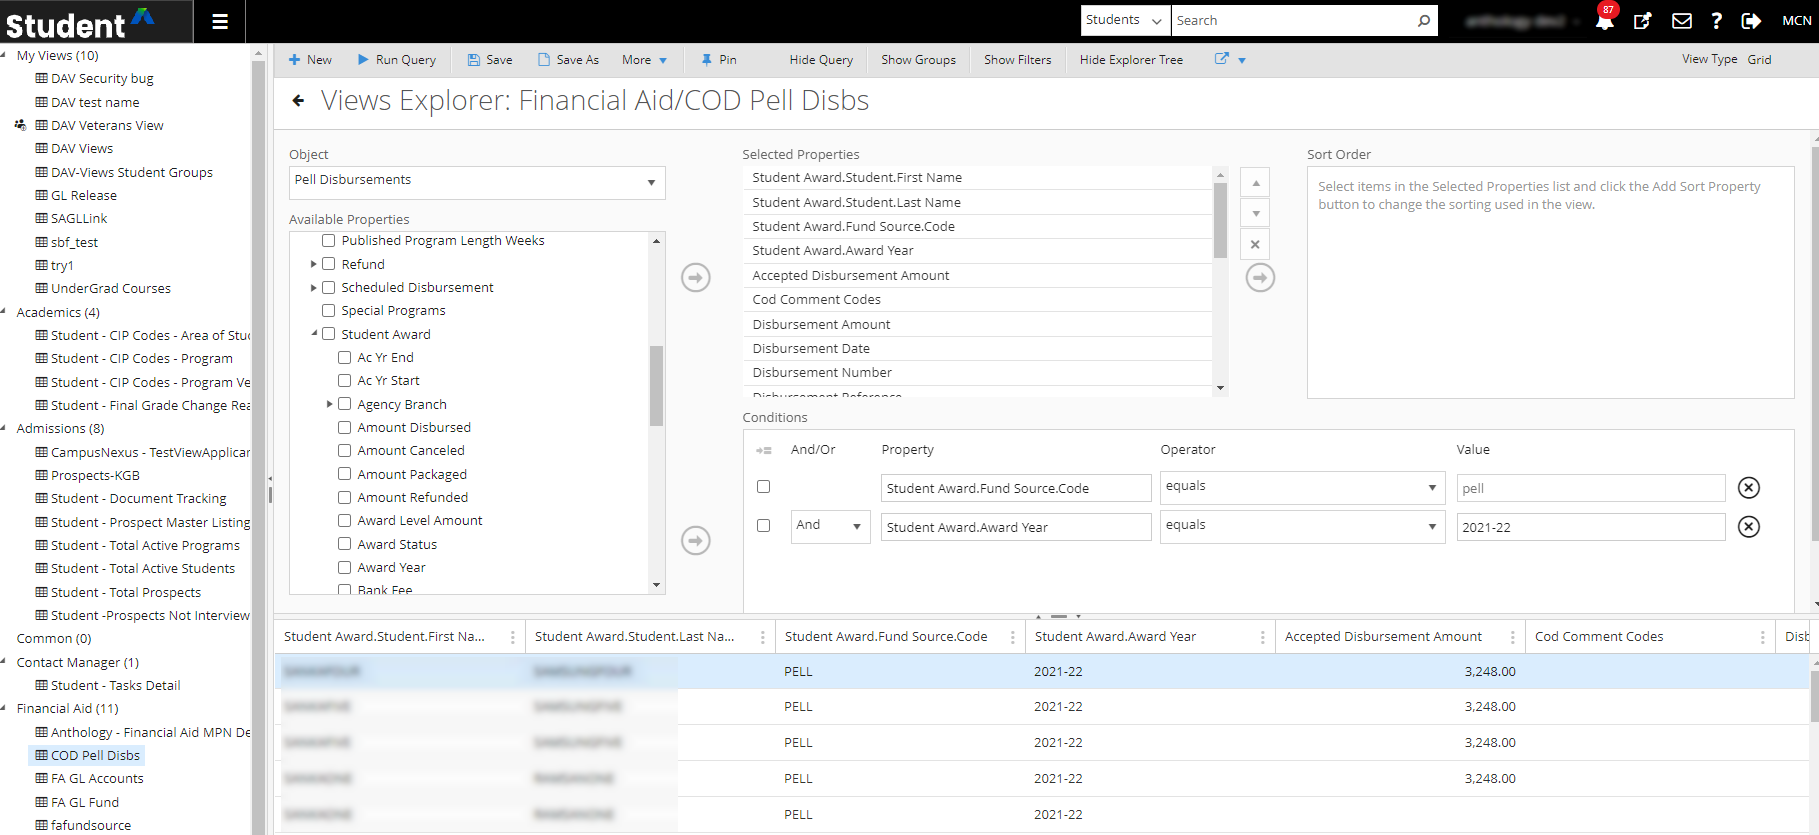
| COD Pell Disbs | Pell Disbursements
|
Departments engaged in managing financial aid Pell disbursements |
X |
X |
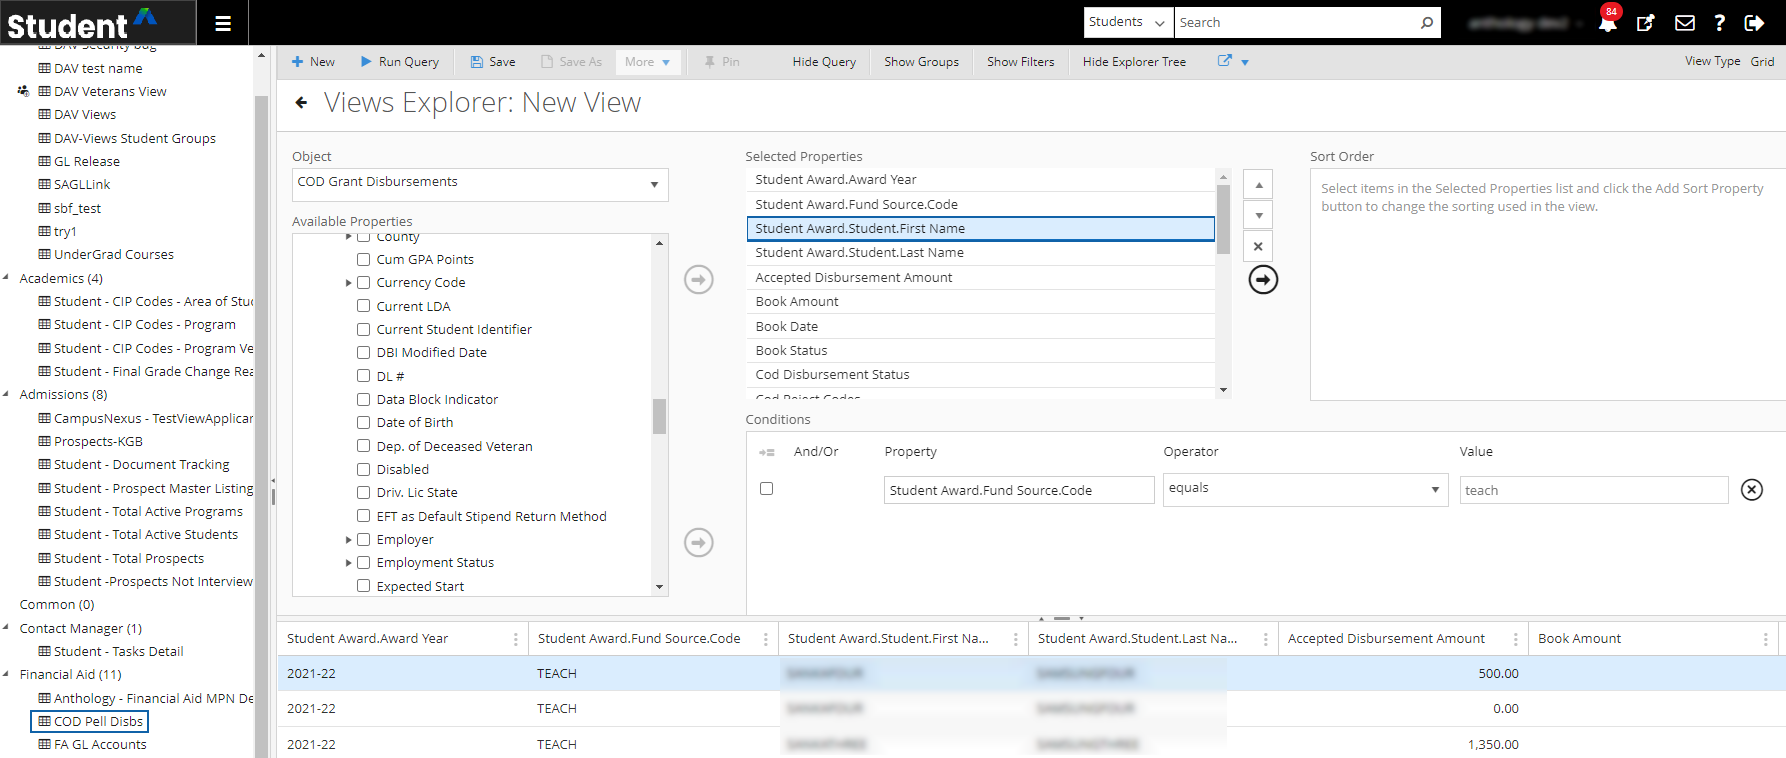
| COD TEACH Disbs | COD Grant Disbursements (TEACH)
|
Departments engaged in managing financial aid COD grant disbursements |
X |
X |