Link and Organize Views
To help you be more efficient, views can be linked. When you link the views, you can quickly access information in the linked views. For example, the views that you link to can contain data that you do not want to add to every view, but still use frequently. The starting point must be a grid, but the grid can link to other grids and charts.
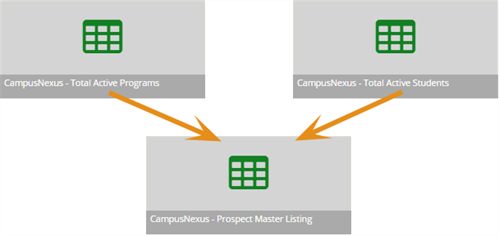
The illustration shows an example of linking using the standard views that are installed with Anthology Student. In the illustration, the:
-
Anthology Student - Total Active Programs view is linked to the Anthology Student - Prospect Master Listing view
-
Anthology Student - Total Active Students view is also linked to the Anthology Student - Prospect Master Listing view
You can organize views using the buttons on the toolbar and commands on the pop-up menu displayed when you right-select the name of the view in the Views Explorer. For example, you can delete, move, and pin views to the Views page.
Prerequisites
The options for linking and organizing views depend on the view. You must have either:
-
Created the view
-
Been given full access to the view by the staff member who created it
To link views, the views must also:
-
Have the Id as a Select Property in the query (The Id is selected by default in the query. Do not delete the Id from the view.)
-
Share one of the Selected Properties in the query
Access Method
Select the Views tile > Explore Views tile.
Procedure to Link Views
-
Select a View in the View Explorer.
-
If the view is not a grid, select in the View Type drop-down list and select Grid.
-
Either:
-
Right-select in the grid and select the Link Child View command
-
Select the More drop-down list on the toolbar and select Link Child View
-
-
In the dialog, select the view you want to link and select the OK button. The screen splits and the view that is linked is displayed as a tab.
-
Repeat steps 1-3 until you have linked all the views you need.
-
If you want to save the links so that they are there the next time you access the view, select Save on the toolbar.
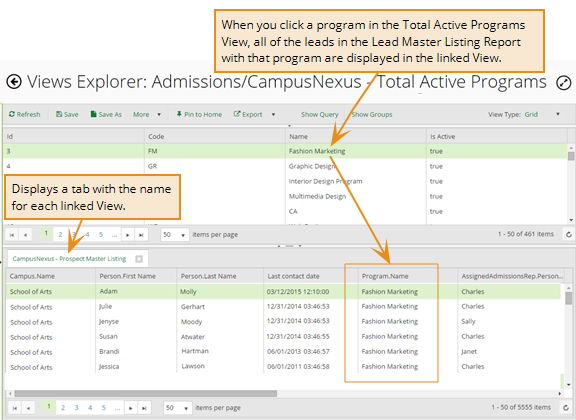
Example of Working With Linked Views
The example shows the linking using the predefined views that are installed with Anthology Student. The Total Active Programs view is linked to the Prospect Master Listing view so that leads can be located by program.
Additional Task for Linked Views
| Task | Action to Take |
|---|---|
| Display the details in the linked view. | Select the row in the top grid. |
| Remove a linked view. | Select the X on the tab for the view. |
Procedures for Organizing Views
-
Select a View in the Views Explorer.
-
Take the appropriate action.
Task Method Button to Select Right‑select Option Delete a view. Select the More button > Delete command. Delete Move a view. All folders in the Views Explorer are public except for My Views. If you create a View in My Views or move a View to the My Views folder, it will no longer be public and only you will be able to access it.
Select the More button > Move command. Move Pin a view to the Views page. Select the Pin to Home button. Pin Unpin a view from the Views Workspace. Select the Unpin to Home button. Unpin