Import Student Group
You can use the Import Student Group page to create a batch that:
- Imports students to a new group
- Adds, removes, or replaces the student in an existing group
You can:
- Manually enter or copy and paste in the list of students
- Import students in comma separated value (CSV) format
- Import students using an Excel file
You can import the students using one of these unique identifiers.
- Student number
- Student ID
- Social Security Number (SSN)
For batches that you created to import students into groups, you can use the History to review the status of all the batches , review the results of specific batches, and manage the batches.
Prerequisites
You must have:
-
Common - Processes - View authorization
-
Contact Manager – Processes – Import Student Group authorization
The student must exist in the Anthology Student database with the unique identifier.
For all file formats, SSNs can be specified with and without dashes.
For CSV and Excel files, the files must:
- Not be open in another application
- Have a file size no greater than 5 MB
Additional Background and Prerequisites for the File Formats
The table lists the additional requirements for each format. There are examples for all the formats below.
|
File Format |
Requirements |
|---|---|
|
Manual |
In the Student Information field, you can specify only the one unique identifier for the student. The unique identifier for the students must either:
You cannot use both new lines and commas. |
|
CSV |
The file must have a .csv extension and be in CSV format. The first row or line must contain headers or labels. (Anthology Student assumes the first row or line is headers or labels and does not process it.) If the unique identifier you want to use is:
Each student must also be on a separate line. |
|
Excel |
The file must have a .xlsx extension. The first row must contain headers. (Anthology Student assumes row 1 is a header row and does not process it.) If the unique identifier is:
|
For CSV and Excel files, Anthology Student processes all of the entries for a position or column and then moves to the next position or column. For example, in a:
-
CSV file, Anthology Student processes position 1 for all students first, then position 2 and 3
-
Excel file, Anthology Student processes column A for all students first, then column B and C
If it finds a valid value in the position or column, it imports the student with the corresponding unique identifier.
Anthology Student ignores the values starting in:
- Position 4 of a CSV file
- Column D of an Excel file
In most cases, you will be importing using one type of unique identifier (such as student number or SSN).
Anthology recommends that you create backups of your original files. Then, delete the positions or columns in the files that you plan to import that might cause a student to be imported using another unique identifier from another student (rare).
For example, if you have a student with a student number in column A, Anthology Student adds the student to the group. If that same student has an invalid or extra value in column B or C that happens to match some other student, that student will also be added even though the student should not be in the group.
Access Methods
Select the Processes tile > locate Contact Manager > select Import Student Group.
Select the Groups tile > select Import Students to Group in the toolbar. (If a group was selected, the group name will be displayed by default with a Type of Existing. You can change the defaults if needed.)
Procedure to Create and Queue the Batch
-
Select the Process tab.
- If you want to:
-
Import the students into a new group, select New in the Type field
-
Add, remove, or replace the students in an existing group, select Existing in the Type field
-
Complete the fields appropriate for the value you selected for Type.
Type
Values to Specify
Existing
New
Staff with Access to Private Group

-
Select the appropriate format in the File Format list.
Action You Want to Take
Value to Select
Additional Actions
Manually specify or copy and paste a list of students
Manual
In the Student Information field, specify the list of students.
Select a file that contains the students in CSV format
CSV
Select the Choose File button and select the file in the dialog.
Select an Excel file that contains the students
Excel
-
Select the Queue Import button.
Anthology Student processes the batch and adds the valid students to the group.
When the batch completes, Anthology Student displays the results on the History tab so that you can verify that the import was successful and that all of the students were imported.
Examples
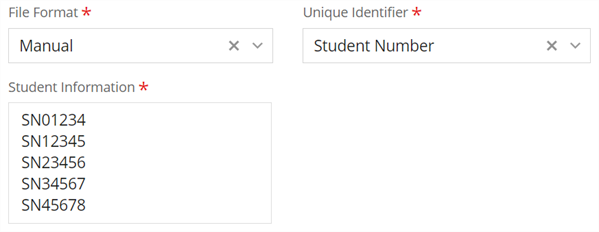
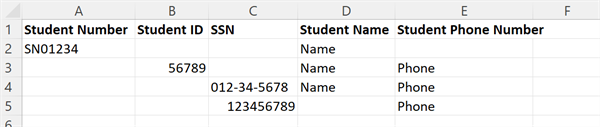
In the example, the unique identifier is the student number and each student is on a separate line.
In the following example:
- The first student is added using their student number (position 1)
- The second student is added using their student ID (position 2)
- The third student is added using their SSN (position 3)
- The fourth student is also added using their SSN without the dashes (position 3)
The file also contains their name and phone number. Anthology Student ignores the data.
Student Number,Student ID,SSN,Name,Phone
SN01234,,,Name,
,56789,,Name,Phone
,,012-34-5678,Name,Phone
,,123456789,,Phone
In the following example:
- The first student is added using their student number (column A)
- The second student is added using their student ID (column B)
- The third student is added using their SSN (column 3)
- The fourth student is also added using their SSN without the dashes (column 3)
The file also contains their name and phone number. Anthology Student ignores the data.
Procedure to Review Results
-
Select the History tab.
Batches on this tab are available for 28 days by default. Anthology Student removes them after 28 days. If you need to keep the information for a batch, use the Export (
 ) button on the toolbar.
 -
Review the status and values for the batches in the list.
-
Select the name of the batch in the list. Anthology Student displays the details for the job in the Job Results list.
-
Review the values in the list.