Auto Repackaging Jobs
On the Automated Job Management form, you can create auto repackaging jobs and edit auto repackaging jobs already configured and saved in Anthology Student.
REPACKAG0033 and REPACKAG0043 Exceptions
The auto repackaging process creates an exception (REPACKAG0033) when a program version was configured to award a summer term after the fall term and spring term were paid out and subsequently the configuration to award the summer loan is removed. The exception informs the user that the summer loan may need to be manually reviewed and adjusted. The exception is displayed within the Exception Processing form or in a pop-up when selecting the auto repackage button before completing the repackaging process.
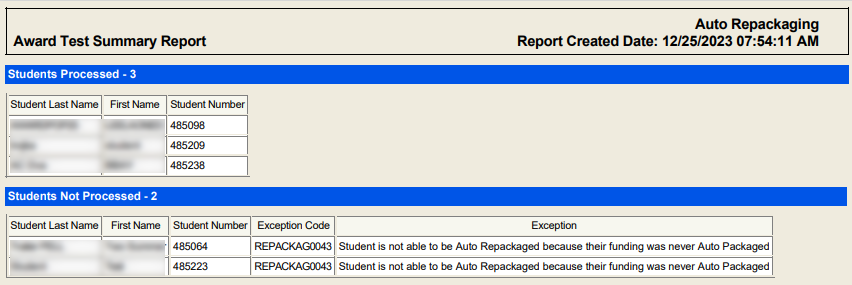
If you auto-repackage a student who has not had at least one fund source auto-packaged within that academic year, an exception (REPACKAG0043 - "Student is not able to be Auto Repackaged because their funding was never Auto Packaged") is generated. This exception will auto-clear if the system auto-packaged the student correctly via the Auto Package button or a packaging job.
Prerequisites
You must have:
-
Common - Configuration - View authorization
-
Financial Aid Automation – Configuration – Automated Job Management - Run Now authorization
-
Financial Aid Automation – Configuration – Automated Job Management - View authorization
-
Financial Aid Automation – Configuration – Automated Job Management - Job Sequence - New and Save authorization
-
Financial Aid Automation - Configuration - Automated Job Management - Auto Repackaging - Edit and New authorization
Access Method
Jobs tab (Select the Configuration tile > expand Financial Aid > select Automated Job Management.)
Procedure to Add or Edit Auto Repackaging Jobs
-
If you want to:
-
Add a new job, select the New Job button on the toolbar to open the New Job section
-
Edit an existing job, select the job link in the Name column to open that job in the Edit Job section
-
-
Specify or change the following values based on whether you are creating or modifying an auto-repackaging job.
Fields to Configure Summary Report

AwardingResultSummary(Test).pdf report shows the job that was run through Auto Repackaging and the date and time the document was created, as well as:
-
Student Processed - Student Last Name, First Name, and Student Number are displayed for students who had a budget calculated and/or funds awarded.
A "Student Processed" will be any student with multiple academic years validated where at least one academic year has a budget calculated and funds awarded.
-
Student Not Processed - Student Last Name, First Name, Student Number, Exception, and Exception Description are displayed for students where the job was validated but failed to have a budget calculated and/or funds awarded.
Note
Before Financial Aid Automation version 23.3, when the Auto Packaging and Auto Repackaging processes were executed through Automated Job Management with the “Attach a Detail and Summary report of students auto awarded” option selected, the AwardingResultsSummary.pdf file did not list all the student records that were processed and did not list exceptions that prevented records from being processed. Now the Auto Packaging and Auto Repackaging Summary report includes all students captured by the job and lists the students in the "Processed" or "Not Processed" sections of the report.
The only scenarios when students are not listed in the "Not Processed" section on the report are:
-
Auto Packaging is skipped because the student is in the Enrollment Status category of "Active for Non-Attending".
-
A Connected enrollment is found for the student and the default program version is processed for awarding.
-
The student is not passing all the criteria on the population defined in the automated awarding job.
-
Exceptions AWARDPOP0031/REPACKAG0037 occurred – The Academic Year start date on the student record is before the Automated Campus Setting for Automated Awarding Effective Date.
-
Exceptions AWARDPOP0033/REPACKAG0039 occurred – The Academic Year start date on the student record is before the Financial Aid Automated Effective Date by Campus.
Detail Report
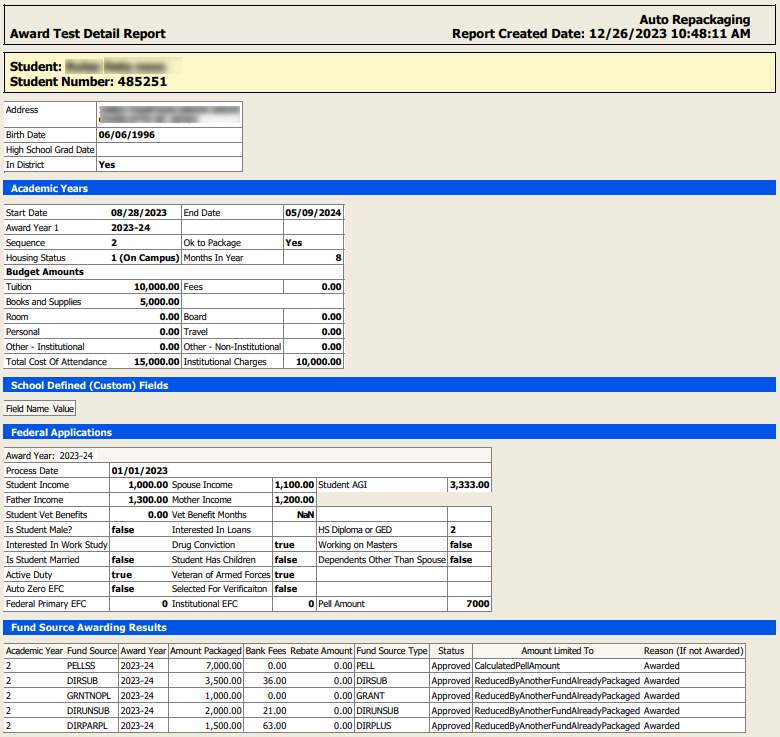
The AwardingResultDetails(Test).pdf report shows the job that was run through Auto Repackaging and the date and time the document was created, as well as:
-
Student Name and Student Number (highlighted in yellow) are displayed but only for students who appear in the Students Processed section of the Summary Report.
-
Automated budget and associated award details are also displayed.
-
The following statement is displayed within the Fund Source Awarding Results grid: "Student had exceptions that have prevented funds from being awarded. Go to the Financial Aid Exceptions page to review the exceptions."
Award details are only provided when the student passes the validation process for Automated Awarding Fund Source Rules.
Updates for the 2024-25 Award Years and Later
-
Due to the FASFA Simplification changes, the Federal Applications section no longer displays the following fields:
Student Income Spouse Income Student AGI Father Income Mother Income Student Vet Benefits Vet Benefit Months Is Student Male? Interested in Loans Interested in Work-Study Drug Conviction Working on Masters Is Student Married Student has children Dependents other than Spouse Auto Zero EFC Federal Primary EFC Institutional EFC -
The Process Date is replaced with the Date ISIR Received.
Staff Notification
Based on your selection in the Assignment Method field, either the Staff Groups or Staff Member field appears.
Schedule
The Recurrence and Days fields only appear based on your selection in the Frequency field. You can configure the rotation of days using a Frequency of Daily. This allows you to configure a job to execute on the day specified under Days. The job will be executed and completed when the day and time occur. If you update the job schedule by changing the Start or End Date or the Days, the system creates new schedule entries and replaces the old schedule.
When the auto repackaging job is configured on the Automated Awarding Campus Settings with Test mode enabled, an attachment (containing a Detail document and a Summary document) will be provided for each job on the History tab. Select the paper clip icon (
 ) to download the zip file containing the reports.
Tip: If you try to create a job that is already saved with the same criteria, a duplicate job validation message is displayed. The message has links for each saved job. When you select any of the links, a new tab displays the job details for your review.
-
-
If you want to save and:
-
Continue making changes, select the Save button
-
Continue to add another item to the list, select the Save & New button
-
Close, select the Save & Close button
-