Configure Power BI in Anthology Student
One feature of Anthology Student is its ability to integrate with Power BI. This allows Anthology Student to list and display any Power BI dashboards, personal workspaces, and shared apps that belong to the currently logged-in user.
By default, this feature is disabled. To enable this feature, a series of steps needs to be completed by an administrator. These steps are listed below and will correctly enable the Power BI integration within an existing Anthology Student solution.
- Register Anthology Student in Power BI
- Obtain your Tenant ID and validate the Power BI registration
- Configure your Anthology Student solution
- Test the Power BI integration
Before we start
You will need to know the URL where you have the Anthology Student solution published, for example, http://www.university-home.com/Cmc.Nexus.Web
The above URL will be referred to as the hostname ([host-name]) within this document.
While following the steps in this document, you will need to gather and save 3 important values:
- TenantId
- ClientId
- ClientSecret
These are long alphanumeric values, so it is recommended that you save them into a text file during this process to avoid errors. Keep this file in a safe place to guard it against unauthorized user access, since it contains the ApplicationSecret (which is a password).
Once you have completed the steps in this document and you have tested that the integration is working successfully, you can delete this text file if you wish.
Register Anthology Student in Power BI
-
As the Power BI administrator, have your login credentials ready.
-
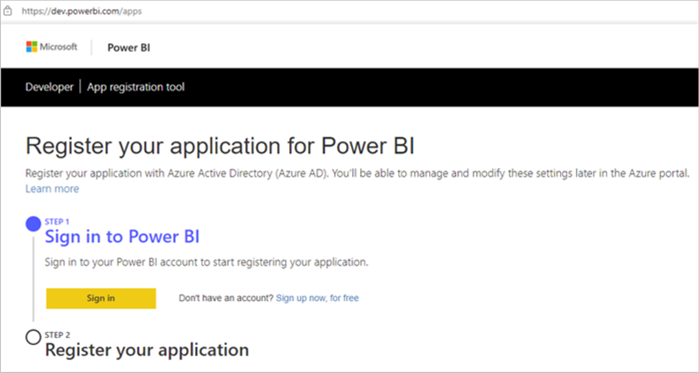
Open a browser to the following Power BI Developer API: https://dev.powerbi.com/apps
-
Specify the details of your Anthology Student solution as shown below.
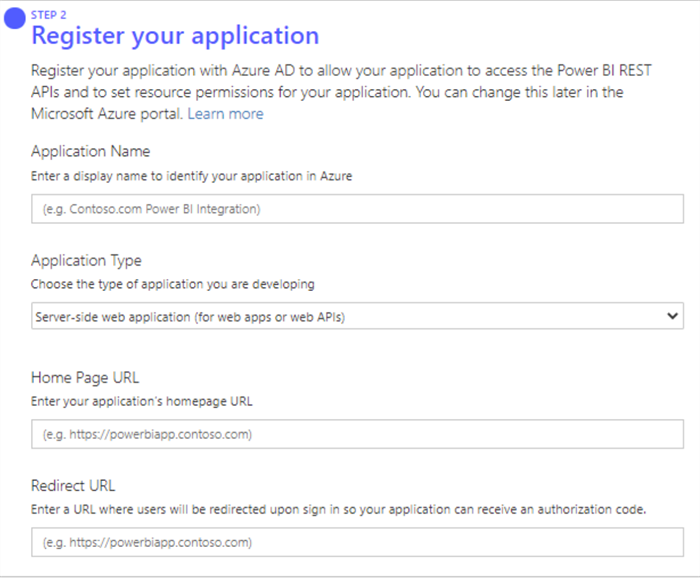
Specify the app details as shown below:
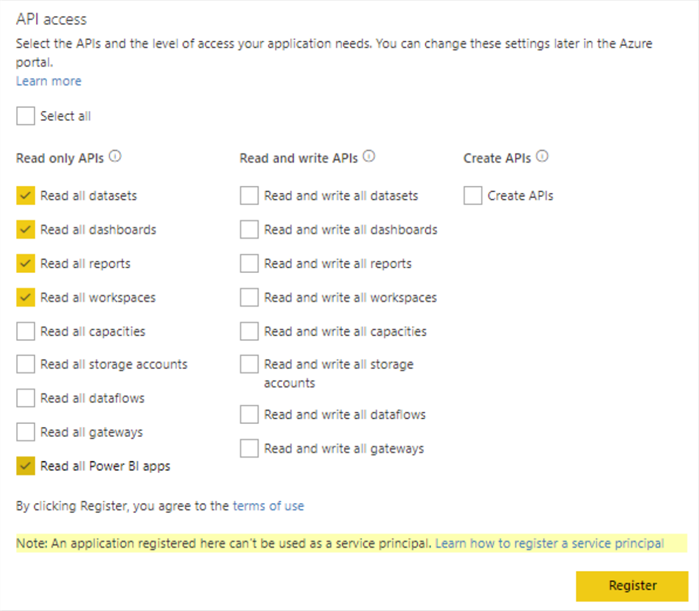
App Name: Enter any app name you prefer. Recommendation: Use “Anthology Student Power BI Integration” App Type: Server-side Web App Home Page URL: [host-name] Redirect URL: [host-name]/Account/OAuthTokenRedirect Select all items shown (unless you need to restrict some access).
-
Select Register to get your Application ID and Application Secret.
Once you select the “Register App” button, the Application ID and Application Secret fields will appear in a pop-up.
Important! Please read.
Save the Application ID and Application Secret to a text file. Do not lose this file. You will not have access to the Application Secret again! You can delete this file once you complete the steps in this document.
Obtain your Tenant ID and validate the Power BI registration
-
Log in to your Azure account at http://portal.azure.com.
-
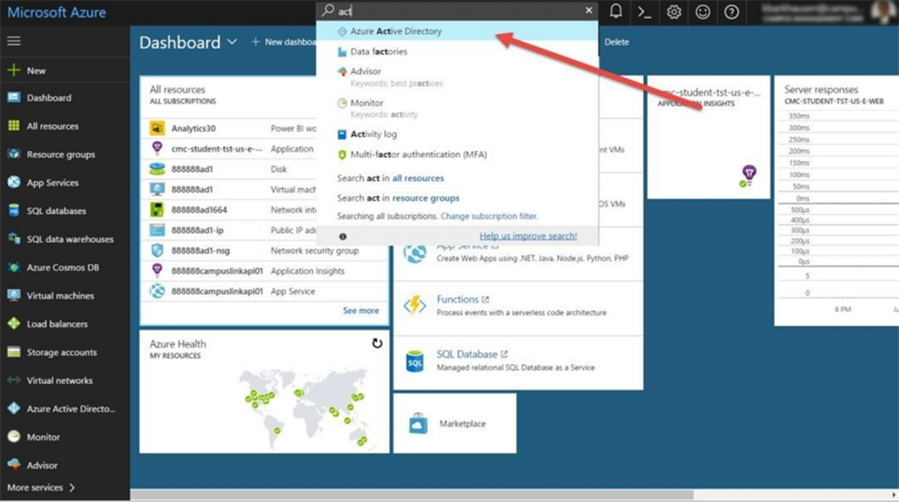
Find the Azure AD resource.
At the top of the Dashboard, search for “Azure Active Directory” using the Search field. Select this option to navigate to your Azure AD.
-
In the Azure AD menu, select Properties (as shown below).

-
Copy the ID for your Azure AD.
On the screen below, select the copy icon to copy the ID shown to your clipboard.
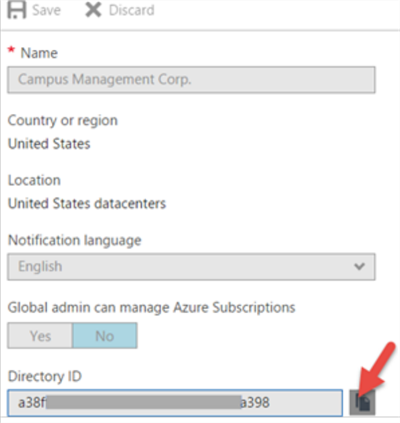
Important! Save this ID to a text file!
Save the Directory ID shown here to a text file. You will need it later. This ID will be referred to as “Tenant ID.
-
Return to the Azure AD menu and select App registrations.

-
Check that your Power BI registration appears here.
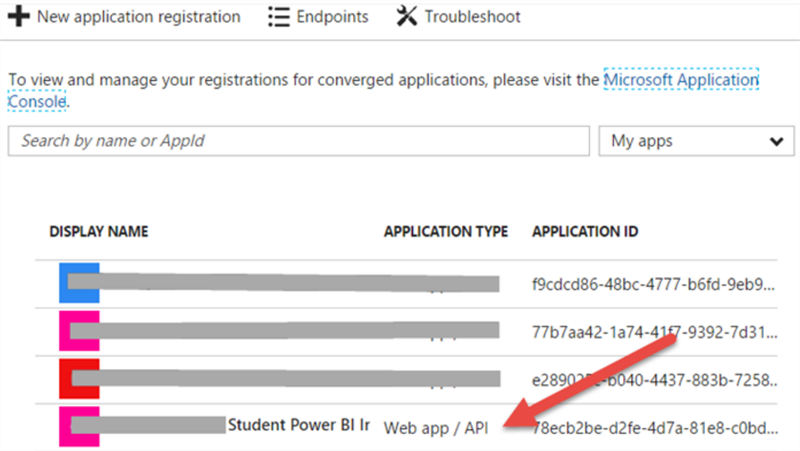
If the app registration “Student Power BI Integration” is listed here, then your Power BI app registration has completed successfully. Proceed to the next step.
Configure your Anthology Student solution
If you are an Anthology hosted customer, you will supply the TenantID, ApplicationID, and ApplicationSecret values to the Deployment team with a Support ticket, and they will add them to the installer.
If you are a self-install customer, you enter the values in Installation Manager > Web Client > Options > Power BI tab and apply the changes.
When Installation Manager is run, the following keys are updated with the values provided by the user:
-
<add key="PowerBi.Enabled" value="false"/>The value in this line is changed from “false” to “true”.
-
<add key="PowerBi.RedirectUrl" value="[host name]/Account/OAuthTokenRedirect" />The [host name] is changed to match your Anthology Student hosting.
For example: “http://www.AnthologyCollegeOne.com/Account/OAuthTokenRedirect” or “https://sisclientweb-XXXXXX.campusnexus.cloud/Account/OAuthTokenRedirect”
-
<add key="PowerBi.TenantId" value="[tenant id]"/>The “tenant id” is changed to the value you obtained from your Azure AD in step 4 (Copy Azure ID).
For example: “b34fy870-9c86-35df-7e6b-8b01f206a398”
-
<add key="PowerBi.ClientId" value="[client id]"/>The “client id” (your Application ID) is changed to the value you obtained from Power BI in step 4 (Register).
For example: “jy7yTGr-b040-4437-883b-7258a317766c”
-
<add key="PowerBi.ClientSecret" value="[client secret]"/>
The “client secret” (your Application Secret) is changed to the value you obtained from Power BI in step 4 (Register).
For example: “gXiOy6N8R6uajuhygt54rORVXkC2XScoE5F+y9H24B8=”
Test the Power BI integration
Log in to Power BI from Anthology Student and access the Power BI Reports and Dashboards on the home page.