Create or Edit All Types of Student Groups
You can use the Groups page to:
-
Create manual student groups.
-
Edit all types of groups. For example, you can specify how often you want Anthology Student to refresh a dynamic group once you have created it using a View.
-
Display, copy, and download the query for dynamic, frozen, and static groups.
When you access a dynamic group created using a View, the page for the group displays the Views icon (![]() ) along with the View used to create group in parentheses at the top of the page. You can select the link to go directly to the View.
) along with the View used to create group in parentheses at the top of the page. You can select the link to go directly to the View.
If the group was created using a report, no icon or report name is displayed on the Groups page because the report is not associated with the View after it is created.
Prerequisites
You must have:
-
To create a group and add students, Common - Student Group - New authorization
-
To edit a group, Common - Student Group - Edit authorization
-
To add students after the group was created, Common - Student Group - Edit authorization
-
To remove students, Common - Student Group - Edit or Common - Student Group Delete authorization
-
To display, copy, or download the query for a dynamic, frozen, or static group, Common - Student Group - View authorization
To edit the values for a public or private group, you must be group's owner or have Common - Student Group - Administrative Tasks authorization.
To change the group, you must be authorized to work with the campuses for the group.
To add, remove, or refresh the students in a private group, you must be the owner of the group or selected for Staff with Access to Private Group![]() when the group was created.
when the group was created.
To add, remove, or refresh the students in a public or private group. The group also:
-
Cannot be expired
-
Must have the Active check box selected
You should also be familiar with the Types of Student Groups and Methods for Creating Them.
Access Method
Select the Groups tile.
Procedure to Create or Edit a Group
-
If you want to:
-
Add a group, select the New button on the toolbar
-
Edit an existing group, select the name in the list
-
-
Specify or edit and review the following values. The values that are displayed will depend on the type of group.
Group Type
 Read Notes.
Keep Manually Added or Removed Students on Refresh
Staff with Access to Private Group
Transfer Student Monitoring Group
Notes about Group Type
Dynamic groups are created from Views or converted from another group type. A dynamic group is a list of students that changes when a student qualifies for the group due to a change in the variable upon which the group was selected. For example, if a group includes students in the Math Program Version 2, any student enrolled in the program version automatically becomes a group member. A student who leaves the program is automatically removed from the group. A dynamic group can be changed to a manual group, but once you save it as a manual group, it cannot be changed back to a dynamic group.
The Allow Dynamic Groups
option under Settings > System > General must be set to Yes if you want staff members to be able to create dynamic groups. If you select No, the system will make the dynamic group type unavailable when creating new groups and will not allow another group type to be changed to dynamic.Dynamic groups are just like static groups, except that the refresh interval can be set to occur on a schedule, such as daily or hourly. This interval is set within the group in the “Job Frequency” field on the Groups page. The frequency options are configured in Dynamic Group Frequency
under Settings > System > General.Frozen groups are created by changing any existing group type to a frozen group. For example, you can create a frozen group if you want to compile a list of students who started on a given date, and the group members must be retained indefinitely.
Manual groups are created from a View or directly on the Groups page by adding one student at a time. Groups that originated as another type of group can be changed to manual groups. For example, you can create a static group by running a report, convert the static group to a manual group, and then add or remove students from the group as required.
Static groups are created from reports. The group population can be refreshed based on the parameters used to build the group. When the Refresh Students button is available, new students will be added to the group and others removed, depending on whether the parameters of the group apply to them. For example, if a group consists of active students at Campus A and the group is refreshed, students will be added or removed depending on whether they are active at Campus A.
The Allow New Student Groups from Reports
option under Settings > System > General determines if student groups can be created from reports and whether the default group type is Static or Manual.For more information, refer to Types of Student Groups and Methods for Creating Them.
-
If you selected the Private option in "Group Visibility", specify the Staff with Access to Private Group
. -
Select the Save button.
Procedure to Add Students to a Group
If you need to add students to a group that was configured in Financial Aid to be a verification comment code hold group for the ISIR import options, you must add them using the Groups tile from the Student Profile so that you can select the award year when the hold applies. You only need one group for verification and comment codes. When an ISIR is imported and a student is flagged for verification or a comment code, Anthology Student identifies the award year and associates the student with the award year-specific group.
-
In the Student list, select the Add button.
-
In the Search Student dialog, select the students.
-
Select the Select button. Anthology Student closes the dialog and refreshes the list with the students and their information.
-
If you want to save the group and:
-
Continue making modifications to the current group, select the Save button
-
Return to the Groups list, select the Save & Close button
-
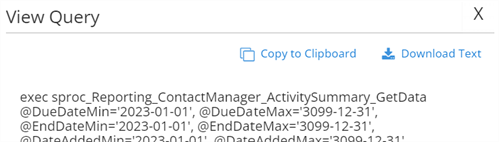
Procedure to Work with the Query for Groups
-
Select the dynamic, frozen, or static group in the list.
-
Select the View Query button in the toolbar.
-
If you want to:
-
Copy the entire query to the clipboard, select Copy to Clipboard
-
Download the query as a text (.txt) file, select Download Text
Example
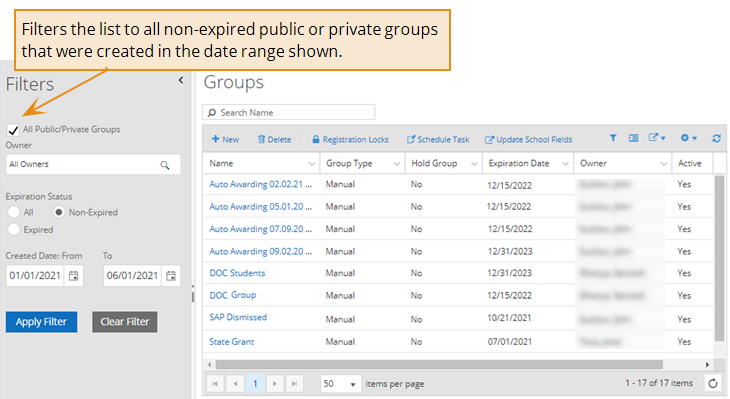
The example shows the Groups page using the filters available on the left.