Population Analysis / IPEDS Enrollment Survey
The Integrated Postsecondary Education Data System (IPEDS) is a system of surveys conducted annually by the National Center for Education Statistics (NCES). IPEDS survey components are collected over three collection periods (Fall, Winter, and Spring) each year. The completion of all IPEDS survey components is mandatory for all institutions that participate in federal financial assistance programs.
The Population Analysis / IPEDS Enrollment Survey form in Anthology Student helps you prepare many accrediting agency reports as well as the 12-month Enrollment Survey and the Fall Enrollment Survey.
-
On the Process tab, specify the data selection criteria and queue the job. The job will run in the background.
-
On the Distance Education Criteria tab, configure selection criteria related to distance education. These configurations can be incorporated into the selection criteria on the Process tab.
-
On the History tab, review the result of the background job that was submitted on the Process tab.
Prerequisites
You must have the following authorization:
-
Common - Processes - View
-
Academics - Processes - Generate Population Analysis/IPEDS Enrollment Survey
Access Method
Select the Processes tile > expand Academic Records > select Population Analysis / IPEDS Enrollment Survey.
Procedure to Create a Population Analysis / IPEDS Enrollment Survey
Process Tab
-
In the Generate Report By drop-down list, select one of the following options:
- Program Version (default)
- Area of Study
-
In the Low Date field, select the begin date of the reporting period. Typically, this is July 1 of the previous calendar year.
-
In the High Date field, select the end date of the reporting period. Typically, this is June 30 of the current calendar year.
-
In the Campus Group field, select a campus group to include in the report. The drop-down list includes all campus groups that you have permission to access.
-
In the Program Groups field, select one or more program groups to include in the report. All Program Groups within the selected Campus Group are selected by default.
-
If you change the Campus Group selection, the Program Groups field will be cleared.
-
-
In the CIP Year field, select 2020 (default) or 2010.
-
In the <Year> CIP Codes field, select one or more CIP codes to include in the report. The field label reflects the selected CIP Year value. All CIP codes applicable to the selected Campus Group are selected by default.
-
If you change the Campus Group selection, the CIP Codes field will be cleared.
-
-
In the Distance Education Criteria field, select an option that was previously configured on the Distance Education Criteria tab.
-
Select Include NDS Statuses to include students in a Non-Degree Seeking school status. Non-Degree Seeking statuses are used when students are enrolled in Program Versions that are configured as Non-Degree Seeking.
-
If this option is not selected, Non-Degree Seeking program versions and students enrolled in them will not be included in the report.
-
-
Select Use the School Status Date Added instead of Effective Date to indicate which date on the student’s status change history records to use when calculating the appropriate population groups for the student.
-
If this option is selected, the Date Added is used to calculate the status of the student.
-
If the option is not selected, the Effective Date (also called the Begin Date) is used to calculate the student status.
-
-
Select Count a student only once if they have a connected enrollment to designate that the Population Analysis report should not count students with connected enrollments more than once.
-
If this option is selected, the report will include enrollment-specific information for connected enrollments using the default enrollment only.
-
-
Select the Queue Report button to start the background process.
When the report is queued successfully, the following message is displayed: “The Population Analysis / IPEDS Enrollment Survey was successfully queued.”
Continue with the History tab.
Distance Education Criteria Tab
-
The Distance Education Criteria tab displays a grid listing previously configured distance education criteria and enables you to configure new distance education criteria.
-
If you want to:
-
Add a new list item, select the New button on the toolbar. Continue with the next step.
-
Edit an existing record, select the link in the Name column, and edit the fields displayed below the grid.
-
Delete an existing record, select the record, and select the Delete button on the toolbar.
-
-
In the Criteria Name field, assign a name to the distance education criteria configuration so that it can be selected on the Process tab.
-
If your Institution does not offer Distance Education courses as outlined in the federal standard, select Institution does not offer Distance Education Courses. All other fields will now be disabled.
-
In the In-State, Out-of-State, Out-of-Country field, select one of the following options to specify how student populations will be gathered:
- Use Student Master (default)
- Use IPEDS State from Enrollment
- Address Type (This option enables the Address Type field.)
-
If the "In-State, Out-of-State, Out-of-Country" field is set to Address Type, select the Address Type field and select one or more values (e.g., Home, Vacation, Work).
-
Specify or change values in the Distance Education Definitions section. At least one value is required.
Note: In Regulatory 12.2 and later, the Programs and Program Versions fields support 2010 and 2020 CIP Codes.
Important: The criteria you select and save affect the accuracy of the IPEDS reports. Student profile information, date ranges, and all other field choices must reflect accurate and timely record keeping. For example, if you select an Enrollment Campus as a distance education campus, all students enrolled in that campus will be gathered as distance education students.
The hierarchy of student classifications is as follows:
-
Exclusive: If the student is gathered using one of the following criteria, the student is gathered as someone who qualifies for distance education reporting only.
- Enrollment Campus
- Enrollment Shift
- Program
- Program Version
- Extra Curriculars
-
Any: If the student is gathered using one of the following criteria and was not gathered using one of the Exclusive criteria, the student is gathered as someone who qualifies with both distance education and non-distance education criteria.
- Course Registration Method
- Course Delivery Method
- Course Type
- Course Shift
-
None: The student is gathered as someone who qualifies for no distance education criteria.
When the report is configured and a student is gathered using several different criteria, the student's status is displayed using the criteria shown in the hierarchy above.
A student may not be gathered if the actions described in the criteria above do not occur during the time frame specified in the tool. For instance, a student could register at an Enrollment Campus but do so either before or after the time frame in the report. This student would not be gathered as Exclusive.
-
-
If you want to save and:
-
Continue making changes, select the Save button.
-
Close, select the Save & Close button.
If you want to delete a record, select it in the Distance Education Criteria grid and select the Delete button.
-
If you modified any settings on the Distance Education Criteria tab and want to use the modified criteria to generate a new Population Analysis / IPEDS Enrollment Survey, continue with the Process tab.
History Tab
-
The History tab displays a grid listing the final batches for the Population Analysis / IPEDS Enrollment Survey.
-
Locate your batch in the grid and check the value in the Status column.
-
When the batch has a Status of Succeeded, select the Generate Report button in the grid toolbar.
When the report is available, the following message is displayed: “Population Analysis / IPEDS Enrollment Survey report downloaded.”
Note: The Generate Report functionality requires the latest version of Microsoft Excel.
-
You will be prompted to open the report in Microsoft Excel. Select OK to open the file or select Save File and open it from the saved location. For security reasons, the Excel file will be in Protected View (read-only mode). You can change the properties of the file to enable editing.
-
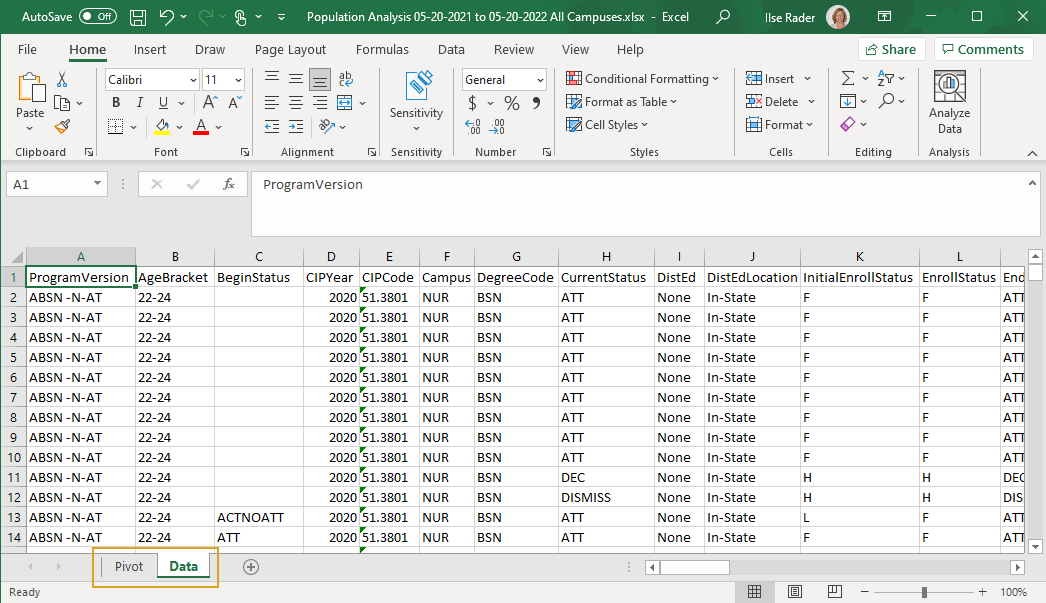
The Excel file has a Data tab and a Pivot tab.
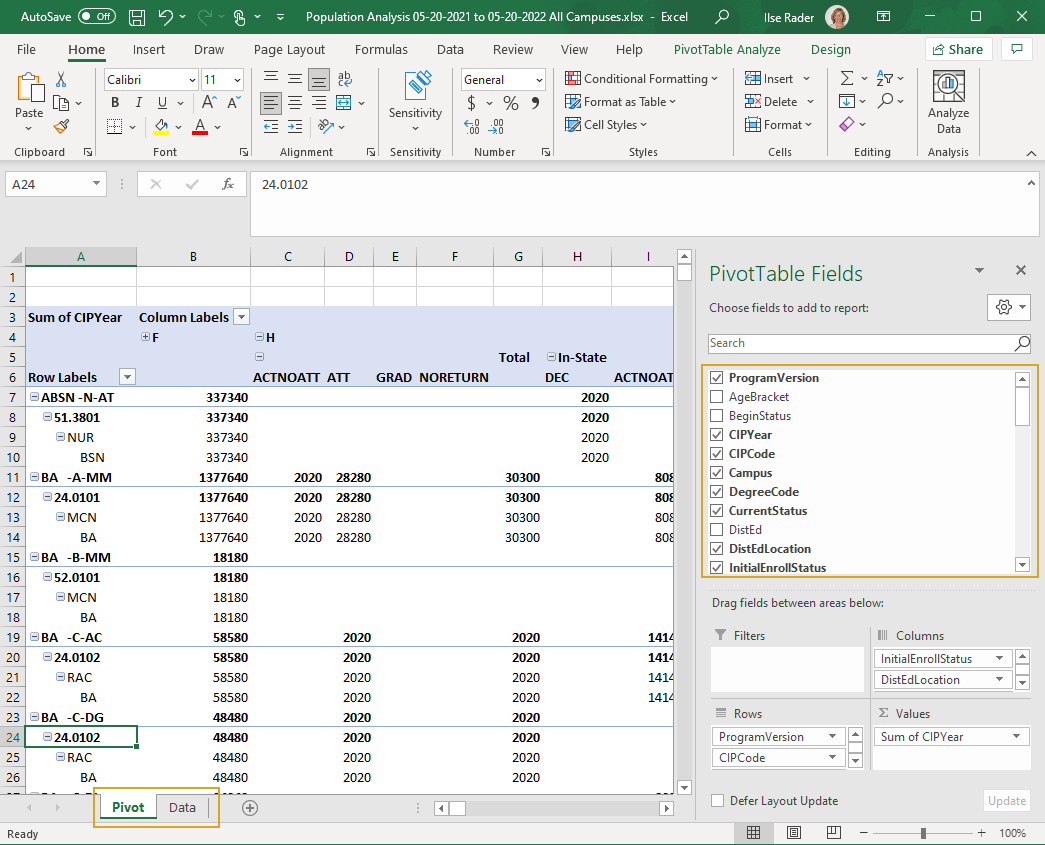
For a selective view of the report data, select the Pivot tab and select the Pivot Table Fields you need.

The Pivot Table Fields include filter dimensions and measures. Each column that supports filtering (e.g., StudentName, StudentNumber) shows a filter box beneath the corresponding header.
Filter Dimensions Program Version (selected by default)
Age Bracket
Begin Status
Campus
CIP Code
CIP Year
Current Status
Degree Code
Distance Education (Yes/No)
Distance Education Location
End Status
Enroll Status
Ethnicity
Gender
Grade Level
Hispanic
High School Graduation Date
High School Graduation Year
InitialEnrollStatus
IPEDS State
IPEDS Transfer
Lead Source
Original Graduation Date
Previous Education
Program
Reason Code
Rep Code
Shift
SSN
Start Date
State
Student Name
Student Number
ZIP
Measures Begin Population
New Start
Re-entry
Transfer In
Transfer Out
Incomplete
Dropped
Complete
SPN (Standard Period of Non-Enrollment)
Graduation
End Population
-
You can drag Pivot Table Fields into the Filter, Columns, Rows, and Values controls to arrange the data as needed.
-
Save the Excel file after you have designed your report.
-
To remove a batch, select a record and select the Cancel Batch button in the grid toolbar.
-
If the job status is Completed, select the Retry Batch button in the grid toolbar to resubmit the job.